Gigabyte GA-X99-SOC Champion Under LN2
Ryan Leiserowitz / 9 years ago
Introduction
The GA-X99-SOC Champion is Gigabyte’s overclocking-centric motherboard for the X99 chipset and is the choice of many professional overclockers and benchmarkers around the world. The board has an OC Socket much like the one that Asus’s Rampage V Extreme had when it came out, that allowed for high uncore/cache overclocks. This board with the OC Socket will allow you to achieve much higher uncore/cache speeds than you would get with a “normal” board. This feature will allow the user to really be able to gain some traction with their benchmarks and memory bandwidth. I found in testing that this will make a huge difference in your results, as we all should know, that will be the result of higher uncore/cache. The board handles sub-zero overclocking amazingly and it should, because it was built for it. If you are wanting to put your 2011-v3 CPU under extreme cooling, then this definitely looks like the board to get.
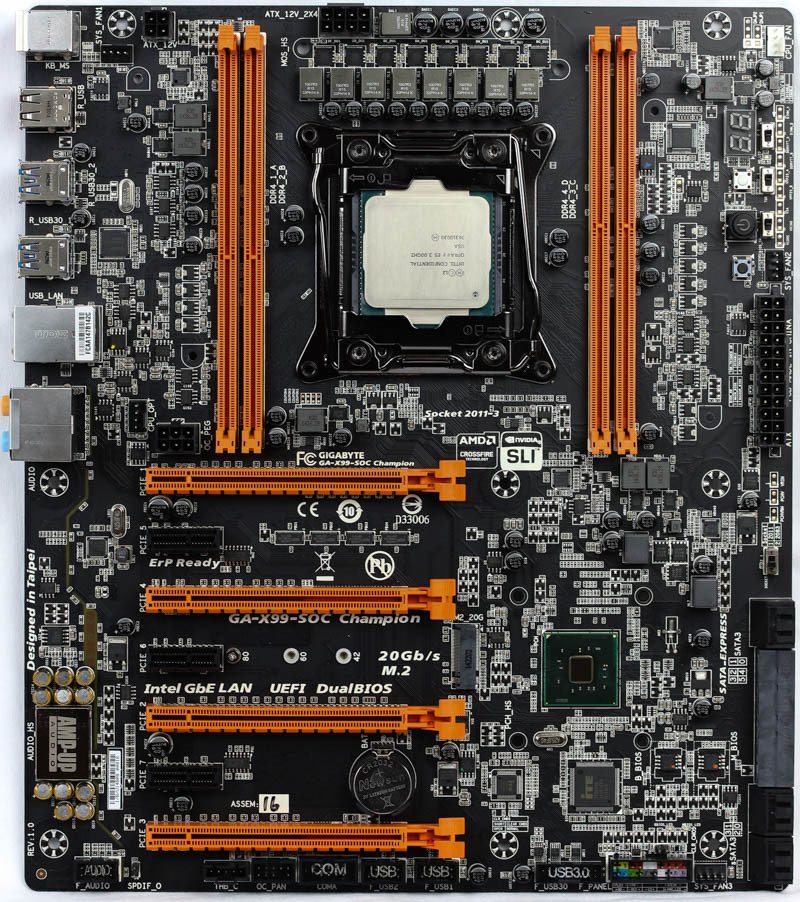
Here we see the GA-X99-SOC Champion without the heat-sink in all its glory, the color scheme or orange and black is retained of the now classic SOC line. The board is built from the ground up for overclocking and has so many features that we will see that accommodates this for the user. The board requires an additional 4 pin (half an 8 pin) in addition to an 8 pin for power along with the standard 24pin.
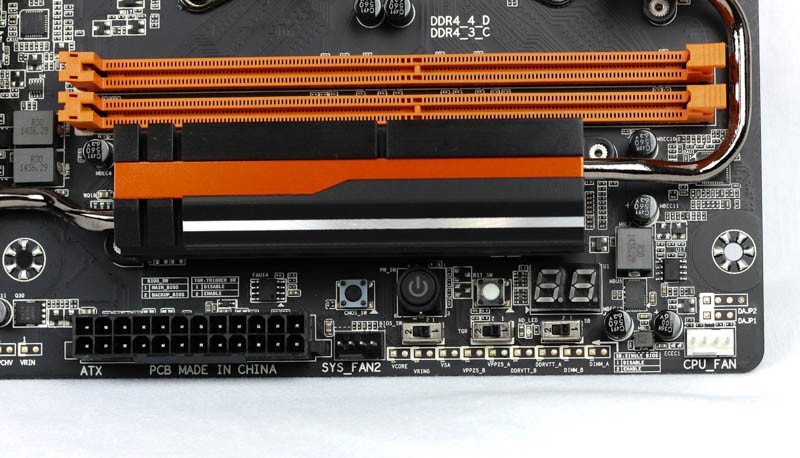
Onboard buttons for power, reset, and clearing CMOS as well as a POST LED display help you quickly manipulate and diagnose issues. There is a bank of voltage read points for watching your board voltages with a multi-meter as well as toggle switches for the dual-bios feature that will make sure that you are still good to go in case you mess one up. There is also a slow mode switch on there that is useful when running close to the edge since the newer CPU-Z editions have a tendency to crash the system, with a flip of the switch you go down to the lowest frequency available and will be able to take your screenshots without issue.
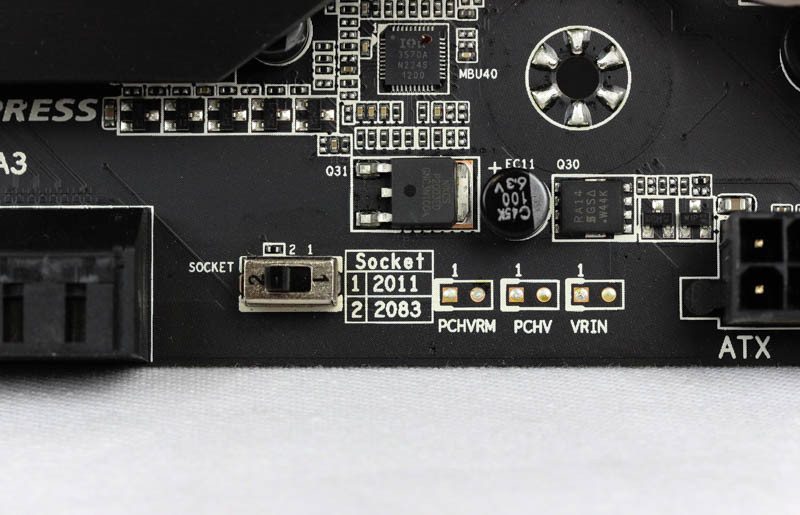
Here we have the switch that activates the OC Socket. In the bios it will open up a new set of voltages for the user to tune the cache/uncore with after the switch is moved to the 2nd position. Next to it are three additional voltage read points.
One thing that is a great addition to overclocking boards is the inclusion of the PS2 mouse and keyboard ports. It really simplifies things and will also reduce the load on the CPU over USB based options while you are overclocking.

CPU VRM
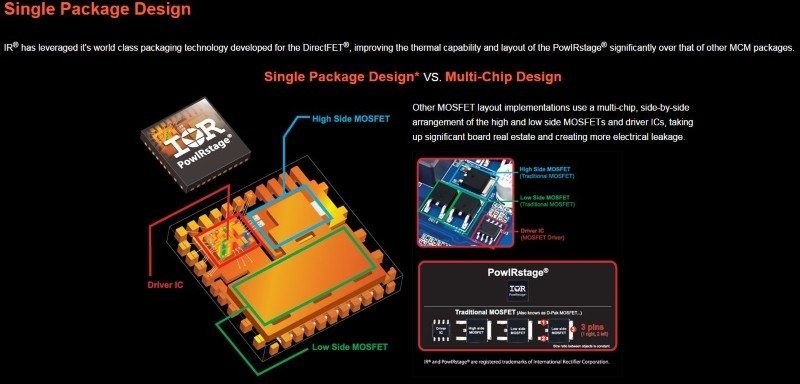
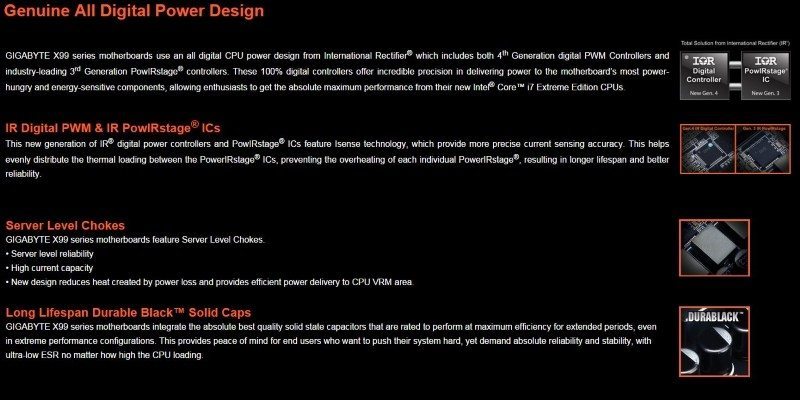
On Gigabyte’s product page, you can find an overview with the board strokes on what the selected components are good for. I have added two of the main points in here as the next two pictures. Essentially they are promoting the use of the all-in-one MOSFET that combines the high-side MOSFET, low-side MOSFET, and the driver IC all into one package. This takes up far less space, looks better, and likely simplifies the manufacturing process.
Here you see a close-up of the CPU VRM area, it may look rather small to be able to push a 5960X to 6GHz and run some benchmarks with the processor fully loaded but it is more than capable as proven by overclocker Steponz proved with his insane wprime run.

Here we see the close up of the International Rectifier IR3556 PowlRstage that has an integrated driver, Schottky diode, control MOSFET and synchronous MOSFET. Paired with the server level chokes that can handle high current loads and the Durable Black solid caps this setup will provide your overclocking with smooth power delivery to the CPU even under the harshest conditions.

Software
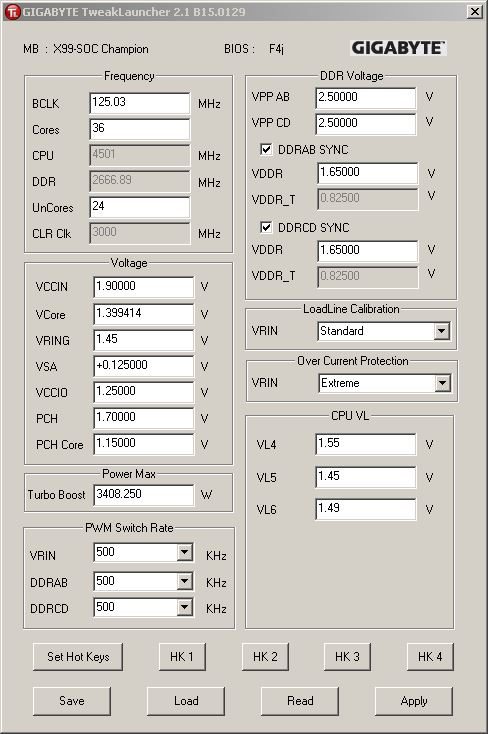
Gigabyte TweakLauncher is the only software that I use to overclock and it is super simple, you just enter the value you want to change to from within windows and hit apply. You must be warned though that if you are unsure of what is safe DO NOT use this as you can easily damage your hardware. you can set profiles to load via hotkeys. Note that CPU VL voltage will only show when you activate the OC Socket via the switch. Also please do not use these values as a jumping off point as they are not a great reference point for you.
Here is the Gigabyte EasyTune app that is very familiar to Gigabyte users – this is the Smart quick boost for the people who don’t know how to OC and want to quickly press a button and get more out of their CPU.

Here we have voltage control and frequency control – it essentially is a mirror of what is available in the bios.

The memory section is a great addition for those who want to tweak their memory from within Windows, but I am pretty old-fashioned and tend to do most of my memory tuning from within the BIOS.

BIOS
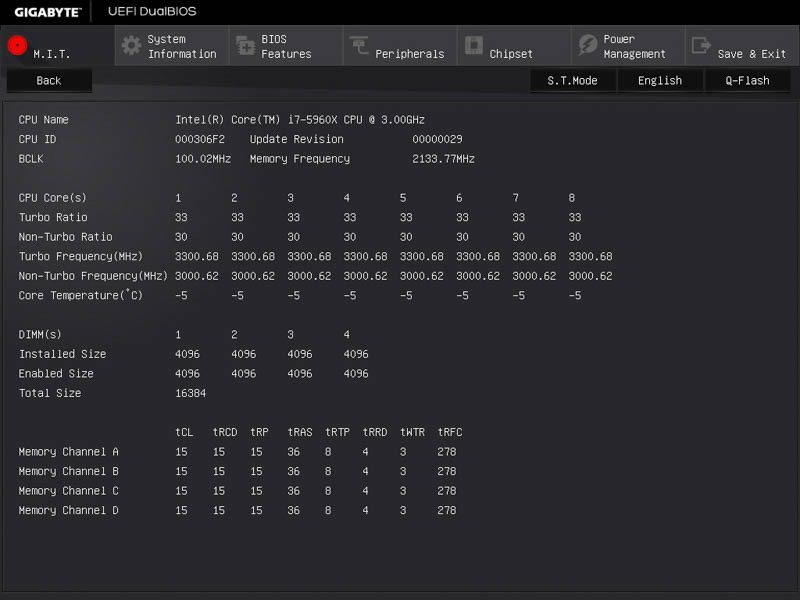
This is the welcome page to the motherboard – it has most of the main items right there for you to change and if you press F2.

You will get to the good parts of the BIOS. This section is where you do all of your overclocking and tweaking.

If you are anything like me you spend 97% of your time here and in the memory section.

M.I.T. Current Status – just shows an overview of what is going on with your system at present.
More BIOS features and boot settings – always have found it ideal to disable the full-screen logo by the way.

Testing & Methodology
Hardware
- Gigabyte X99 SOC Champion
- Intel 5960X
- Kingpincooling Venom 6.66 CPU pot
- Be Quiet 1200W Dark Power Pro
- Crucial MX200 250GB SSD
- Kingston 3000 C15 4x4GB
- XFX 8800GTS 320MB
- Dry Ice/Acetone
- LN2
- TES 1310 Type-K thermometer (great budget choice)
Software
- Windows 7 Ultimate 64bit / Win 10 64 bit – stock install
- Geekbench – available here
- PiFast – available here
- HWBot Prime – available here
- Super Pi / mod 1.5 XS – available here
- Intel XTU -available here
- AIDA 64 Engineer – available here
- CPU-Z – available here
- wPrime – available here
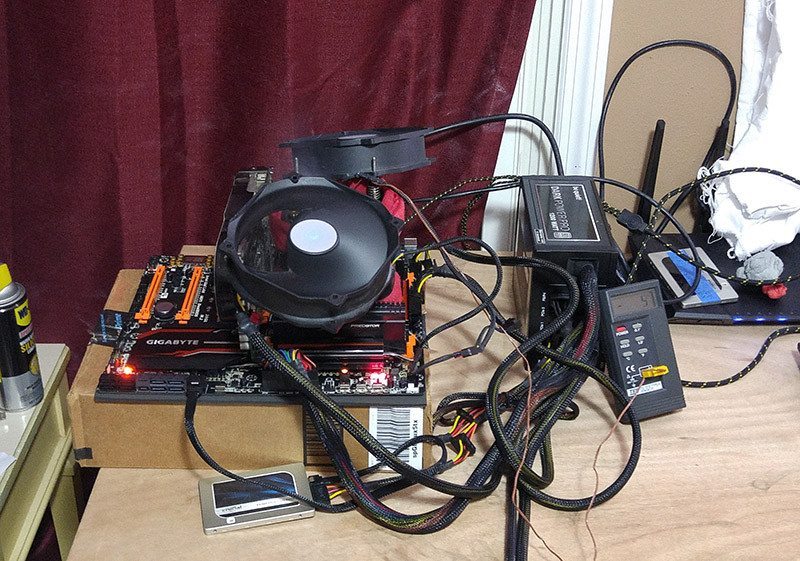
The motherboard was insulated around the socket area with kneaded rubber eraser and the board itself had been coated with conformal coating to help protect it from any possible moisture buildup. I also use, in the socket and in the memory sockets, a bit of silicone spray to help with moisture control; if you have caught on, it is all about moisture control when you insulate for subzero.
Kneaded rubber eraser is one of my favorite insulation styles since it is reusable, though it does take time to apply. You can obtain the kneaded rubber eraser from your local art store in small blocks, and you will need quite a few. On top of that is a gasket that is made out of blue paper towel that will soak up water and hold its form. Blue paper towels are the bencher’s best friend. In the picture below the red rags are around the paper towels. I will say that I still prefer the use of dry ice as it costs me less and is a bit more relaxed for my benching style when I don’t need temps below -60C.
Results
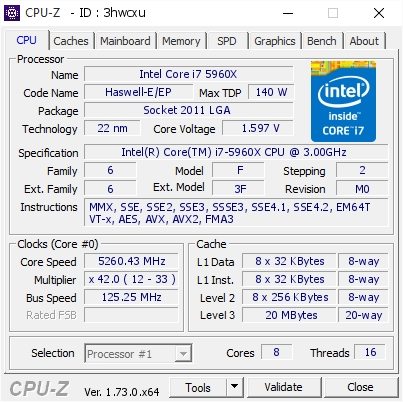
While I could get to 5.5GHz for PiFast and to do a few things I could not get the validator to output the file at anything more than 5260.43MHz. I am wondering if using CPU-Z 1.70 will be a bit more willing to cooperate.
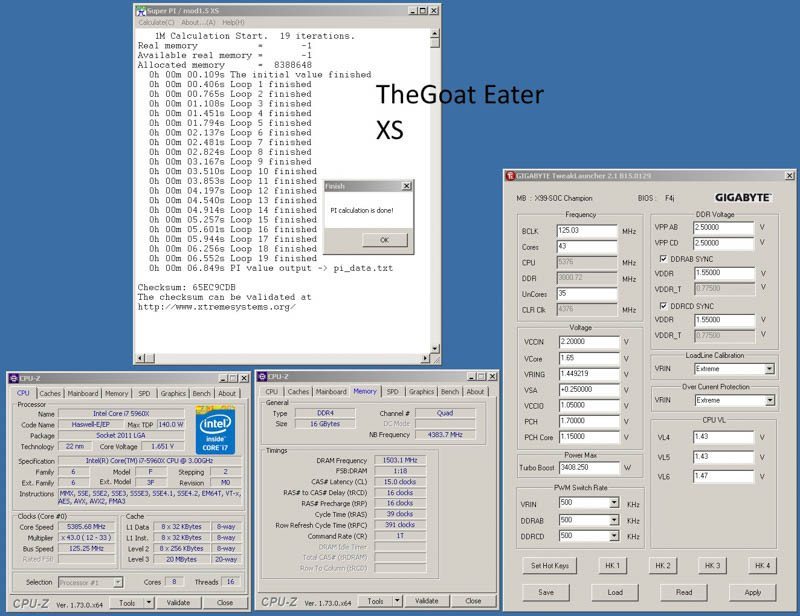
6sec 849ms Super Pi 1M @ 5385MHz.
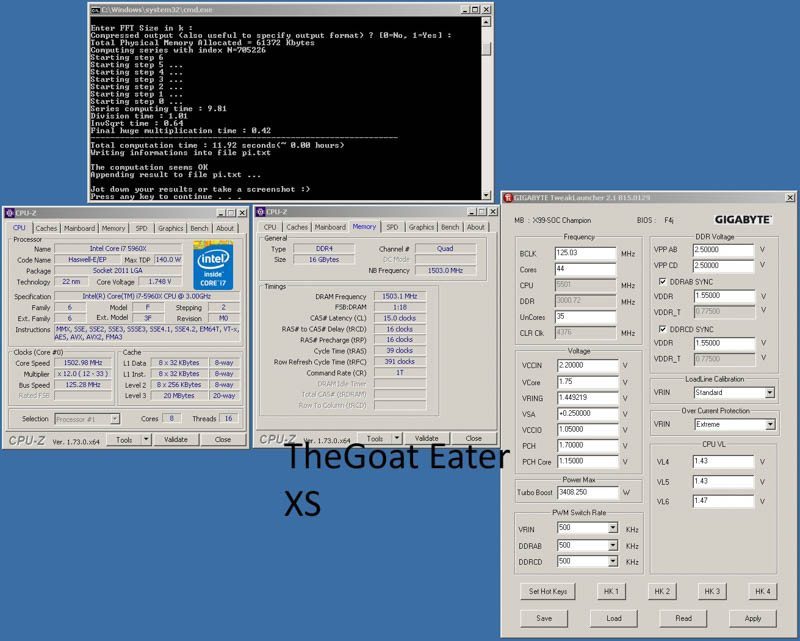
11sec 920ms Hexus PiFast @ 5501MHz.
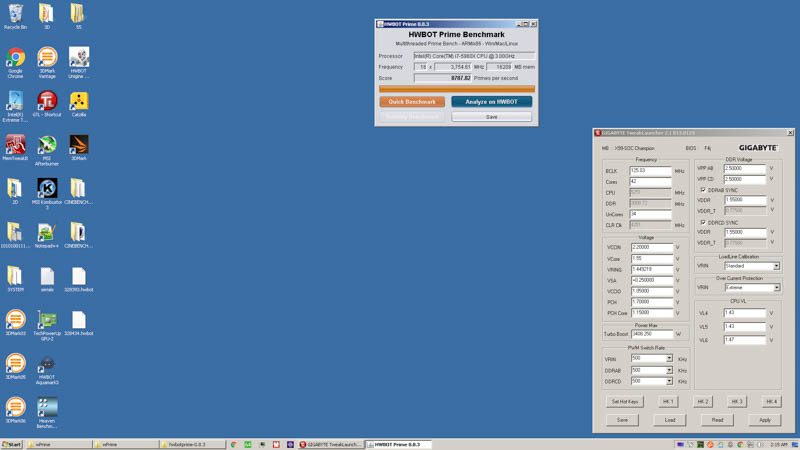
8787.82 pps HWBOT PRIME Benchmark @ 5251MHz.
LN2 Testing
I was competing for OC Challenger 2015 Div 1 Round 3 and was doing some testing with LN2 after I did the dry ice testing. unfortunately for me I found that I really couldn’t go much further than I got with dry ice originally. Fortunately, I was able to get a decent placing in the contest ending up at #15 out of 334 people.
38155 points Geekbench3 @ 5385.7MHz.
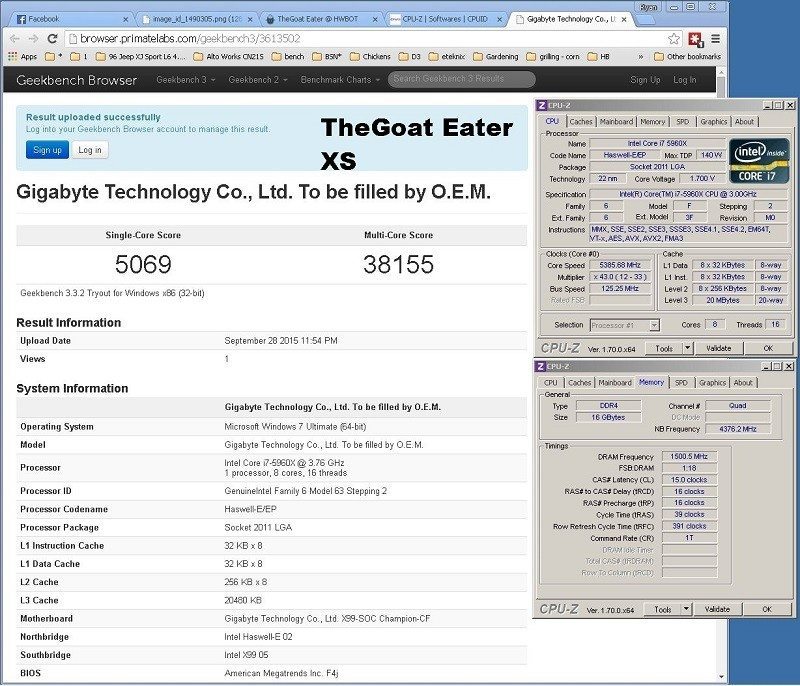
I got a decent score with Geekbench running at 5385MHz but I could have done better and even helped my final placing had I purchased the benchmark as the 64 bit does do much better than the standard 32bit stock bench. I’ll take it as a learning experience and know that mistake may have propelled me into the top 10.
5GHz Intel XTU: 2645 marks
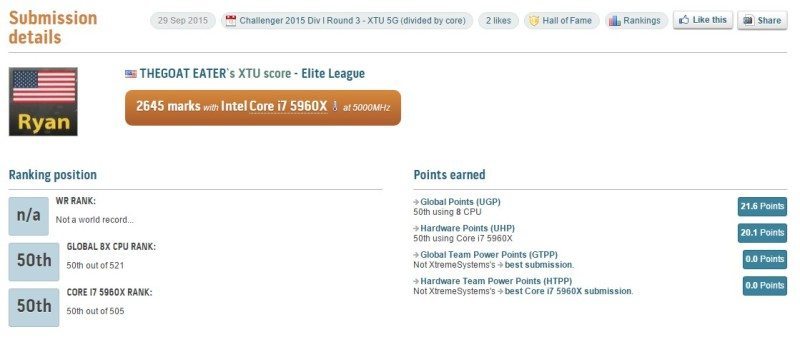
I was decently surprised with this score as it beat out a run that I had done at 5150MHz on dry ice. I think with some of the new Samsung based IC memory I might be able to improve this score greatly since the new Samsung should be able to tighten up quite a bit at 3000.
1min 12sec 646ms wPrime @ 5000.9MHz.
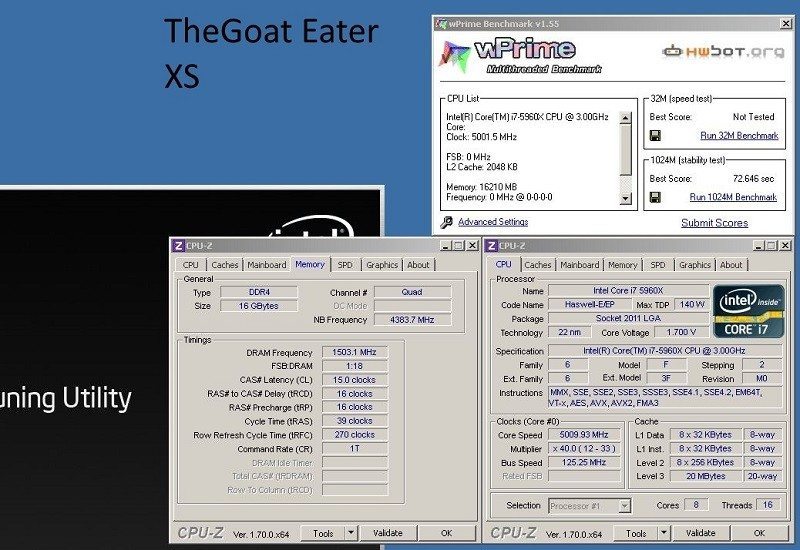
wPrime was unfortunately not able to be run at anything higher than 5GHz for now and I will be working on getting things stabilized so that I can improve over this score.
Final Thoughts
Pricing
With a price point right at $299.99 there is nothing that really detracts from making the decision to purchase this board since it is really budget friendly for a X99 board. Really there is no other board that I would be considering if I wanted something to overclock at the $300 price point.
Overview
With a refined bios and support system that Gigabyte has for its overclocking boards, this is an ideal board to get for your next overclocking adventure with X99. Really if you want to try and go sub zero with a board, it isn’t that expensive and you can really squeeze the last bit of performance your other hardware has to offer. If you are wanting to get something that overclocks for your system and has some great options for gaming I wholeheartedly suggest the Gigabyte X99 Gaming line, as I currently use that in my gaming rig too.
Things I thought it was lacking was the fact that there were no onboard buttons this time around to manipulate the multi or the FSB. I would have liked to have seen the OC Socket built-in without the need to activate it, not really an issue just a personal preference. I ran into a few frustrating moments, but it was usually solved with swapping out the memory and clearing the CMOS. It really wasn’t too temperamental compared some of the boards that I have really pushed to the limits in the past.
The overall verdict is I would say if you want this board, get it and give it a spin and take the plunge into sub-zero benching. I will advise that it is very rewarding and fun if you like benchmarking on air or water already. The board was a pleasure to tweak and has been rewarding to work with prepping for the cold on-air and I have found that it has become my favorite board to use right now. I look forward to some more bios updates to hopefully play with some of the brand new DDR4 that are hitting the channels now as it should be fun to see what they should do, especially so with this motherboard at the heart of the testing.
“From pro overclockers to enthusiast system builders, if you’re wanting to push your hardware to the limit, the GX-X99-SOC is the perfect tool for the job.”