Gigabyte Z170-Gaming K3 (LGA1151) Motherboard Review
John Williamson / 8 years ago
BIOS and Overclocking
Gigabyte’s UEFI DualBIOS adopts a simplistic theme with keyboard driven menus to help with navigation and list system variables in a clear manner. When compared to the company’s more graphically exuberant theme, it can look a little bland but I actually find it easier to use given the solid background and labelled tabs. On the front page, key information is displayed about your system including Vcore, CPU temperature and BIOS Version.
![M.I.T._[19-46-58]](http://www.eteknix.com/wp-content/uploads/2016/03/M.I.T._19-46-58-800x600.jpg)
The BIOS has an option to relay a huge number of statistics regarding memory timings, and temperature per CPU core. This can be really handy when performing diagnostics and determining the impact of advanced voltage changes.
![M.I.T. Current Status_[19-47-12]](http://www.eteknix.com/wp-content/uploads/2016/03/M.I.T.-Current-Status_19-47-12-800x600.jpg)
If you’re feeling apprehensive about the overclocking process, there’s no need to worry because the BIOS has various profiles to automatically set a specific target frequency. Personally, I always recommend manual overclocking because auto options have the propensity to use too much voltage, but it’s a great option for those without experience or have a restricted amount of time. Traditional overclocking is relatively easy and requires you to set the CPU clock ratio. As you can see from the image below, our chip is capable of 4.8GHz, meaning the CPU ratio is increased to 48. This section also allows you to enable XMP and even modify the memory multiplier.
![Advanced Frequency Settings_[19-48-02]](http://www.eteknix.com/wp-content/uploads/2016/03/Advanced-Frequency-Settings_19-48-02-800x600.jpg)
Once your target frequency is known, increase the voltage until stable and ensure the temperatures remain within thermal limits. Gigabyte makes this process incredibly straightforward and explains the effect of each setting on the right-hand side.
![CPU Core Voltage Control_[19-48-30]](http://www.eteknix.com/wp-content/uploads/2016/03/CPU-Core-Voltage-Control_19-48-30-800x600.jpg)
Users with a greater level of technical proficiency can tweak the chipset voltage, power settings and other variables to help with stability.
![Advanced Voltage Settings_[19-48-47]](http://www.eteknix.com/wp-content/uploads/2016/03/Advanced-Voltage-Settings_19-48-47-800x600.jpg)
The System Information page lists details about the model name, BIOS version, BIOS ID and user privileges.
![Main_[19-49-05]](http://www.eteknix.com/wp-content/uploads/2016/03/Main_19-49-05-800x600.jpg)
You can jump to the PC Health Status tab to monitor system voltages, fan speeds, and disable thermal warnings.
![PC Health Status_[19-48-53]](http://www.eteknix.com/wp-content/uploads/2016/03/PC-Health-Status_19-48-53-800x600.jpg)
There’s a fantastic Boot priority tab to re-organize the boot order, and ensure your operating system is the primary device.
![BIOS Features_[19-49-10]](http://www.eteknix.com/wp-content/uploads/2016/03/BIOS-Features_19-49-10-800x600.jpg)
This section provides the settings to modify the SATA controller mode, but it’s not really going to be overly useful for the majority of consumers. Nevertheless, it’s great to have more advanced functionality to please power users.
![SATA Configuration_[19-49-29]](http://www.eteknix.com/wp-content/uploads/2016/03/SATA-Configuration_19-49-29-800x600.jpg)
The Chipset tab allows you to enable or disable the VT-d, Integrated Graphics and Audio Controller. Usually, you shouldn’t have to modify these variables, but it’s handy to disable the on-board graphics in case any graphical problems arise on boot.
![Chipset_[19-49-38]](http://www.eteknix.com/wp-content/uploads/2016/03/Chipset_19-49-38-800x600.jpg)
Next is the Power Management page containing a number of options to adjust ErP, Power Loading and Platform Power Management. Once again, I would leave all of these on the default values to avoid unusual mishaps when it comes to system behavior.
![Power Management_[19-49-43]](http://www.eteknix.com/wp-content/uploads/2016/03/Power-Management_19-49-43-800x600.jpg)
The final page is extremely useful to load/save overclocking profiles, quickly boot from a particular drive and load optimized defaults after a failed overclock. Also notice the Q-Flash utility in the corner to update the BIOS to the latest version via a file or network.
![Save & Exit_[19-49-49]](http://www.eteknix.com/wp-content/uploads/2016/03/Save-Exit_19-49-49-800x600.jpg)
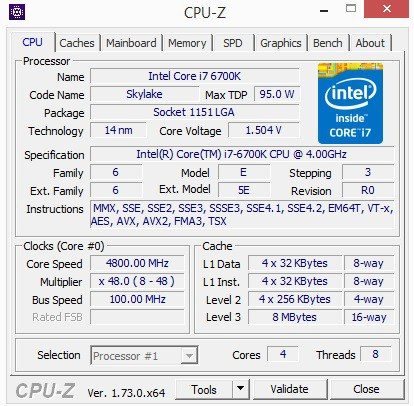
Overclocking
Overclocking on the Z170-Gaming K3 was effortless and I managed to set the multiplier to 48, while increasing the CPU’s core voltage to 1.504V. Please remember, we are using a very proficient all-in-one liquid cooling solution to help with thermal loads, and of course the silicon lottery will impact on your chip’s final frequency figure. This result follows with other Z170 motherboards and demonstrates how the level of overclocking headroom is CPU based and doesn’t revolve around the motherboard’s circuitry by a significant margin.