Gigabyte Z170X-Ultra Gaming (LGA1151) Motherboard Review
John Williamson / 8 years ago
Introduction
Despite the majority of recent media headlines surrounding Intel’s Broadwell-E architecture and the unveiling of new 2011-v3 motherboards sporting striking colour schemes, this is a very niche section of the market and it’s important to not overclock the mainstream Z170 chipset. This is especially the case after witnessing the pricing of Broadwell-E processors and the only viable option for users on a sensible budget is the Haswell-E based i7-5820K. While this can be priced similarly to the i7-6700K, the cost of a reliable, feature-rich motherboard is considerably higher. As a result, the i7-6700K is a solid choice and now that the Z170 chipset is mature, there’s a huge catalogue of motherboards to choose from. In lieu of this massive range, you’d expect motherboard vendors to retain their current offerings and release new additions at a reduced pace. This is a cogent strategy since AMD’s fabled Zen platform is being readied, while Intel will undoubtedly respond with an update to the Z170 chipset. Even though this trend has come to fruition, there are a few new models gracing the market and aiming to provide consumers with the best possible solution.
Not one to rest on their laurels, Gigabyte have unleashed the Z170X-Ultra Gaming which includes dual hybrid fan headers, USB 3.1 Type-C connectivity capable of 100W power delivery, triple NVMe support in RAID0 and a stunning ambient lighting system. Not only that, the product is Thunderbolt 3 certified which means you can daisy-chain up to six devices and offers unparalleled flexibility. On a more technical note, the motherboard utilises a 15u gold-plated CPU socket, 10k capacitors and dual-BIOS to ensure your system will post even if one of the BIOS chips fails or becomes corrupt during an update. As you can see, this is a wonderful specification and retails for a competitive price of £145.99. Is this the best Gigabyte motherboard using the Z170 chipset thus far? Let’s find out!
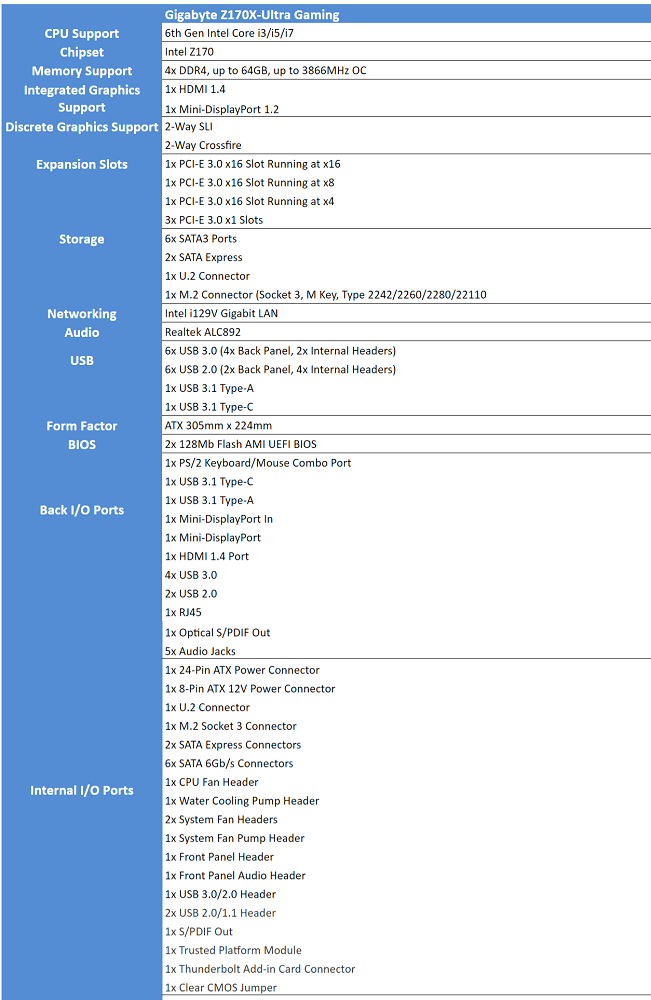
Specifications
Packing and Accessories
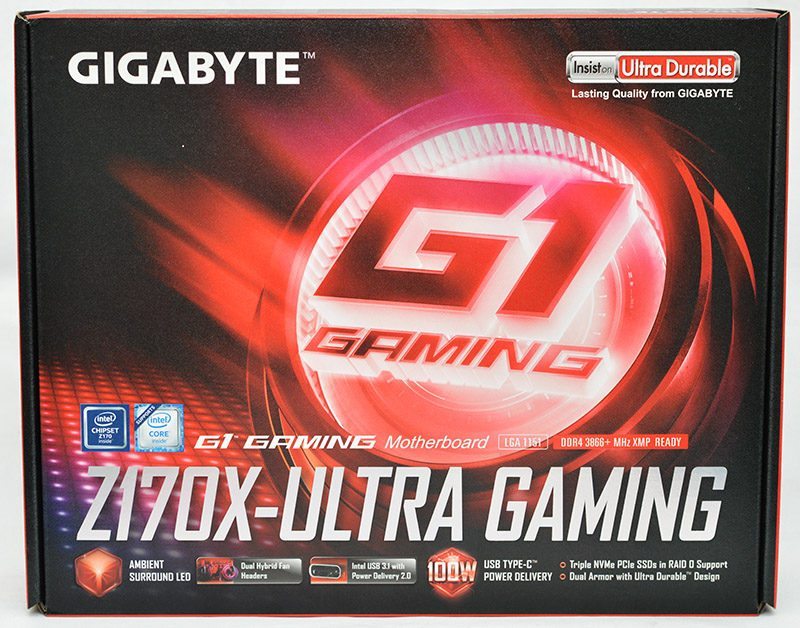
The motherboard box contains Gigabyte’s iconic G1 Gaming logo and the lighting elements provide an insight into the unit’s attractive illumination. Also, the packaging outlines information on the product’s DDR4 3866+ XMP capabilities as well as a number of other essential features. Overall, the box design is really eye-catching and looks absolutely stunning.
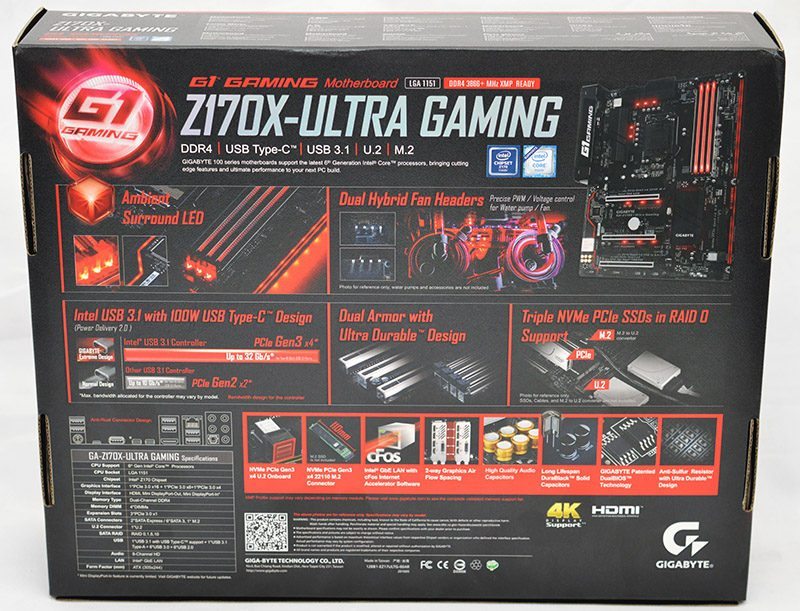
On the rear side, additional details are displayed regarding the motherboard’s audio solution, Intel Gigabit LAN and more. As expected, everything is presented in a professional and simple manner which encourages the end-user to look at the packaging.
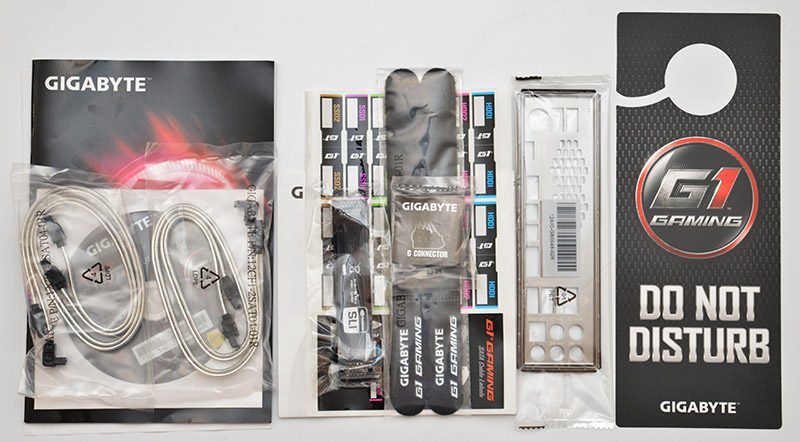
Accessories-wise, the motherboard is bundled with a user’s guide, driver/software disk, two flat ended SATA cables, two right ended SATA cables, installation guide, cable labels, SLI bridge, velcro ties, G-Connector, I/O shield and a door hanger.
A Closer Look
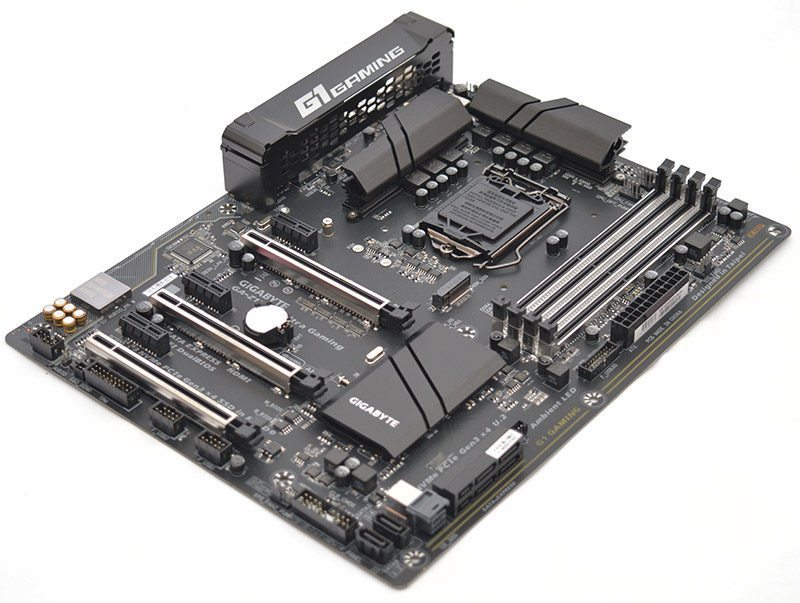
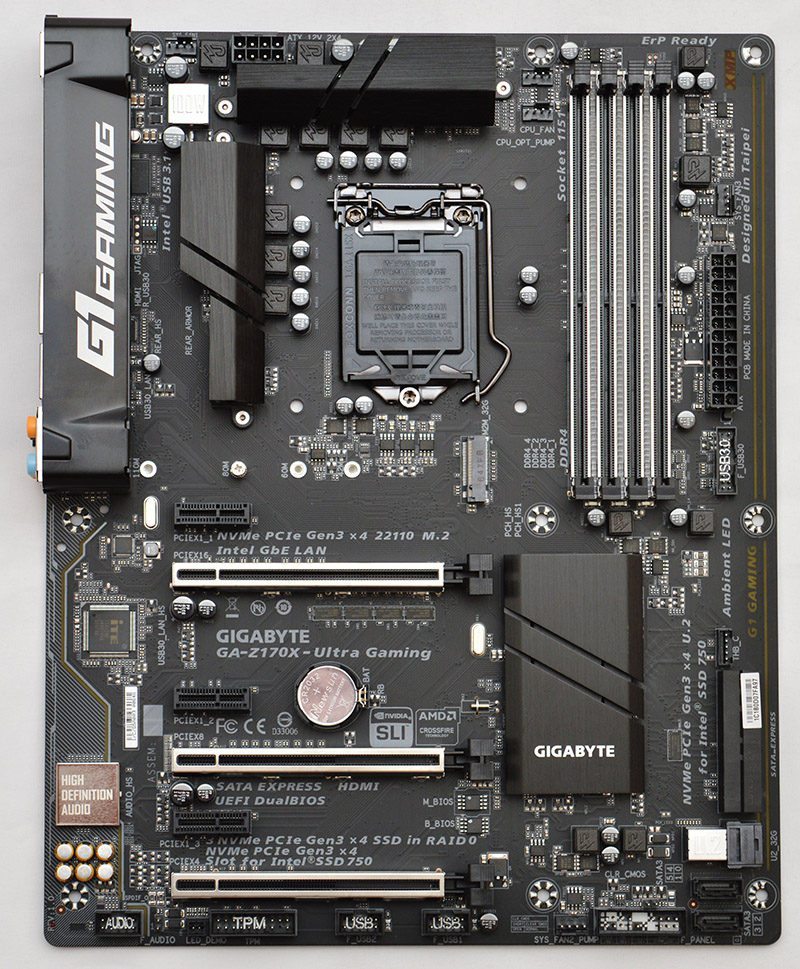
The Gigabyte Z170X-Ultra Gaming employs an understated theme and adds a more spectacular finish via integrated LEDs. Unlike many of their competitors which use a more dramatic two-tone colour combination on the heatsinks, Gigabyte has produced a neutral product which should compliment a wide range of system builds. In particular, I love the brushed finish on the heatsinks and consistent colour application. The black and silver hues combine in a seamless manner to create an elegant aesthetic.
Saying that, some users may dislike the imposing G1 Gaming branding positioned on the I/O cover. Of course, it’s a subjective matter and depends on your own personal taste. While the I/O cover enhances the motherboard’s distinctive appearance, it doesn’t feel sturdy and can wobble when you apply some pressure. It’s not a massive issue though as securing the motherboard in a chassis will reinforce the cover. Overall, Gigabyte has done a splendid job in the visuals department and forged a stylish design which deserves recognition.
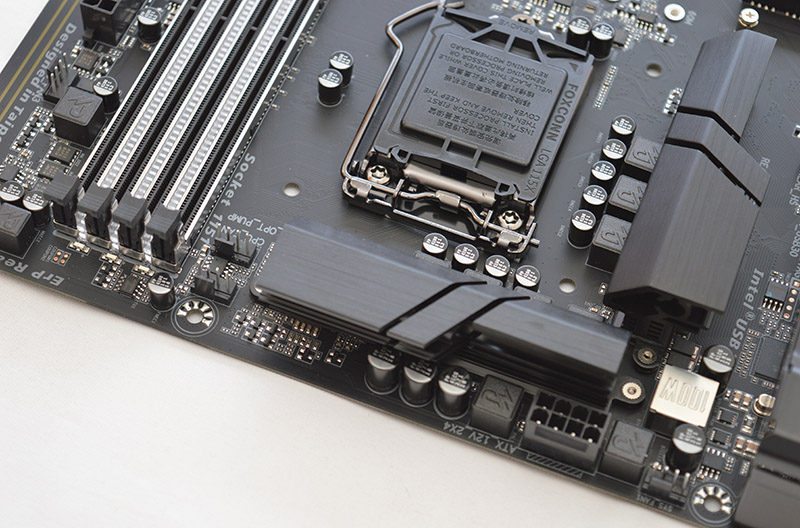
Gigabyte has selected an 8-phase digital power delivery to improve reliability and ensure the purchaser can maximise the potential of their CPU when using extreme cooling solutions. Furthermore, the motherboard utilises 10K rated ultra-low ESR capacitors and a 15u gold-plated CPU socket to prevent the pins from corroding. The heatsinks are held in place via the traditional dual screw arrangement and feel very solid.
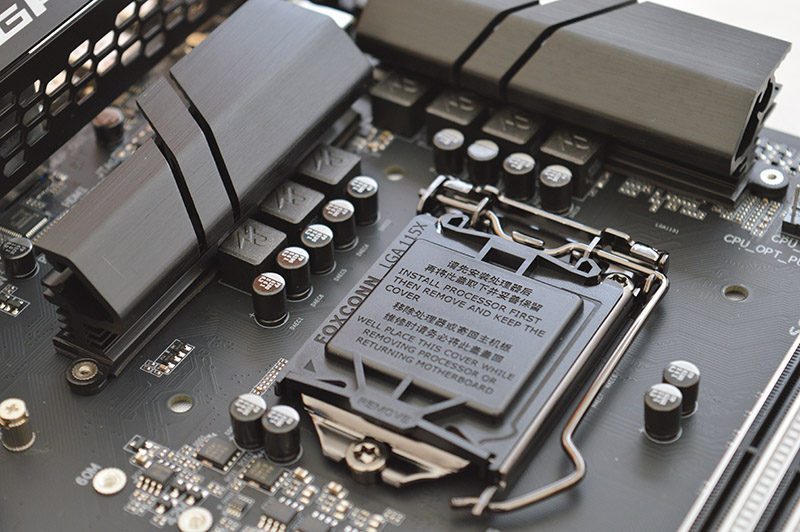
Towards the top portion of the motherboard, we can see the standard 8-pin EPS connector in its optimal position for cable management, a system fan header, CPU fan header, water pump header, and 100W shielded USB 3.1 Type-C controller which can charge devices including tablets and mobile phones incredibly fast providing the devices support power delivery 2.0.
The embedded LED strip has two lines before branching off to display the G1 Gaming logo and streamlining the lighting to a single strip. This works incredibly well and makes the motherboard look unique. Additionally, the XMP logo lights up and injects colour into the motherboard’s matte black theme. Speaking of XMP, Gigabyte Z170X-Ultra Gaming can house up to 64GB of DDR4 memory running at speeds in excess of 3866MHz. This means the memory slots have been thoroughly tested to use higher frequency DIMMs and you shouldn’t encounter any stability issues when applying a simple XMP profile. Instead of manually adjusting memory voltages to compensate for a weak memory controller or motherboard issue, the default XMP settings should work the first time and every time.
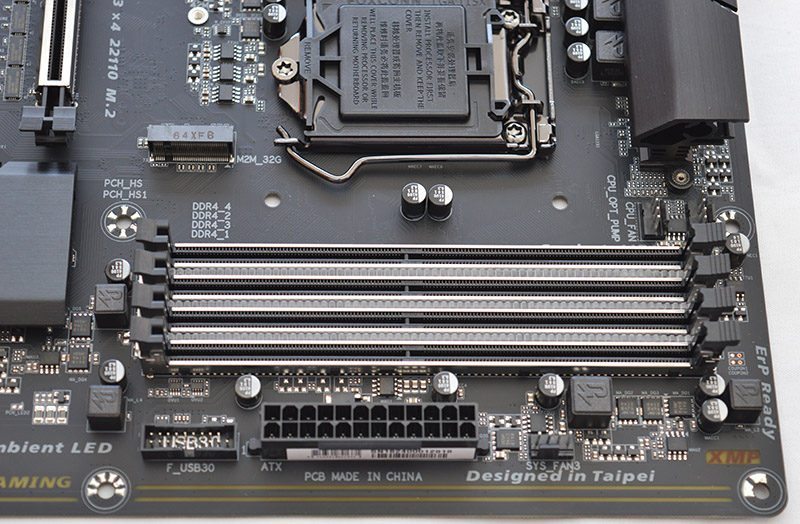
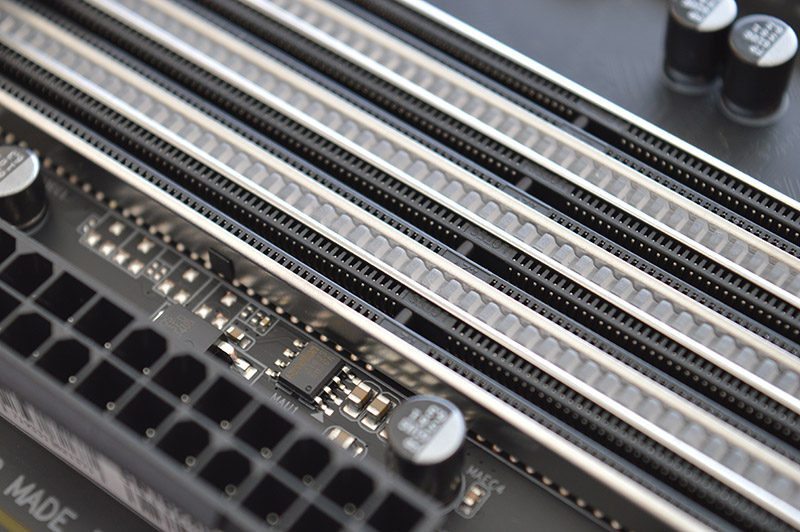
Gigabyte’s Dual Armor protects the DIMM slots from becoming damaged by improper installation and adds peace-of-mind for novice builders. Also, there’s a sense of satisfaction when pushing in the memory modules due to the strengthened design. On another note, there are three LED strips between the DIMM slots which contain red light and bring greater attention to this section of the motherboard.
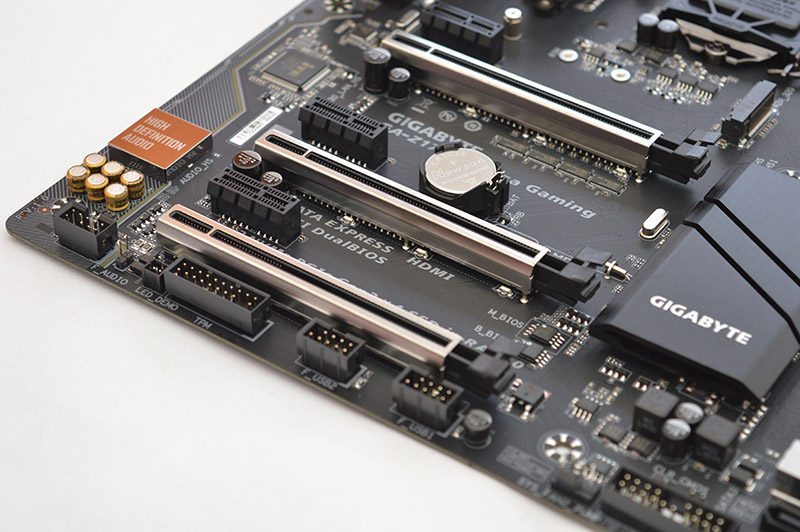
The Gigabyte Z170X-Ultra Gaming can accommodate either a 2-way Crossfire or SLI configuration running at a speed of x8/x8. Thankfully, Gigabyte decided to leave enough space between the primary and secondary graphics slots to improve airflow. As you can see, there’s another PCI-E x16 slot if you require a more unconventional positioning for two graphics cards and three PCI-E x1 to connect a sound card, M.2 PCI card or something similar. The PCI-E slots utilise Gigabyte’s patented double locking bracket with a soldered back section which creates a strong bond. Not only that, the stainless steel durable shielding has extra anchor points and offers 3.2 times the retention force compared to the industry’s standard design.
Another interesting addition is the use of three LEDs under the first two PCI-E slots to forge a more exciting appearance. The motherboard contains the usual array of headers including the trusted platform module, front USB 2.0 and pins to attach your case’s power/reset jumpers. For the audio solution, Gigabyte has deployed the Realtek ALC892 codec, premium Japanese audio capacitors, and an EMI shield. Furthermore, the audio chipset is positioned on a dedicated PCB with isolation layer to reduce interference. Unfortunately, there isn’t a headphone amplifier with a high signal to noise ratio.
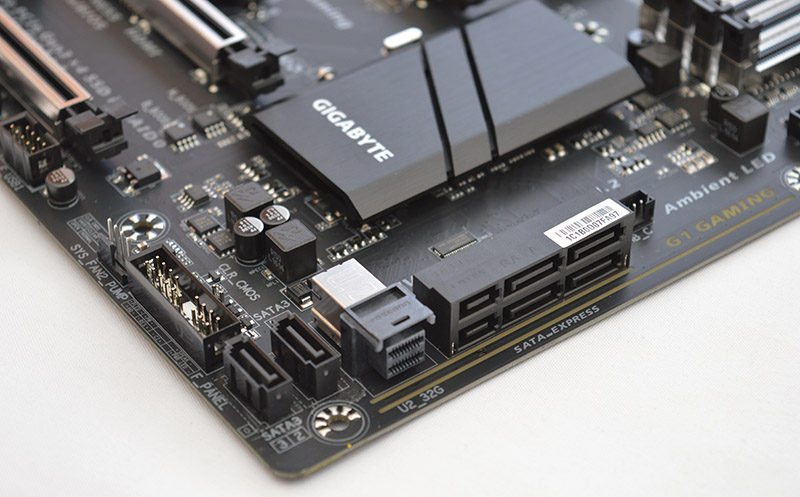
In terms of connectivity, the motherboard has six SATA 6Gb/s ports, two SATA express 16Gb/s ports, a U.2 port supporting unbelievable speeds up to 32Gb/s. This is the perfect interface for NVMe drives and should be more widely adopted in the future. Please note, this technology is only useful on the new Intel 750 series solid state drives at this time. It’s possible to connect various sized M.2 drives ranging from 42mm all the way up to 110mm. When combined with the U.2 port, and an M.2 to U.2 converter, it’s possible to attain a sequential read of 3525 MB/s and write reaching 2841 MB/s. If you need even more options, there’s a header to slot in a Thunderbolt card.
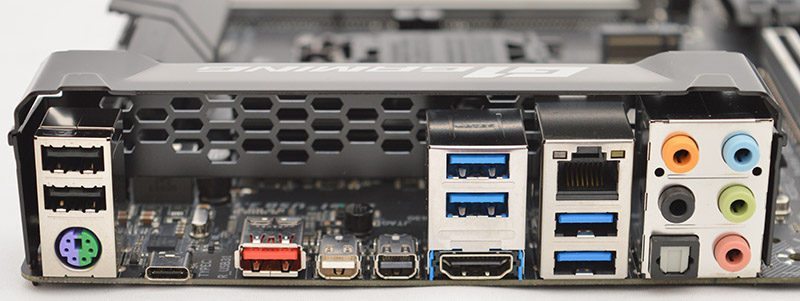
The rear I/O includes two USB 2.0 ports, a PS/2 combo port, USB 3.1 Type-C, USB 3.1 Type-A, Mini-DisplayPort in 1.2, Mini-DisplayPort 1.2, four USB 3.0 ports, HDMI 1.4, 5 audio jacks and an S/PDIF out.
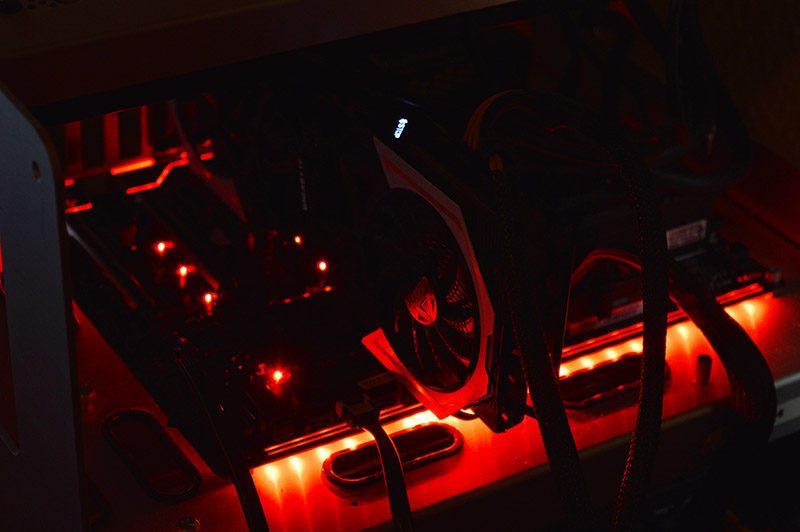
Once powered on, the light emanates from almost every section of the motherboard and combines to create a unique aesthetic. The illumination is bright and can be seen even in a relatively well-lit room.
Testing & Methodology
Here is the test bench used for all Z170 motherboard reviews:
Hardware
- Motherboard varies by review
- CPU: Intel Core i7 6700k
- GPU: NVIDIA GTX 980Ti
- RAM: Crucial Elite 16GB (2x8GB) 2666MHz
- Cooling: Thermaltake Water 3.0 AIO with Gelid GC-Extreme
- Case: Lian Li T80 Test Bench
- Storage Drives: Main storage: Crucial MX200 250GB, Test Devices: SanDisk Extreme Pro 240GB SSD, Plextor 256GB M6e M.2 SSD and Patriot SuperSonic Magnum 256GB USB 3.0 Flash Drive
- PSU: be quiet! Dark Power Pro 11 850W
- Operating System: Windows 8.1 64-bit
- Networking: ASUS RT-AC68U router
Software
- SiSoft Sandra Engineer – available here
- WPrime – available here
- Cinebench – available here
- 3DMark – available here
- Bioshock Infinite – available here
- Tomb Raider – available here
- AIDA 64 Engineer – available here
- Latencymon – available here
- Rightmark Audio Analyser – available here
- LAN Speed Test Lite – available here
- Passmark – available here
Memory
For our memory tests, we use the built-in memory benchmarks in AIDA64 Engineer and SiSoft Sandra. For more details on each of the benchmarks please see here and here respectively.
Storage
To test the storage performance in our motherboard reviews we use AIDA’s Disk Benchmark utility built into their AIDA64 Engineer Edition software package and run linear read and write tests. We run each of the benchmark tests on a SATA III, USB 3.0 and M.2 device. For SATA III testing we use a SanDisk Extreme Pro 240GB, for USB 3.0 testing we use the Supersonic Magnum 256 GB USB 3.0 flash drive and for M.2 testing we use Plextor’s 256GB M.2 M6e SSD. The drives are always formatted before use.
Networking
For our networking tests we connect the test system up to our Intel Gigabit-enabled ASUS Rampage IV Extreme X79 motherboard test system through the ASUS RT-AC68U router and run our tests. We opted for this over a direct point-to-point connection because we wanted to simulate real-world performance. For our WiFi tests we do the same except we connect the test system to the ASUS RT-AC68U router via WiFi at a distance of 2 metres from the router. The testing software we use for these are LAN Speed Test Lite and Passmark, available here and here respectively.
PassMark
The PassMark Advanced Network Test (which is part of PerformanceTest) is designed to test the data transfer rate between two computers both of which must be running PerformanceTest. One of the computers must act as the server and will sit waiting for a connection. The other computer acts as a client. It connects to the server machine and sends data to it for the duration of the test. You can download a trial version of PerformanceTest from here.
Power Usage
To measure power consumption we, use a “killawatt” meter and measure the total system power draw at the wall. We run three different use-case scenarios for 5 minutes and take the average reading.
RightMark Audio Analyser (RMAA)
RMAA suite is designed for testing quality of analog and digital paths of any audio device. The results are obtained by playing and recording test signals passed through the tested audio path by means of frequency analysis algorithms. A more common mark is also provided for those unfamiliar with measured technical parameters. Available here. We run the RMAA test using a 3.5mm to 3.5mm cable connecting the line out to the line in to test the quality of the motherboard audio codec not any external audio devices. We run the complete playback and recording test at default settings and then get RMAA to interpret the results giving the below outputs. We sync the playback and recording audio devices to the same setting as the test for accurate results.
DPC
DPC is a Windows tool that analyses the capabilities of a computer system to handle real-time data streams properly. It may help to find the cause for interruptions in real-time audio and video streams, also known as drop-outs. This software is available for download free here.
wPrime
wPrime is a leading multithreaded benchmark for x86 processors that tests your processor performance by calculating square roots with a recursive call of Newton’s method for estimating functions. wPrime is a free utility that is available for download here.
Cinebench R15
Cinebench is a widely respected benchmark for testing the performance of x86 CPUs. The program allows you to test single and multi-threaded performance as well as GPU performance by rendering with Open GL. Download here.
3D Mark
The new 3DMark includes everything you need to benchmark your hardware. With three all new tests you can bench everything from smartphones and tablets, to notebooks and home PCs, to the latest high-end, multi-GPU gaming desktops. Download here.
Tomb Raider
In Tomb Raider, the player is confronted with a much younger Lara Croft who is shipwrecked and finds herself stranded on a mysterious island rife with danger, both natural and human. Tomb Raider is a demanding game offering up ultra quality textures, full DirectX 11 support, SSAA, FXAA, MSAA and AMD TressFX technology.
Bioshock
BioShock Infinite is the third and last game in the BioShock series. It is a first-person shooter video game developed by Irrational Games and published by 2K Games. BioShock Infinite supports dynamic shadows, post-processing, light shafts, ambient occlusion, object level of detail, Diffusion Depth of Detail, FOV adjustment controls and other advanced DirectX 11 features.
BIOS and Overclocking
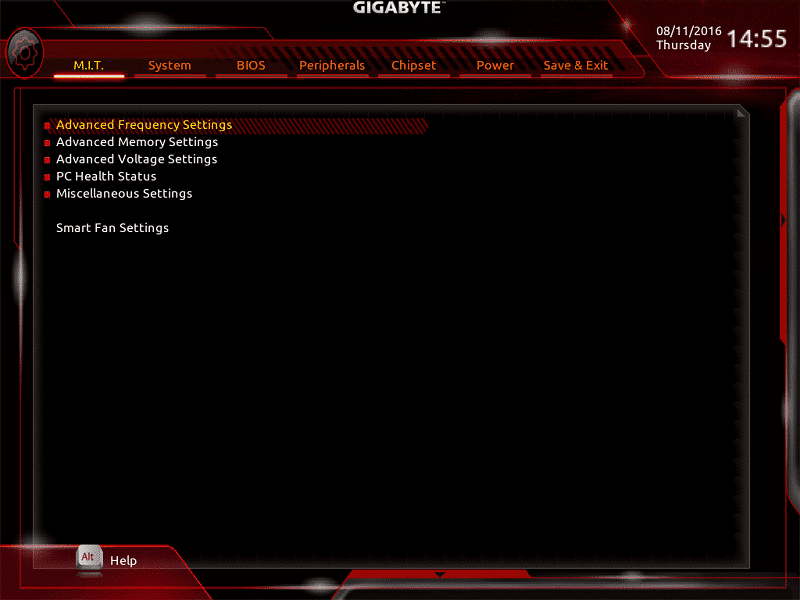
Gigabyte’s revised BIOS layout is based on a simplistic design and clean aesthetic which makes navigation a simple task. Even if you’re unfamiliar with the BIOS, it’s a quick process to adjust to the logical arrangement. Additionally, the black background and white font combine rather well and the pin sharp text can be read from numerous angles. This is handy if you’re monitoring voltage changes while visually inspecting the motherboard. Overall, I’m really impressed with the BIOS’ functionality and modern aesthetic. On the M.I.T page, you can access a large array of menus to adjust voltages, the CPU frequency and even allow the motherboard to automatically configure the fans based on thermal values.
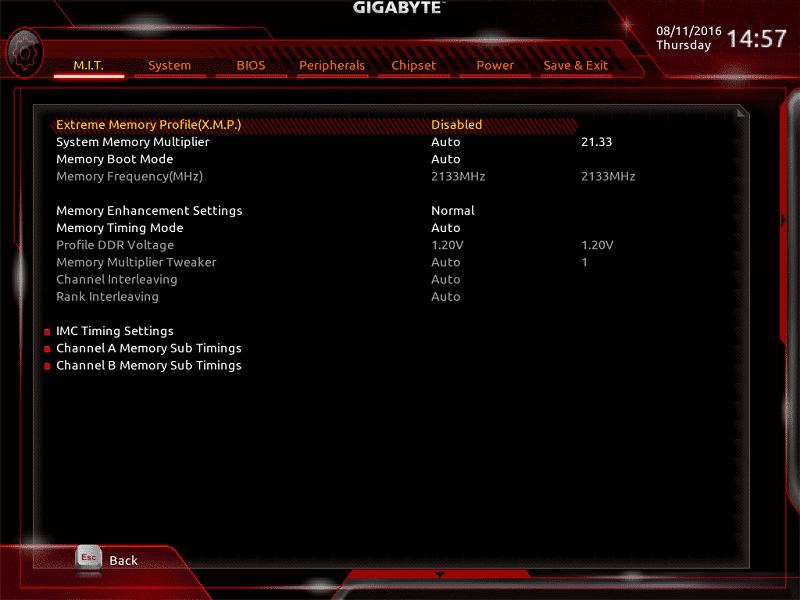
The frequency page houses a wide range of options to tweak the base clock, slice ratio, clock ratio and FCLK. Not only that, the CPU Upgrade setting contains pre-defined profiles up to 4.6GHz which provides users who are uncomfortable with manually overclocking a quick method of enjoying a higher frequency. Although, it’s always recommended to overclock your CPU through gradual testing to find its maximum frequency and lowest stable voltage. On another note, this screen incorporates a setting to select your memory’s XMP profile. Please note, the screen capture was taken before testing began, hence why the memory reads as 2133MHz.

If you want greater control over the memory’s behaviour, it’s possible to use a dedicated menu and tweak the operating speed, voltage and individual timings. Of course, this is only suitable if you’re well versed in overclocking and have no desire to employ the basic XMP profile.
Here we can see the CPU’s voltage page which can be used to manually input the required Vcore, VCCIO, VCCPLL and much more. The majority of users will probably just want to modify the Vcore and leave the other settings to their default values. However, it’s great to see additional options for those with lots of overclocking experience.

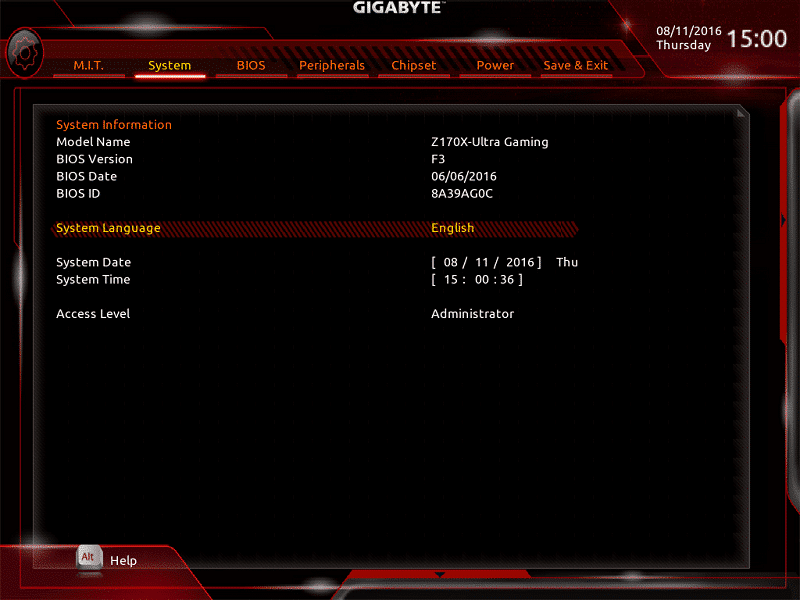
The System Information tab outline key details about your PC such as the model name, BIOS version, and BIOS ID.
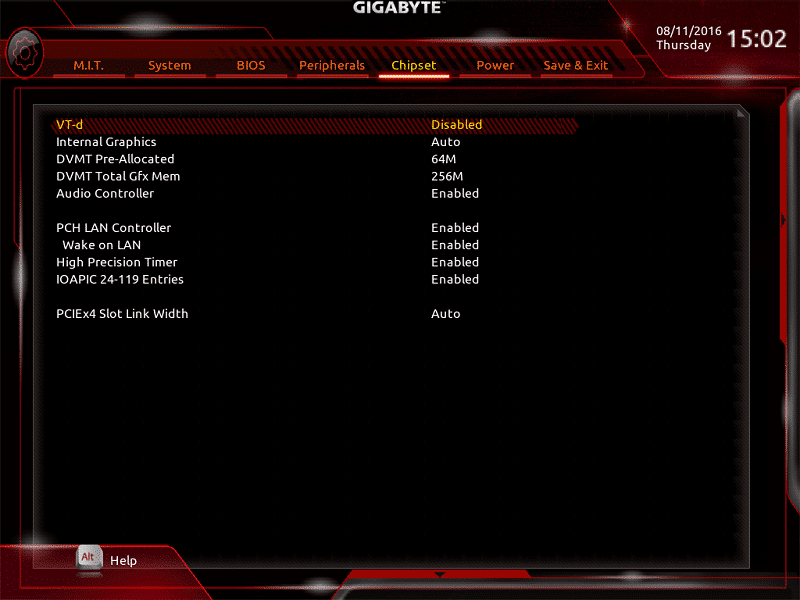
Unless you have a high level of expertise, the Chipset section is to be avoided, but it’s still crammed packed full of useful features for those who enjoy tweaking every possible aspect of their system.
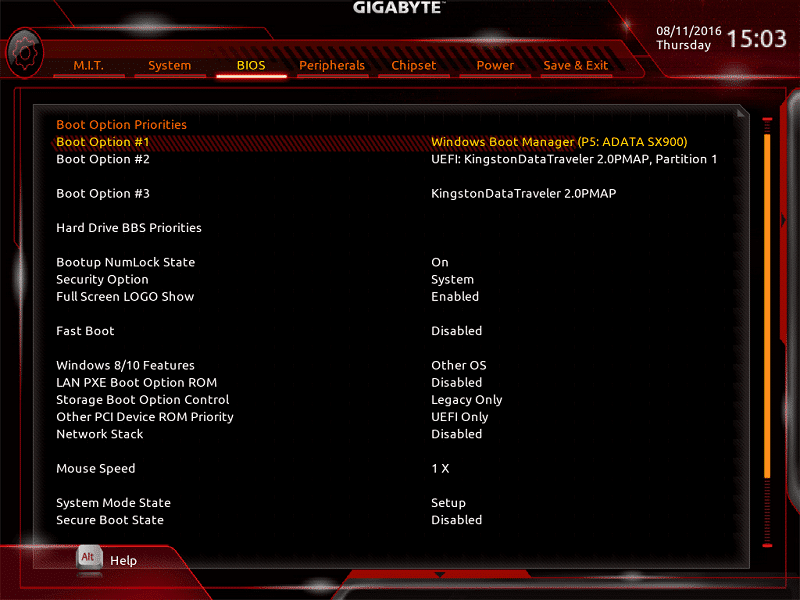
The next screen grab illustrates the BIOS’ option to change the boot priority, cycle between UEFI and legacy modes and even increase the mouse speed. My approach still involves the keyboard for navigation especially since the mouse speed on many BIOS versions can be jittery and slow. Therefore, this is a really handy option if you don’t have a mouse which supports on-the-fly DPI switching.
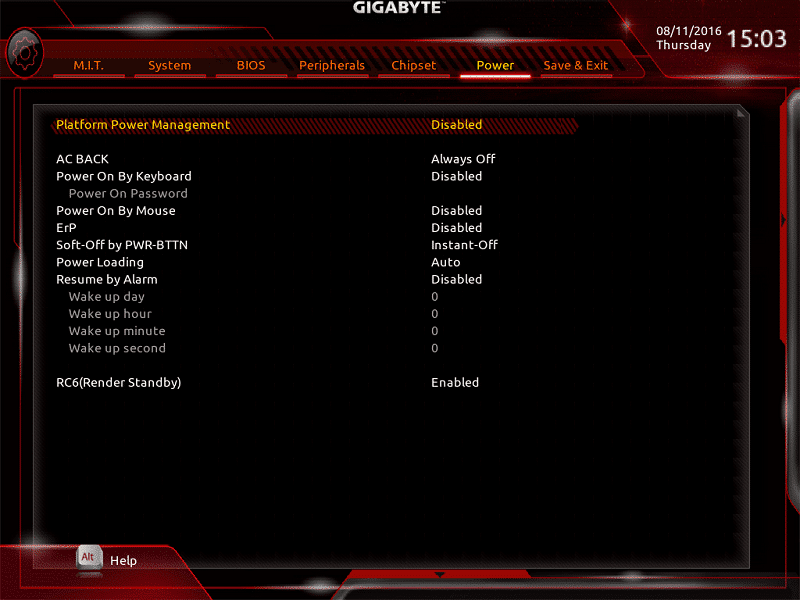
Next up is the Power tab which can be deployed to enable or display Platform Power Management, adjust the AC BACK mode and much more. Once again, you probably won’t be spending much time on this page.
On the final page, you can save any changes, restore optimal defaults, adjust the default boot priority and load/save any overclocking profiles.

Overclocking
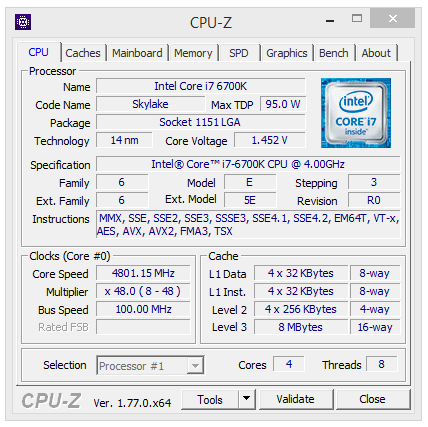
The i7-6700K sample for review purposes cannot exceed 4.8GHz despite my best efforts so the usual process involves reaching this figure and toning down the voltage until stable. Initially, I attempted 4.9GHz but this wasn’t possible even when hovering around 1.495v which causes thermal throttling. Eventually, I adjusted the multiplier to x48 and set the voltage to 1.475 which has been the amount needed during the last few reviews. To be clear, it appears the CPU has changed over time and requires more voltage than before. However, the motherboard fared much better with this CPU and dialling back the Vcore to 1.452v didn’t impact on stability. Honestly, I was surprised by this and couldn’t believe how effortless the overclocking procedure was.
Software Overview
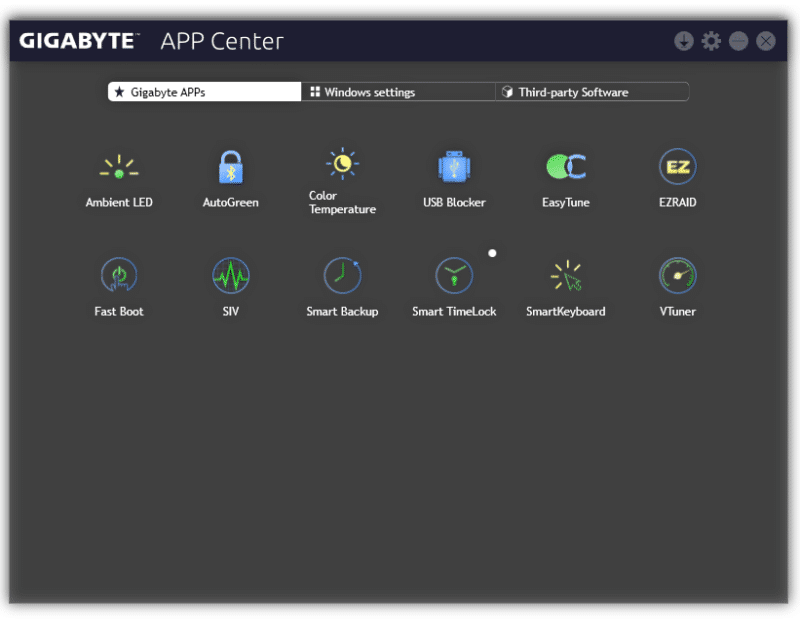
Gigabyte has completely overhauled the App Center’s GUI which now uses a larger square window instead of being positioned on the system tray. While it takes up more desktop real estate, it’s a more visually appealing design and doesn’t clash with your monitor’s PPI rate. The previous concoction featured huge icons and an overly bright colour scheme. This time, it’s a neutral main menu which evokes a sense of professionalism.
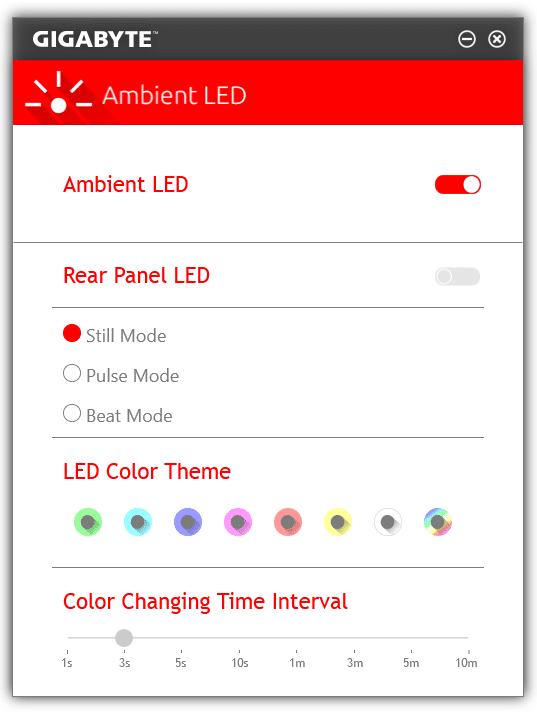
The Ambient LED utility is useful to disable the motherboard’s lighting, choose from transitional effects and adjust the colour theme. Since the Gigabyte Z170X-Ultra Gaming can only output a single colour, any customisation options have been disabled.
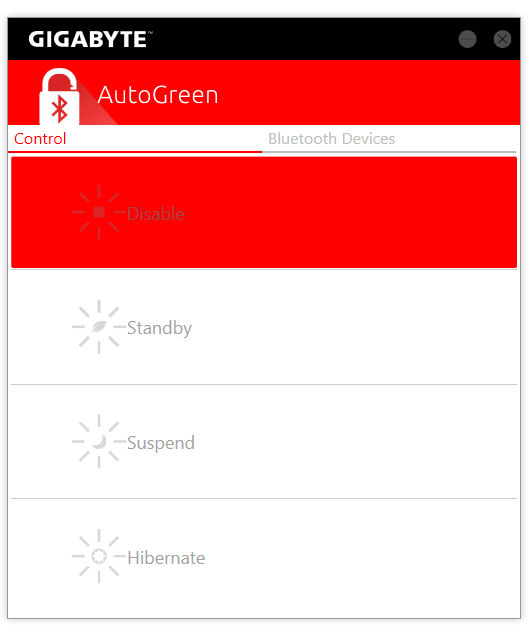
Another interesting application which I haven’t encountered before is entitled AutoGreen. This piece of software automatically saves energy via Bluetooth although I haven’t been able to test this claim because the tech bench doesn’t have any support for the Bluetooth protocol.
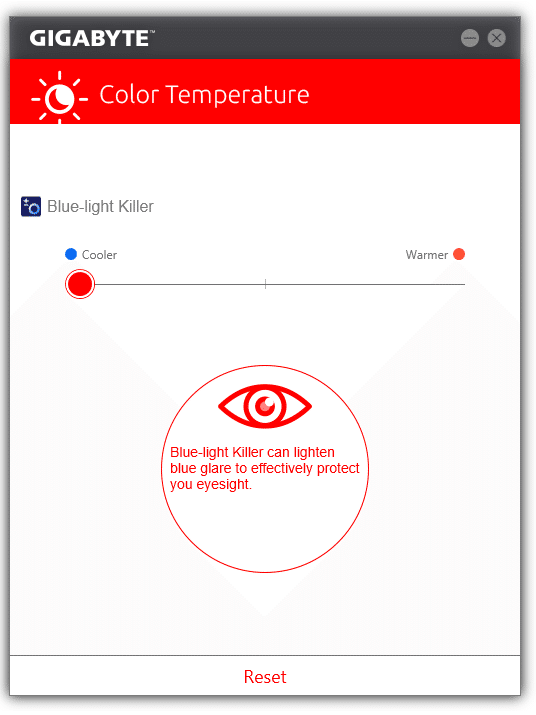
Here we can see Gigabyte’s Color Temperature tool which gives the end-user the option to change their monitor’s blue light hue. In many cases, blue light can cause eye fatigue and the application houses the required adjustments to minimise this effect.
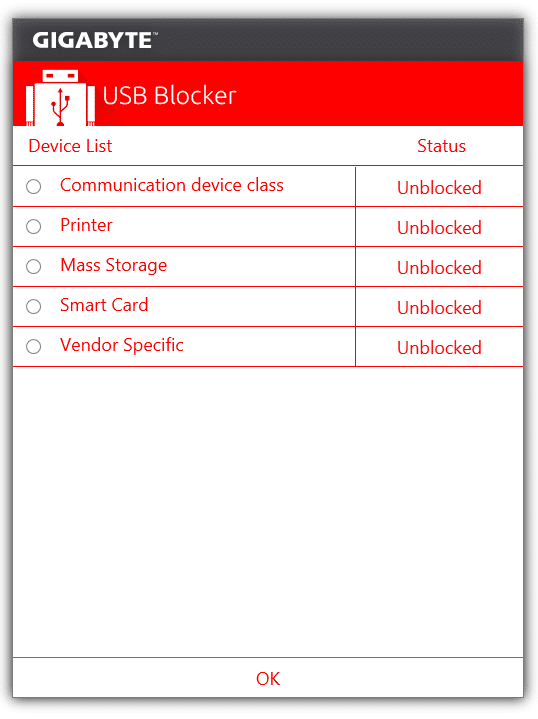
The USB Blocker is able to automatically detect particular types of USB devices such as flash drives and block the operating system from configuring them. Why would you want to do this? Perhaps, you’re worried about other people transferring certain files onto your computer or simply have concerns about drivers impacting on your system’s stability.
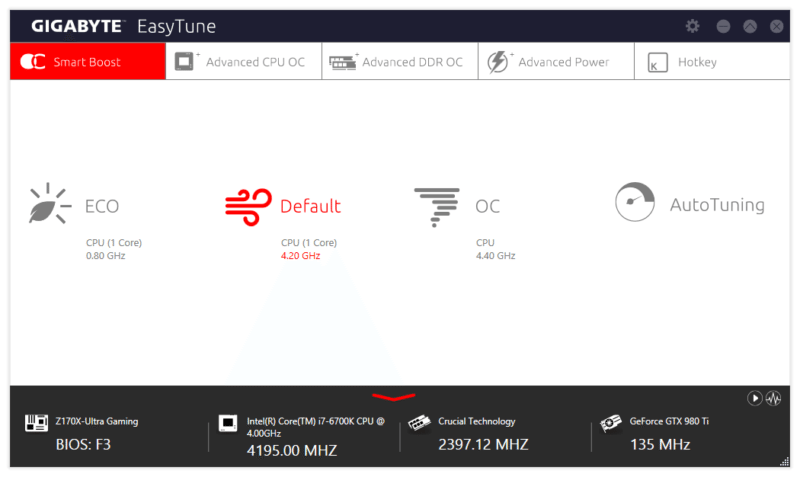
Gigabyte’s EasyTune software offers similar functionality to the BIOS and allows you to overclock the CPU, memory and make other essential changes. The first page includes three profiles which configure the system based on your specific requirements or you can let the application analyse the thermals and cooling hardware to find a suitable frequency. Also, notice the useful information near the bottom which outlines your system’s key specification.
On the advanced tab, you can manually set the BCLK, multiplier per core, CPU voltage, VCCIO and a modify a whole host of complex settings.

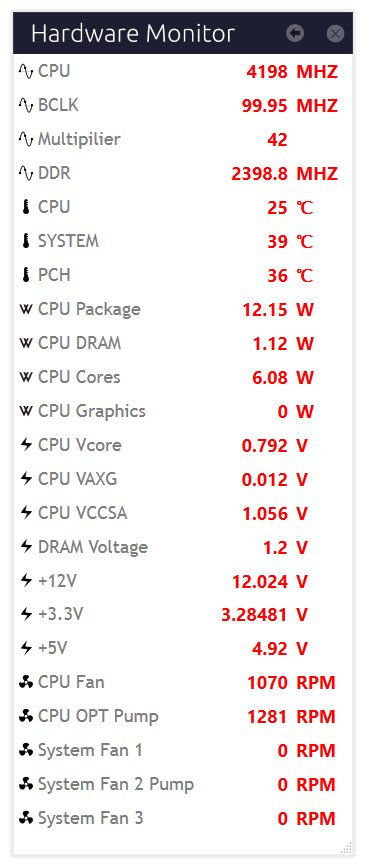
The Hardware Monitor displays a lot more information on the voltages compared to widely used software like HWMonitor. The interface is a bit clumsy and takes up a lot of screen space, though.
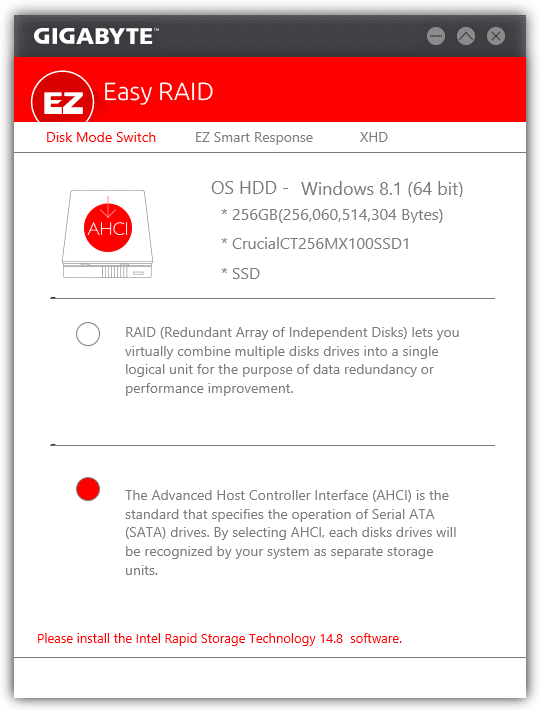
As its name suggests, Gigabyte’s Easy RAID utility makes setting up a RAID array ridiculously simple due to the user-friendly interface. Now, consumers don’t have to navigate through a command line or system outside of Windows to configure a RAID setup and enjoy huge sequential rates across multiple drives.
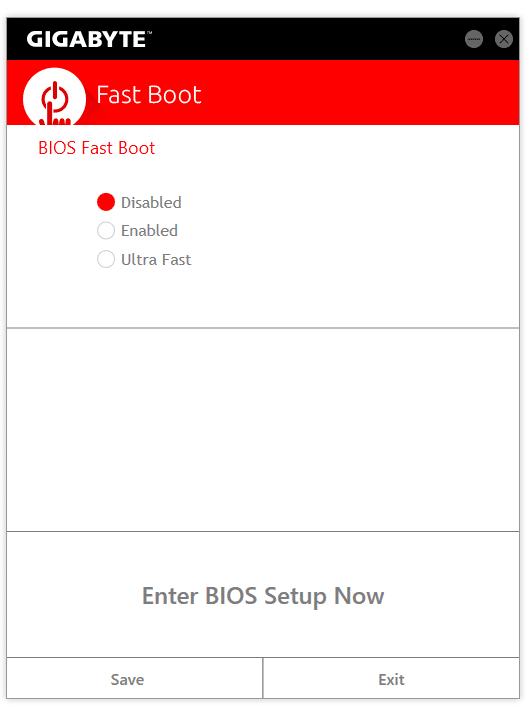
The Fast Boot software has the option to quickly boot into Windows or directly enter the BIOS. Please note, the Ultra Fast setting will make it challenging to press the BIOS key in time due to the rapid boot times on NMVe storage devices.
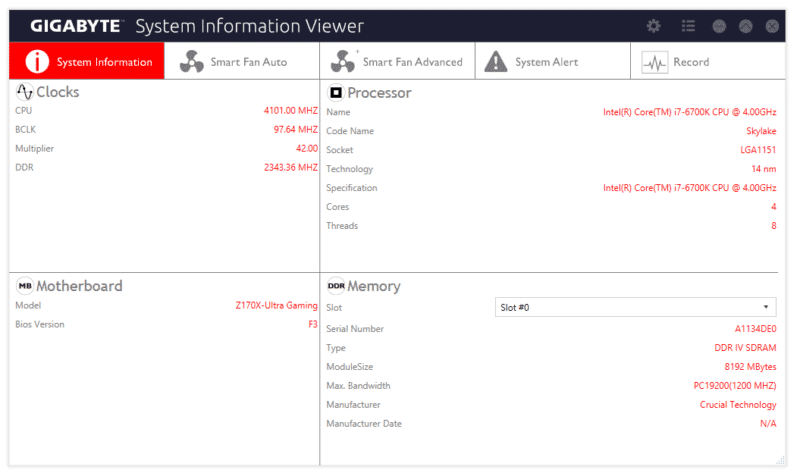
Here we can see the System Information Viewer which relays details on the CPU’s current parameters and its core specification. Furthermore, the menu contains information on the motherboard version and memory’s SPD.
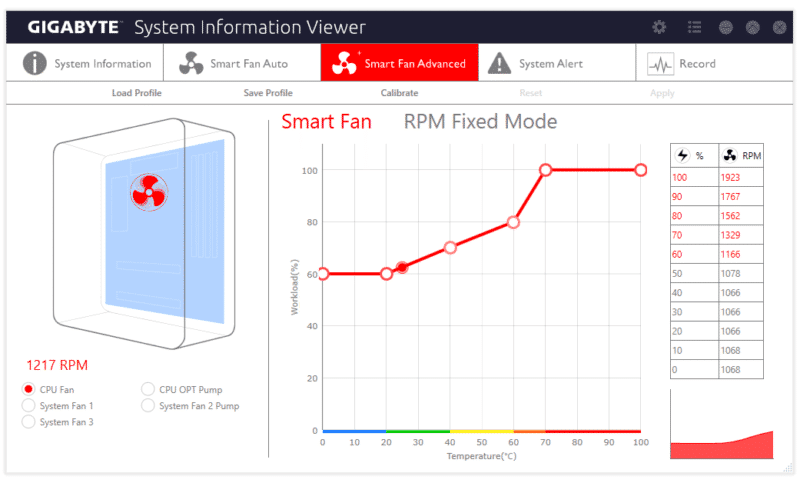
In additional to the automatic fan configuration, it’s possible to create a custom curve by balancing thermal loads and the rate of CPU utilisation. This offers great flexibility for those users who prefer a more gentle or aggressive fan curve.
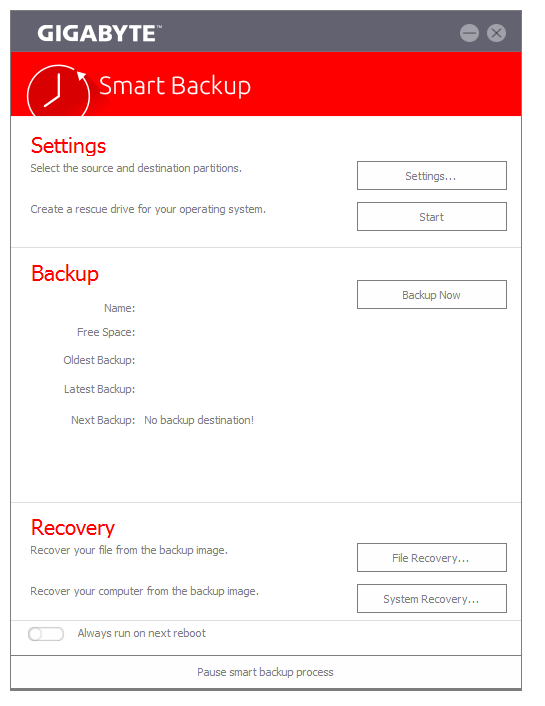
Gigabyte’s Smart Backup is fairly self-explanatory and has the ability to rescue a drive, backup essential files or recover your PC from a backup image created ever hour. In theory, this should protect your data without the need to perform laborious manual backups.
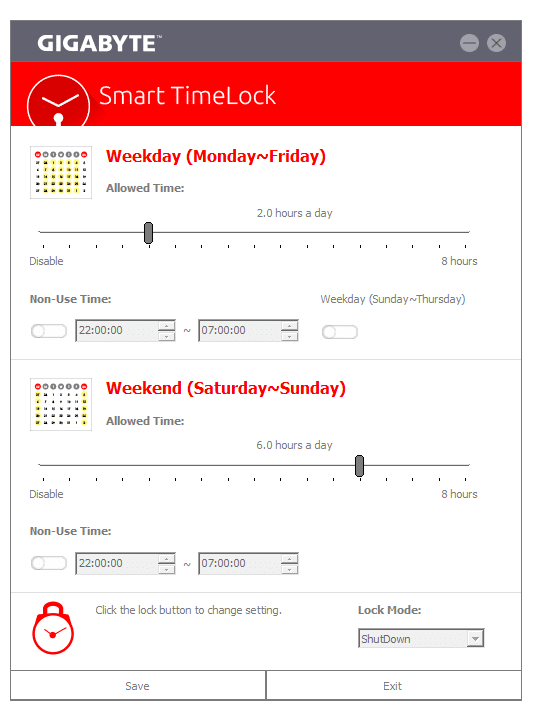
The Smart TimeLock can restrict PC access for a particular interval or indefinitely to ensure other PC users aren’t spending too much time browsing the internet unsupervised.
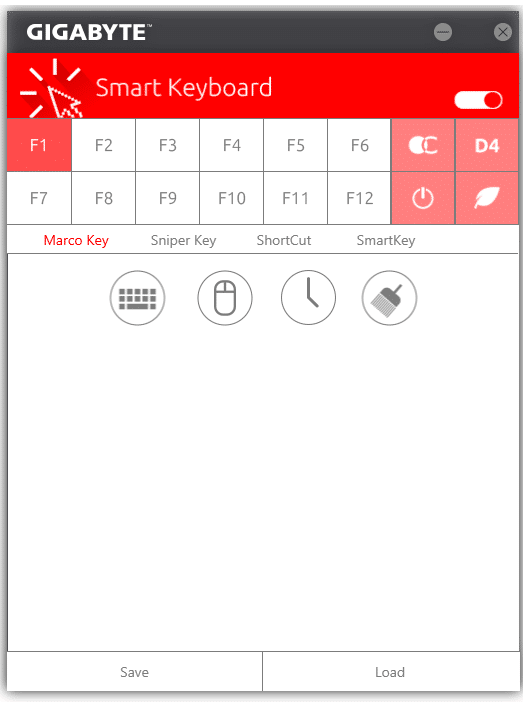
Here we can see the Smart Keyboard utility which allows you to re-bind individual keys for specialised functions.
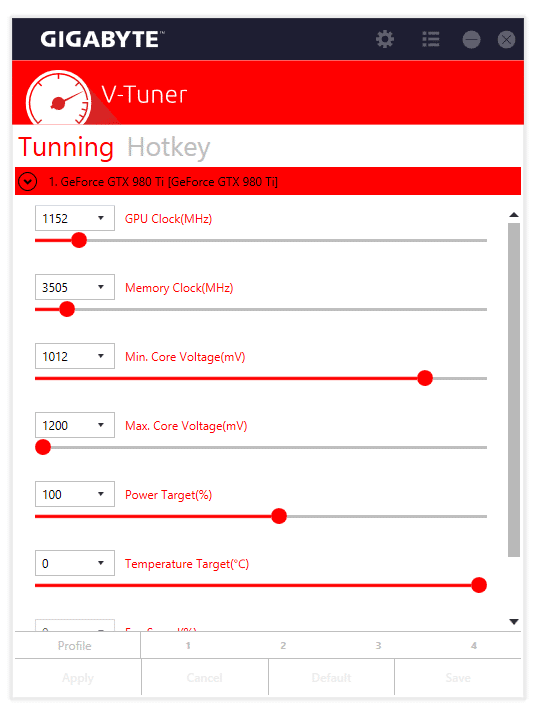
The V-Tuner is a graphics card overclocking tool which contains all the features you need in a compact user interface. Saying that, it’s very basic and you’re better off using something like MSI Afterburner to monitor overclocked performance.
CPU & GPU Performance
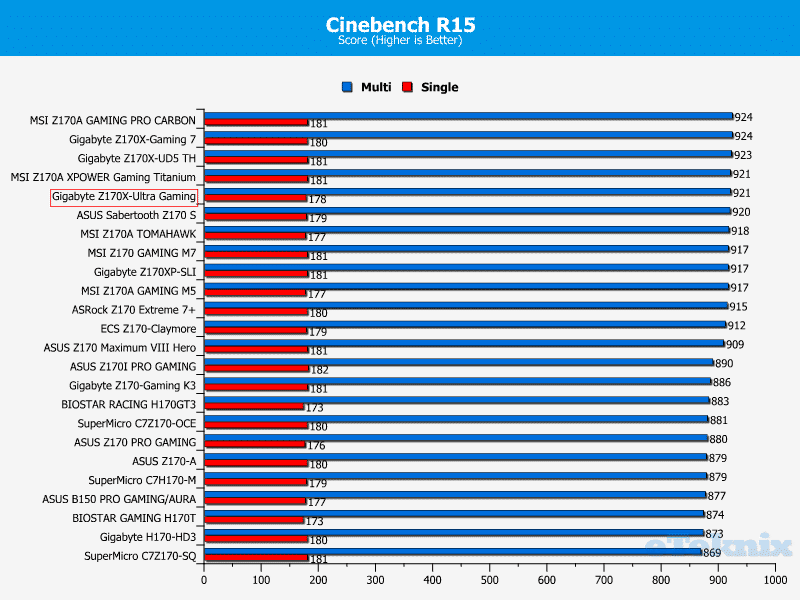
Cinebench
When running the CPU at its stock configuration, the motherboard posts impressive Cinebcnech scores and competes exceptionally well with products costing significantly more.
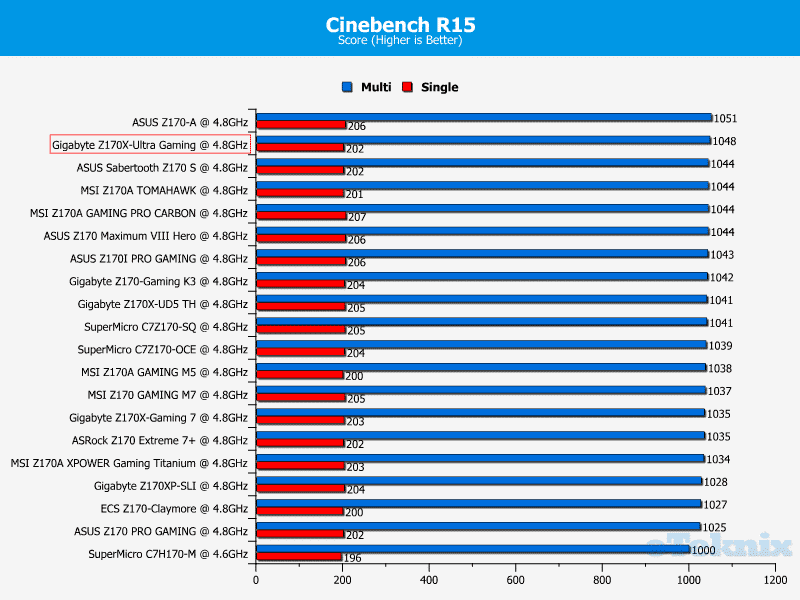
Once overclocked, the Gigabyte Z170X-Ultra Gaming excels and almost manages to take the top spot. Saying that, the single core performance isn’t the greatest on record but it’s within an acceptable margin of error.
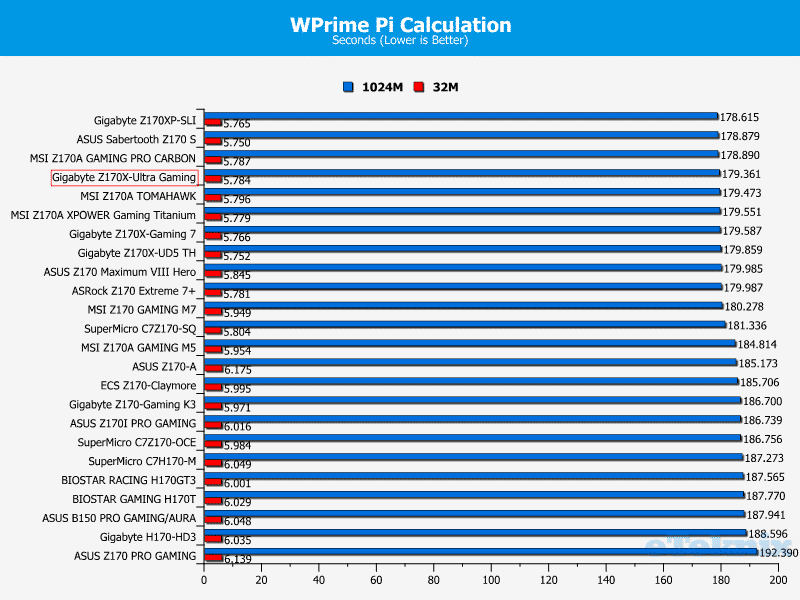
WPrime
In WPrime. the motherboard completed the pi calculation in a very respectable time and defeated the majority of Z170 models available today.
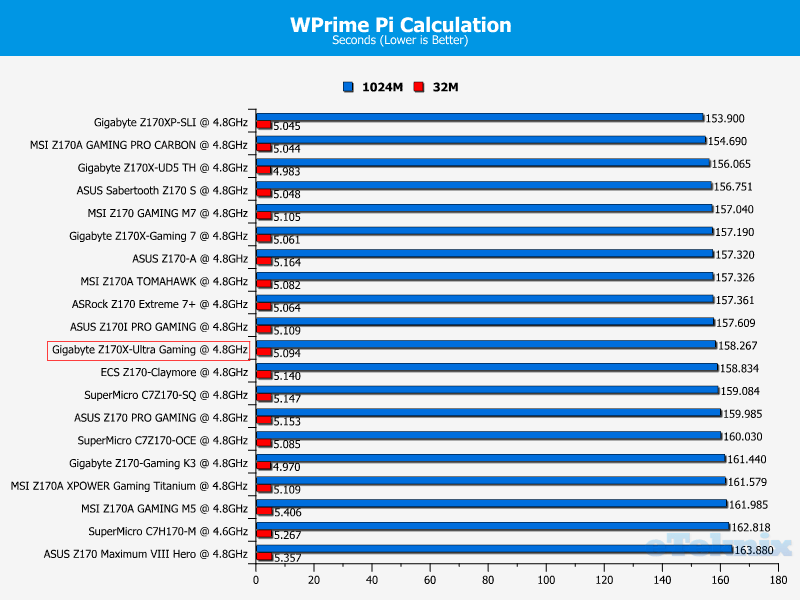
Unfortunately, Gigabyte Z170X-Ultra Gaming couldn’t uphold this higher tier position after being overclocked and attained a mid-table position. Despite this, it’s still worthy of praise and there’s very little to choose between motherboards during the overclocked benchmark.
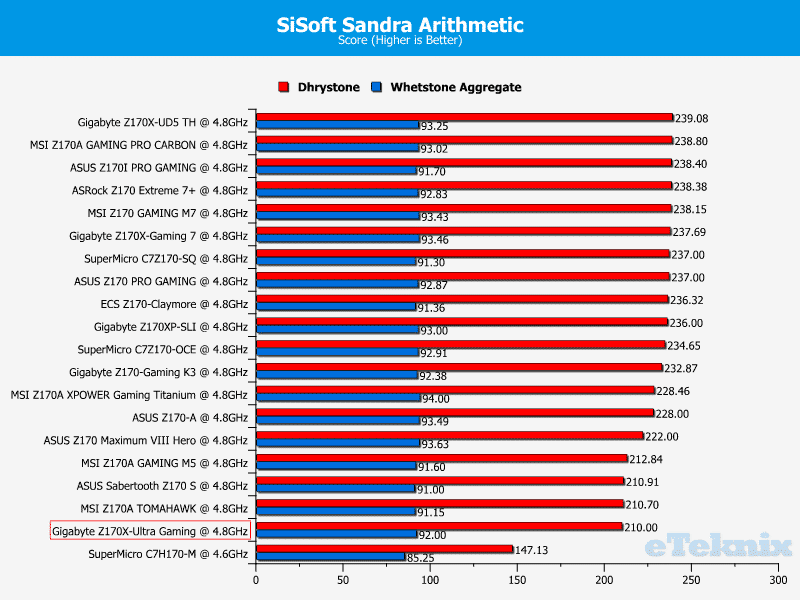
SiSoft Sandra
For some bizarre reason, the motherboard didn’t fare well when tackling the Sanda Arithmetic test and struggled to match a large number of rival products. This is surprising given the extraordinary performance figures in both Cinebench and WPrime.

This performance deficit remains quite significant compared to other Gigabyte creations such as the Z170X-UD5 TH while operating at the 4.8GHz frequency. To clarify this, I re-ran the benchmark but the results didn’t change. Please remember it’s been some time since I reviewed a Z170 product, so perhaps a software issue is contributing to the weak scores.
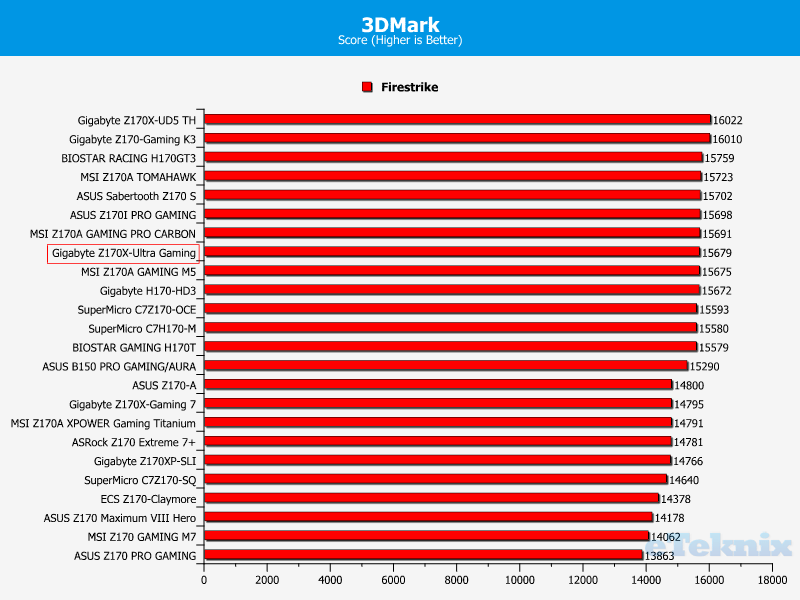
3DMark
The Gigabyte Z170X-Ultra Gaming is able to utilise the test bench’s GTX 980Ti to its full potential and attain a marvellous Firestrike score. On the other hand, you would expect it to surpass motherboards using an older NVIDIA driver. Honestly, your choice of motherboard doesn’t make a huge difference in games or synthetic 3D applications providing the same chipset and processor are being compared.
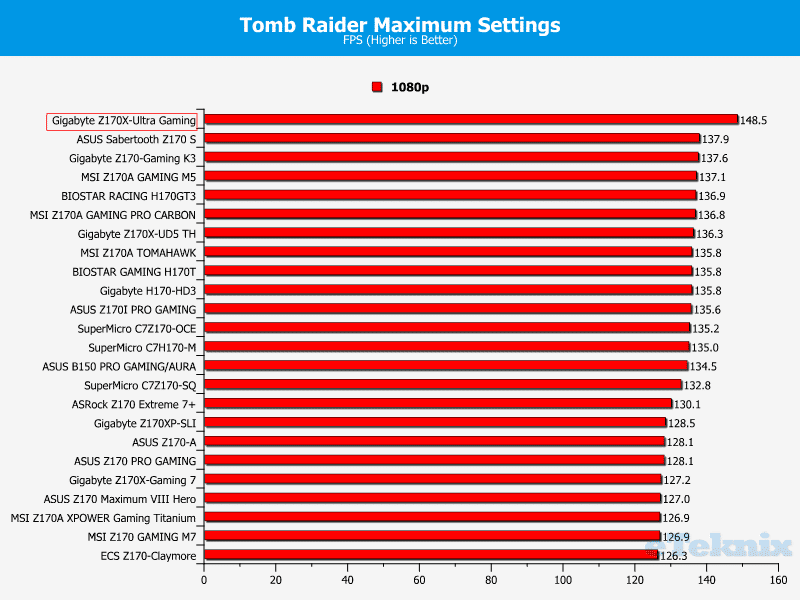
Tomb Raider
Evidently, the recent driver updates have made a monumental difference when playing Tomb Raider on the Ultimate preset and I was mesmerised by the performance increase. This is a wonderful result and showcases the importance of optimisation at a driver level.
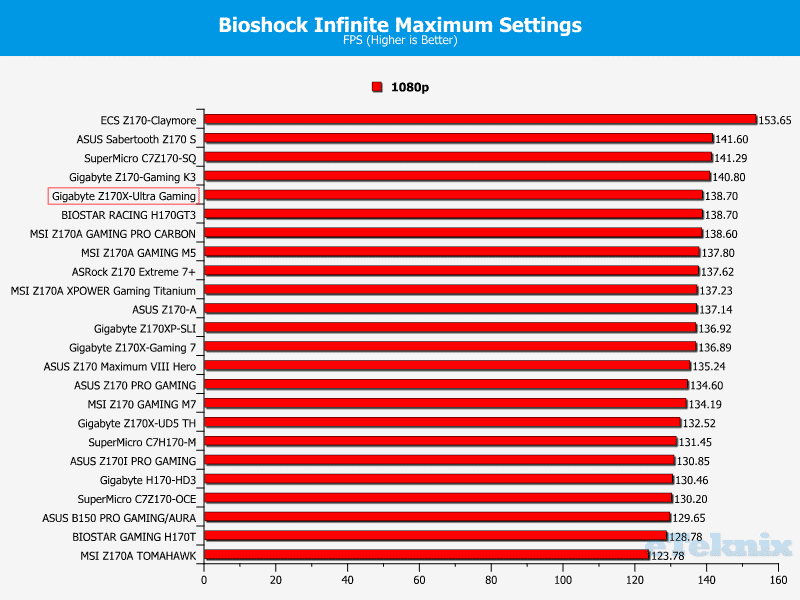
Bioshock Infinite
In direct contrast to the previous data, the motherboard’s frame-rate isn’t substantially higher than other products tested with older drivers. Nevertheless, it’s still a strong showing but it looks unlikely that anything will threaten the ECS Z170-Claymore’s unusually high frame-rate.
Memory Performance
AIDA64 Engineer
The Gigabyte Z170X-Ultra Gaming’s memory bandwidth is superb and outperforms a large number of rival offerings.

After the overclock was applied, the motherboard came into its own and posted exceptionally high numbers.

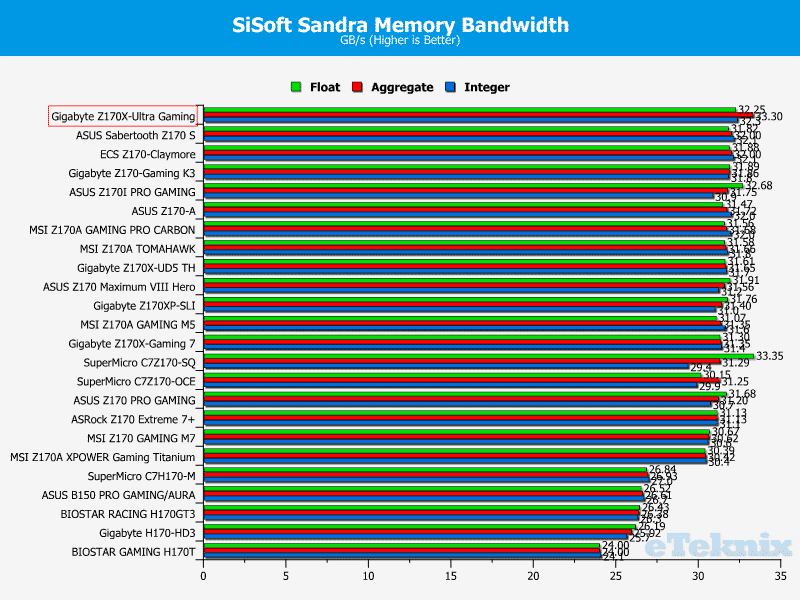
SiSoft Sandra
On a similar note, the stock performance during the SiSoft Sandra memory bandwidth benchmark is phenomenal and exemplifies the motherboard’s wonderful memory capabilities.
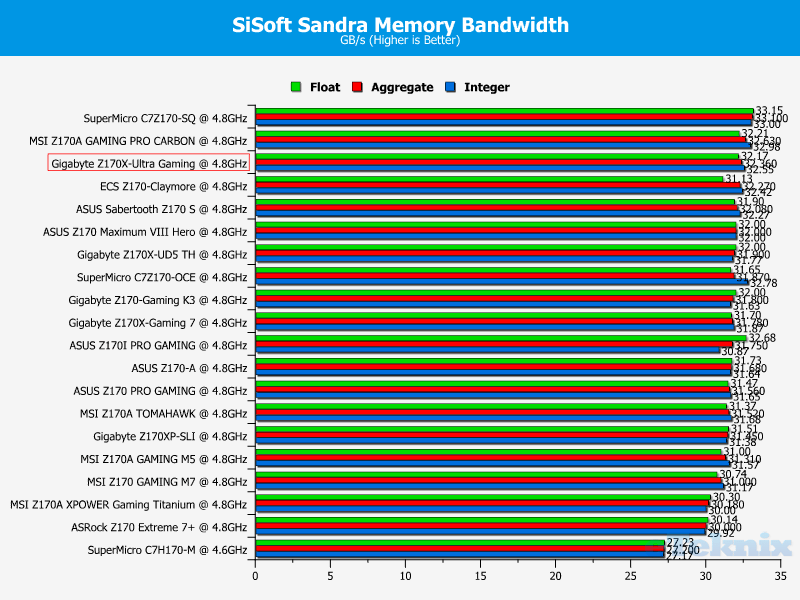
Once overclocked, the motherboard falls back slightly and no longer dominates the top position. However, the margin between the top results is incredibly small and only becomes apparent during synthetic applications. Also, these are the best figures I’ve seen from a Gigabyte motherboard which deserves a great deal of praise.
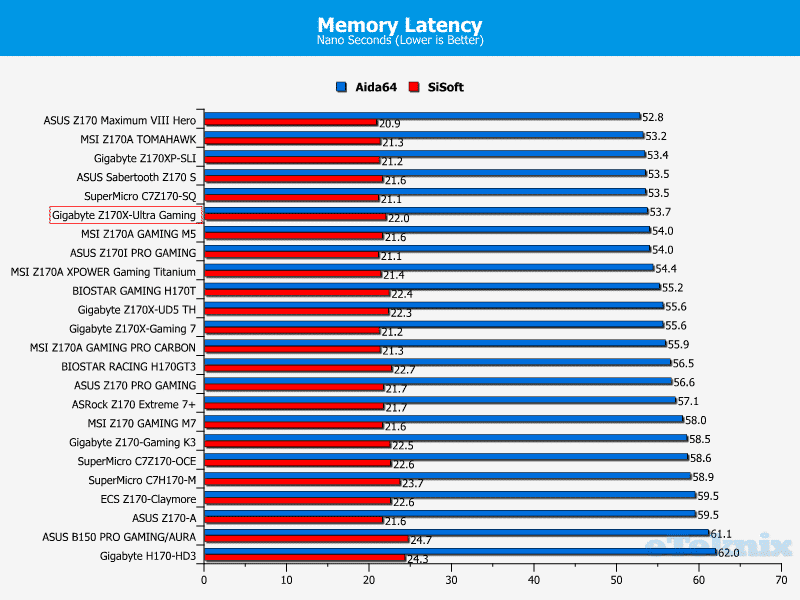
Combined Latency Test
The Gigabyte Z170X-Ultra Gaming outputs low memory latency numbers in both Aida64 and SiSoft Sandra.
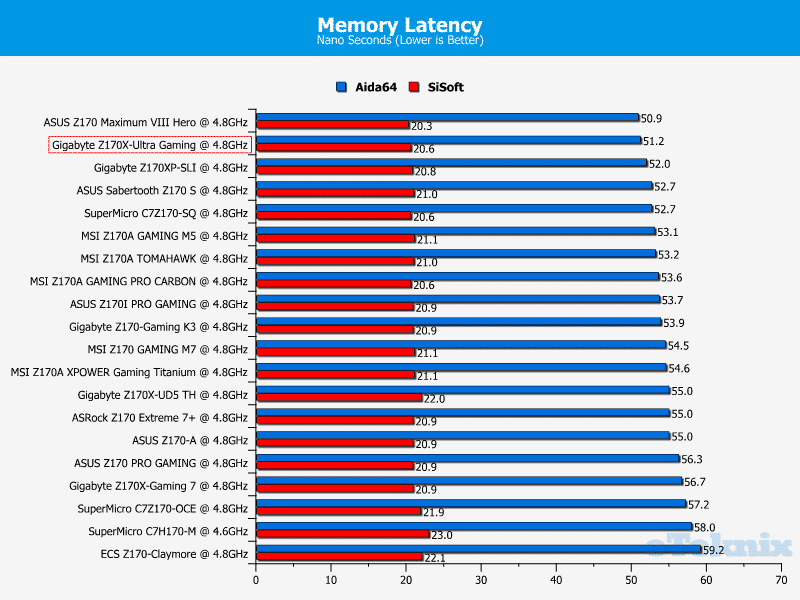
The overclocked results are even more remarkable and the motherboard continues to thrive during memory benchmarking.
Storage Performance
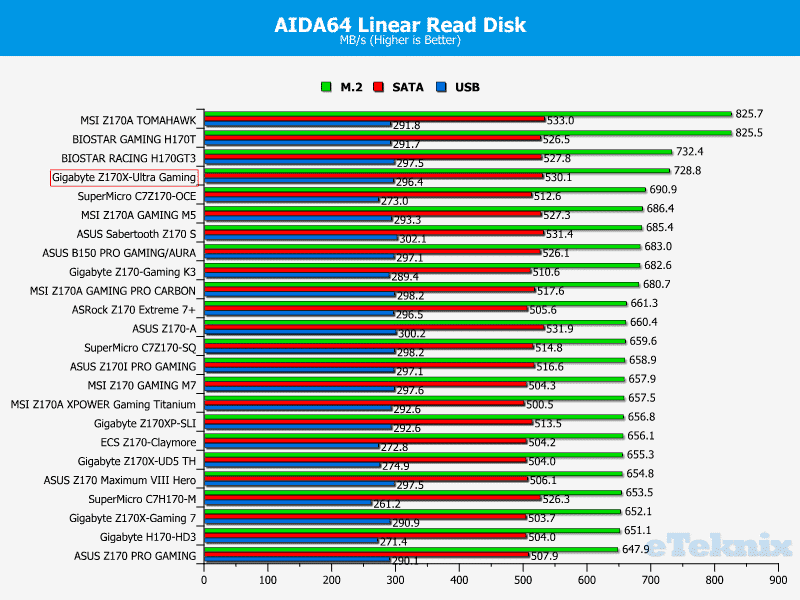
Linear Read
Moving onto storage, the motherboard outputs very respectable results and manages to attain an M.2 read speed beyond 700MB/s. Also, the SATA performance was excellent while the USB 3.0 speed remained solid.
Linear Write
The motherboard’s linear write performance is another highlight especially when you look at the 496.7 MB/s SATA speed. Additionally, the M.2 rate remained high although I did experience some unusual drops well beyond an acceptable tolerance. Thankfully, this was quickly resolved and appeared to be the result of a background process. The USB 3.0 write was good and one of the best write speeds on record.

Networking Performance
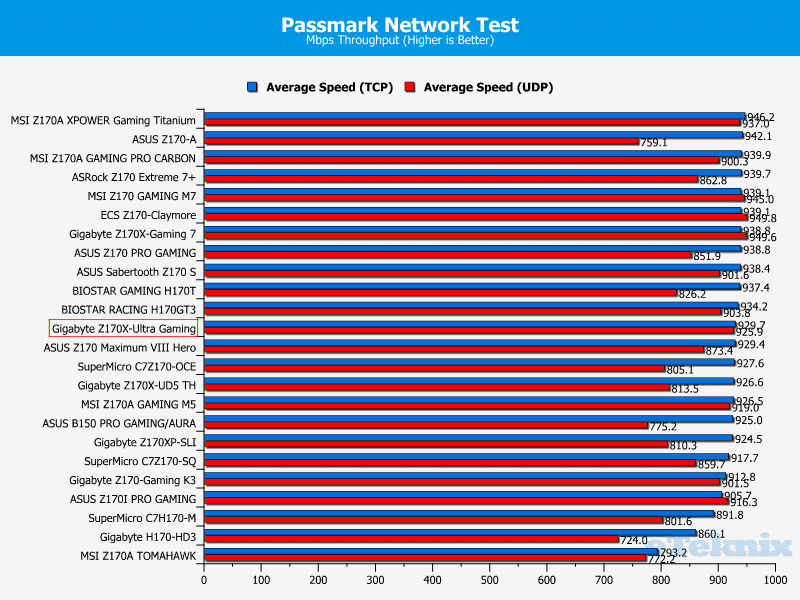
Passmark Performance Test 8 – Ethernet
The motherboard’s Intel Gigabit LAN upholds reliable numbers when employing either the TCP or UDP protocol. In fact, the performance appears to be almost identical when switching between these, unlike many other competing products which favour a particular protocol.
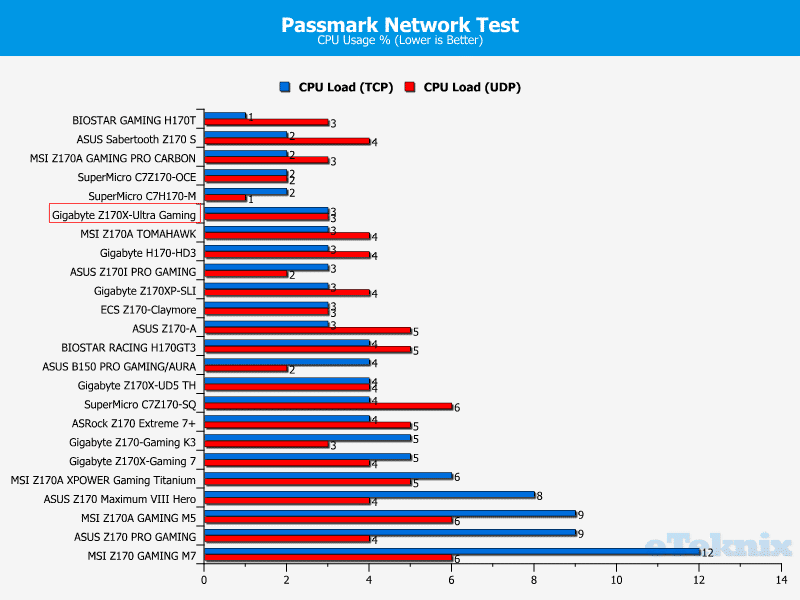
Passmark Performance Test 8 – CPU Work Load
As expected, the motherboard’s network interface doesn’t require hefty CPU utilisation and only used 3% throughout the testing process.
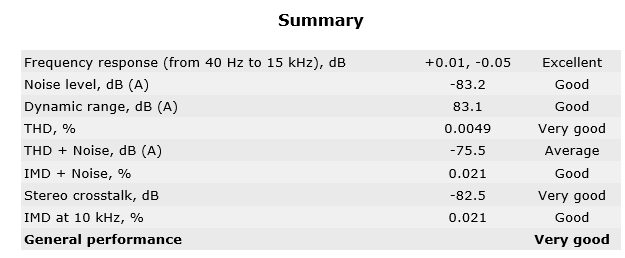
Audio Performance
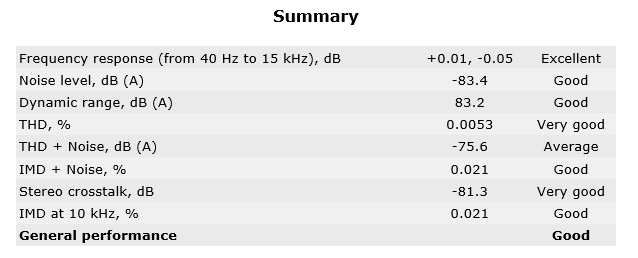
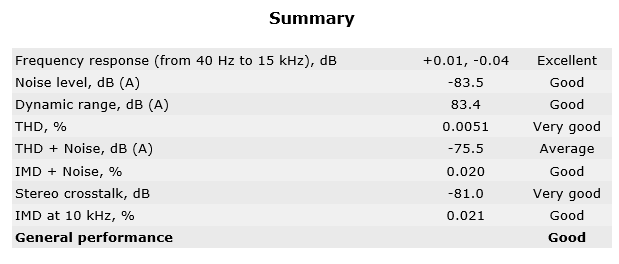
The Gigabyte Z170X-Ultra Gaming’s audio solution performs brilliantly at the 16-Bit 44KHz bit-rate. As you can see, the frequency response is impressive while the THD % and Stereo crosstalk are more than respectable. When utilising higher bit-rates, the performance curtails off slightly which brings the overall rating down to “Good”. Despite this, the motherboard’s audio is decent enough for most users and upholds a high level of clarity. Although, it’s disappointing to see a lower-end codec used on a motherboard costing over £140.
16 Bit, 44KHz (DVD Quality)
16 Bit, 96KHz (Studio Quality)
24 Bit, 96KHz (Studio Quality)
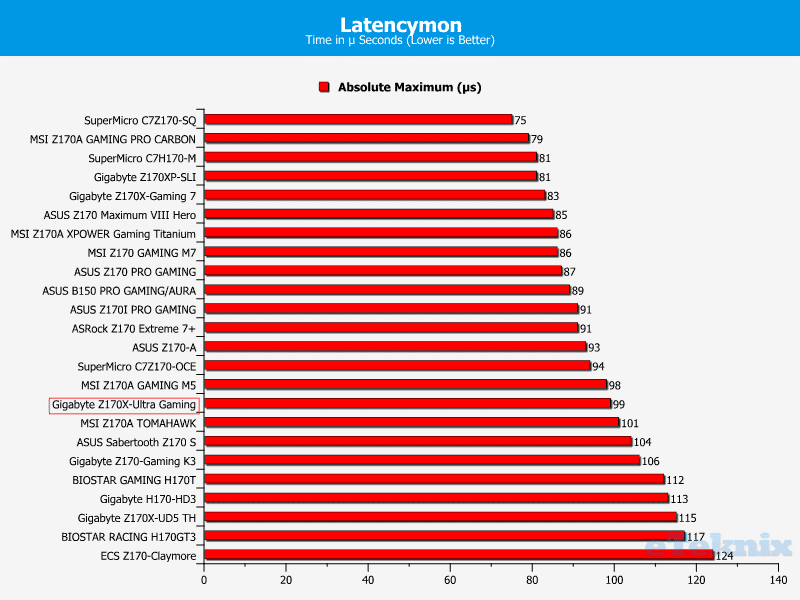
DPC Audio Latency Analyser
In terms of audio latency, the motherboard fares pretty well and shouldn’t encounter any problems in this department.
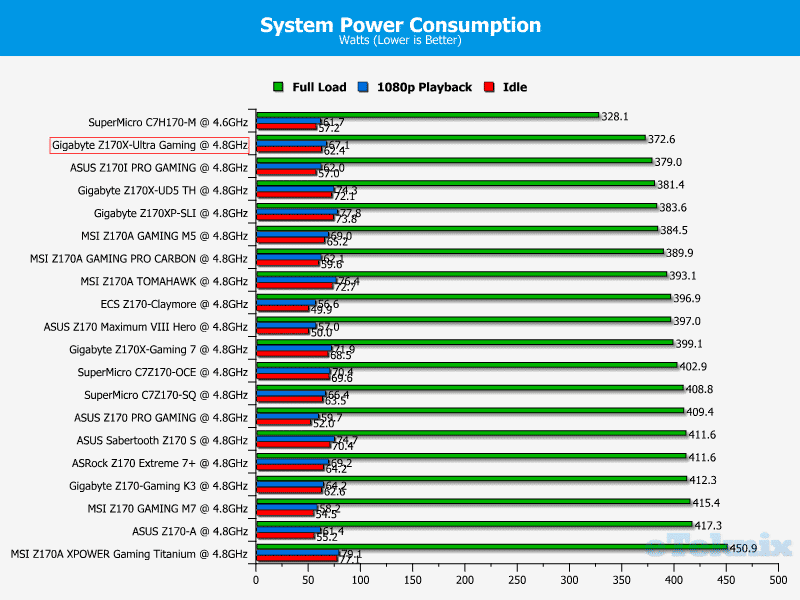
Power Consumption
At stock settings, the motherboard’s total system power draw remains under 360-watts which is a decent mid-table result.
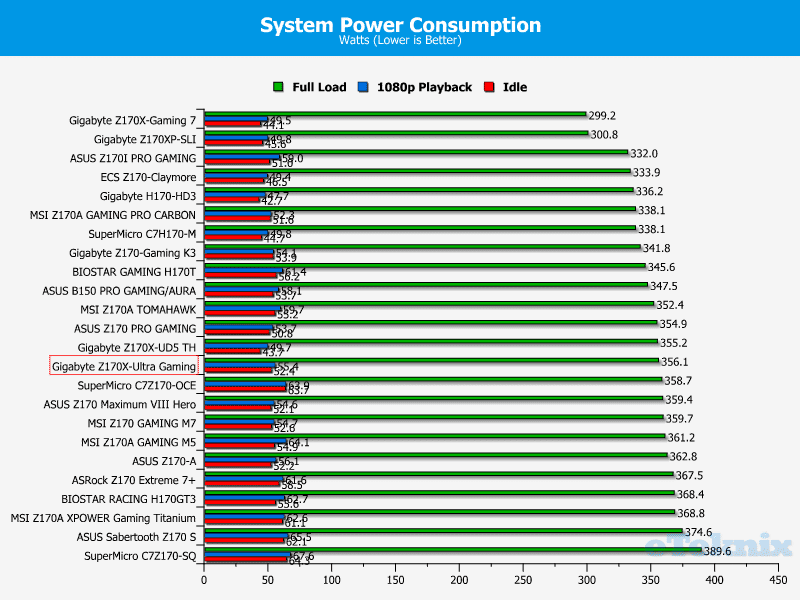
Once overclocked, the power consumption only increases by a small degree and it’s the lowest figure on record for a motherboard running the i7-6700K at 4.8GHz.
Final Thoughts
Pricing
Currently, the Gigabyte Z170X-Ultra Gaming is available from the respected retailer Box.co.uk for £145.99 including delivery. Around this price point, there’s a lot of competition from models like the ASUS Z170 PRO GAMING/AURA costing £158.99 and the MSI Z170A Gaming M5 with a retail price of £151.99. Overall, the motherboard is competitively priced and has loads of connectivity options to suit even the most demanding usage scenarios.
Overview
Intel’s Z170 chipset has matured since its initial unveiling and provides a great upgrade path for consumers using older motherboards due to the support for high frequency, low voltage DDR4 memory. While the i7-6700K is overpriced in the UK, the performance continues to impress and it’s tricky to find sealed versions of the i7-4970K for a cheaper price. Therefore, Skylake seems to be the best option and there’s a massive catalogue of motherboards to choose from. One could argue that the Z170 motherboard market is over saturated and releasing additional models won’t make a huge impact as many enthusiasts are awaiting news of AMD’s Zen architecture. While this theory has some merit to it and motherboard companies appear to be slowing down their release schedule, it’s always welcome to see new models with an excellent list of premium features.
The Gigabyte Z170X-Ultra Gaming is an impressive specimen and utilises the highest grade of components. For example, the CPU socket is 15u gold-plated to prevent corrosion or bad contact points and the 8-phase power delivery is more than ample to cope with an i7-6700K running at high voltages. Not only that, the motherboard opts for anti-sulfur resistors, anti-rust rear I/O connectors and 10K rated capacitors. These combine to offer exceptional reliability.
Sadly, the motherboard isn’t suitable for LN2 overclocking due to the lack of voltage points, onboard buttons and a debug LED. Even if you’re not overclocking, the buttons are useful to test hardware before assembling your new PC in a chassis. Additionally, I rely on the post read-out to analyse boot problems and hardware malfunctions. Honestly, these elements should be included given the motherboard’s price point and I’m not entirely sure why they were omitted. Perhaps it was to create a more minimalist appearance. Whatever the case, professional overclocking is a niche outlet and the motherboard doesn’t focus on this target demographic.
Speaking of overclocking, I was able to reach 4.8GHz without any hassle while employing a very respectable 1.452v. This is significantly less than many previously reviewed motherboards which required around 1.475v to remain stable under load. To be perfectly clear, I haven’t assessed anything on the Z170 platform for some time so it could be an evolution of the chip or strong voltage regulation on the motherboard itself.
The motherboard’s audio solution is passable and based on the ALC892 Realtek codec. Ideally, I would have liked to see the ALC1150 codec which from my testing, tends to fare much better at higher bit-rates. Not only that, the audio circuitry doesn’t have any headphone amplifier or replaceable Op-Amps. In the grand scheme of things, it’s not a huge issue and the audio quality is good enough for most users. There’s still an isolated PCB, EMI shield and Japanese capacitors. However, I expected more given the price point.
On a more positive note, the Gigabyte Z170X-Gaming Ultra accommodates a huge array of storage technologies including U.2, M.2, SATA Express, SATA and Thunderbolt 3. The motherboard has received Thunderbolt 3 certification which is a huge plus and fairly unexpected on a product costing £145. This allows the end-user to daisy chain multiple displays, use high-resolution monitors at 60Hz and attach dedicated graphics card enclosures although this is less useful on the desktop. Another superb feature is the 100W USB 3.1 Type-C charging which powers devices extremely quickly providing they support Power Delivery 2.0. Additionally, the motherboard can take advantage of triple NVMe SSDs in an RAID0 configuration using an M.2 to U.2 converter. On the other hand, this is only possible with the Intel 750 Series for the current time. Nevertheless, it’s great to see such a wide range of support for different sized M.2 drives and other NVMe storage.
If you’re considering a custom water cooling loop, then the Gigabyte Z170X-Gaming Ultra has you covered and includes two hybrid fan headers with precise PWM control. The end-user can either attach a water pump or fans to these headers and control them via PWM as well as DC.
The motherboard’s BIOS has been overhauled and is a vast improvement due to the slick, stylish user-interface. It’s not just style over substance either and navigating around the BIOS is a quick and painless process. Despite being really simple, the BIOS contains an assortment of tweaks for advanced users through sub-menus. This prevents the kind of user who requires a basic multiplier overclock from being overwhelmed by too many variables. The BIOS outlines all the key information in a clear manner and includes a fan tuning utility which adjusts the RPM values based on recorded thermal loads. Also, the BIOS update process is quick and can be accessed within the main BIOS.
Aesthetically speaking, the motherboard’s neutral black and silver colour scheme is sublime and I adore the understated theme. This fusion of colours works incredibly well and evokes a luxury feel. In particular, the brushed matte black paint work on the heatsinks is wonderful and I’m also quite fond of the I/O cover. Saying that, the imposing G1 branding doesn’t appear to match the subtle styling and the lettering probably could have been more subdued. However, this is only a personal viewpoint and your opinion may differ.
To cater towards those who prefer spectacular lighting, Gigabyte has incorporated LEDs around the motherboard. These span across the PCB’s edge, PCI-E slots, DIMM slots and power delivery. While the lighting is extremely vivid, it can only output a single colour. The lack of RGB is disappointing as the red LEDs might clash with a particular colour scheme. Therefore, why create such a neutral design if you’re going to embed lighting with only one colour? It’s not a huge problem because you can turn the LEDs off completely and the red and black theme is very popular among the gaming audience.
In terms of performance, the motherboard offers stellar results and often hovers around the top positions. As previously mentioned, the memory bandwidth and latency are mind blowing and a major selling point for this product. Additionally, the Cinebench scores were marvellous when running the CPU at stock and 4.8GHz. Although the SiSoft Sandra Arithmetic data was puzzling and didn’t follow this trend. On another note, the storage results remained extremely high, especially when analysing the SATA interface. The networking figures were consistent and the CPU usage hit an average value of 3%.
Pros
- 100W USB Type-C charging
- Comprehensive software suite
- Dual BIOS
- Excellent SATA read/write speeds
- Includes world’s first USB-IF USB 3.1 certified controller
- Low overclocked power consumption
- Premium 8-phase power design
- Sophisticated, neutral appearance
- Stainless steel PCI-E shielding
- Stupendous memory performance
- Supports 3-way NVMe RAID0 with a converter
- Thunderbolt 3 certified
- Ultra Durable components
- Vibrant LEDs
Cons
- Audio based on ALC892 instead of ALC1150 codec
- Lighting can only be displayed in red
- No integrated power button or debug LED
“The Gigabyte Z170X-Ultra Gaming is really affordable given the Thunderbolt 3 certification and 100W USB 3.1 Type-C charging power. While the audio solution is lacking somewhat, the motherboard’s Ultra Durable components and exceptional storage performance more than makes up for it.”

Gigabyte Z170X-Ultra Gaming (LGA1151) Motherboard Review
Thank you Gigabyte for providing us with this sample.


