SuperMicro C7H170-M (LGA 1151) Motherboard Review
John Williamson / 8 years ago
Introduction
SuperMicro might not be the most recognizable name among enthusiasts with the likes of MSI, ASUS, Gigabyte and other household brands being the logical choice for consumers. However, their pedigree is unparalleled when it comes to stability and creating the best server solutions available today. As a result, I’m always overjoyed to test any SuperMicro motherboard and see this level of expertise move into other markets. Slowly but surely, SuperMicro appears to be targeting the gaming audience and releasing visually appealing products with an impressive range of features.
Approximately two months ago, we reviewed the SuperMicro C7Z170-SQ and felt it offered excellent overclocking functionality for extreme usage scenarios. In contrast to this, today’s review sample is built on the H170 chipset which theoretically disables any chance of frequency boosts. However, recent evidence shows that BCLK overclocking can be attained on non-K series CPUs and H170 motherboards via a BIOS update. The C7H170-M has been proven to allow for BCLK adjustments and huge overclocking headroom using high-end cooling apparatus. Clearly, we’re not going to change our testing CPU to keep the results fair. Although, I’m fascinated to see the maximum frequency on a H170 motherboard and see how close it gets to traditional multiplier overclocks.
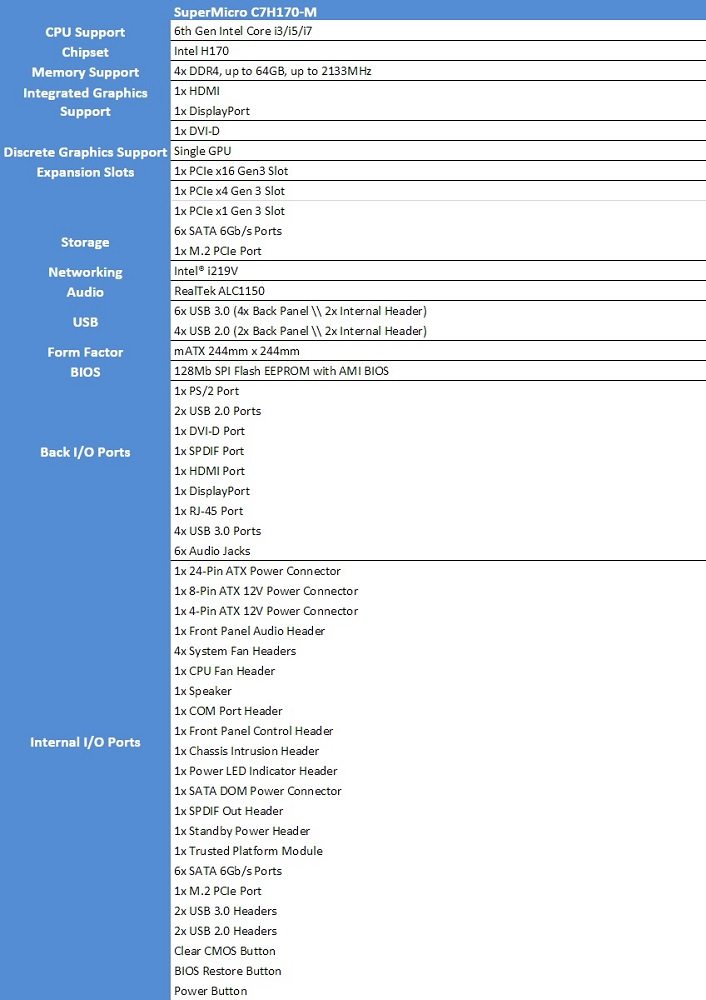
Specifications
Packing and Accessories
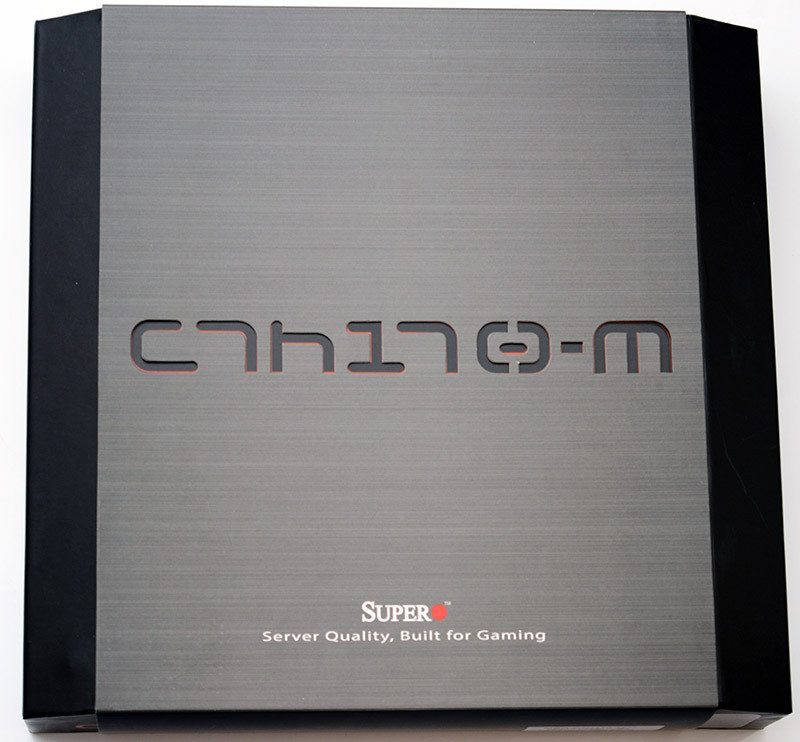
The SuperMicro C7H170-M comes in a gorgeous box which evokes a sense of luxury. Its design is simplistic while being extremely unusual and looks stylish. I’m incredibly fond of bold cut-out for the lettering which makes this particular product stand out.
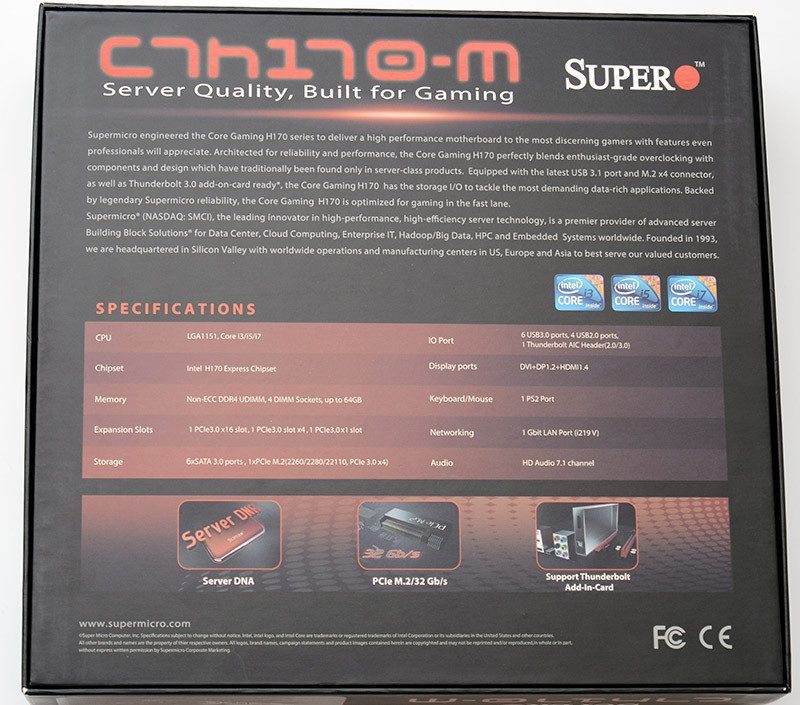
On the rear, there is a detailed overview about the motherboard and its core specification.
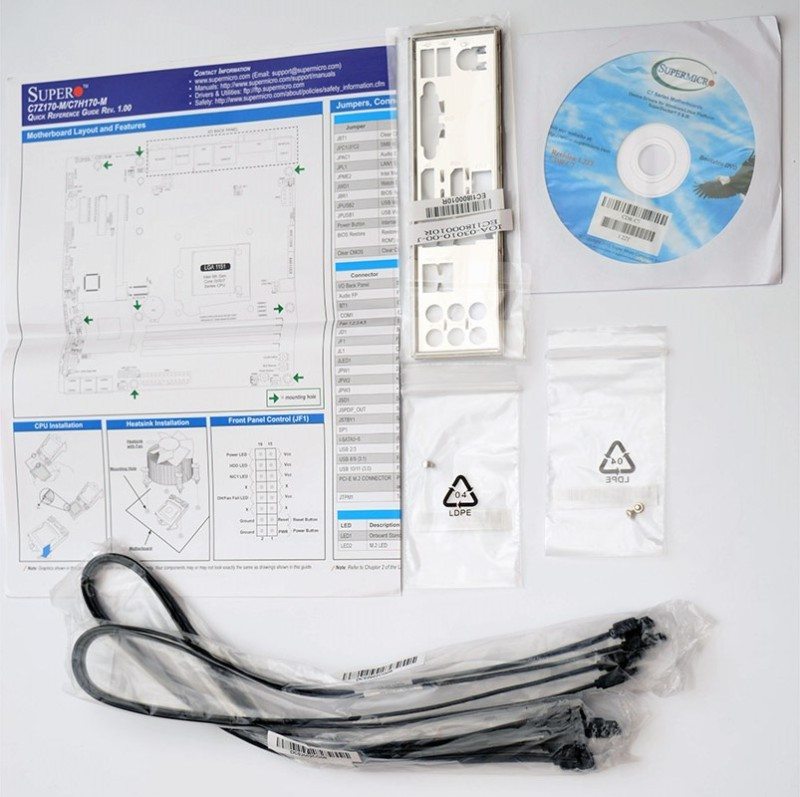
The package is quite barebones and comes with a layout diagram, I/O shield, driver disk, M.2 screws and server-style SATA cables. Please note, the included technical sheet also helps with the rudimentary installation procedure. Although, it’s much less detailed than other vendors. Nevertheless, this shouldn’t pose a major problem, and I don’t expect the type of customer purchasing a SuperMicro product to have limited experience in system building.
A Closer Look
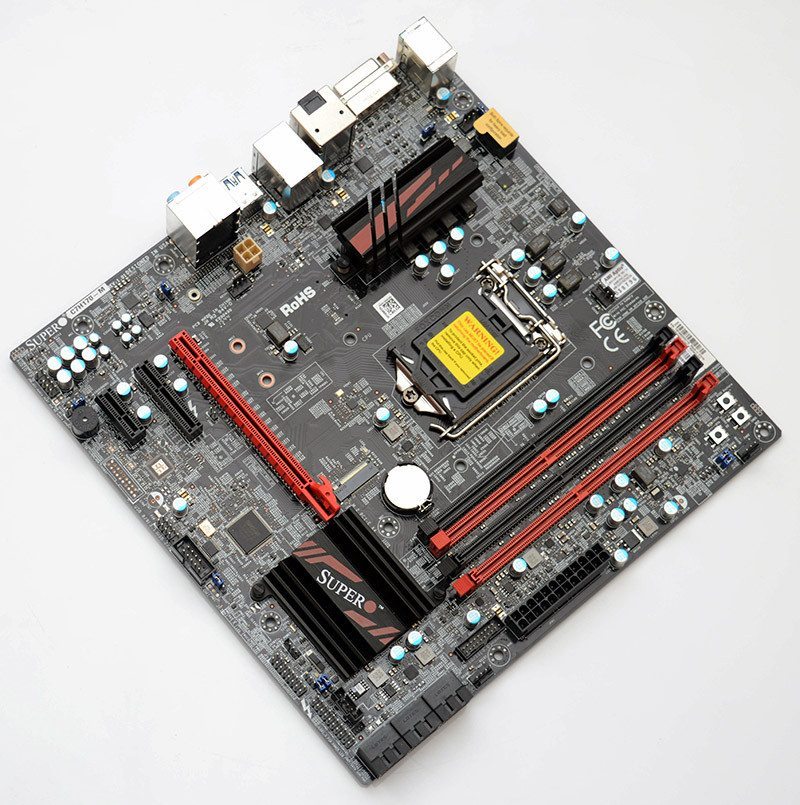
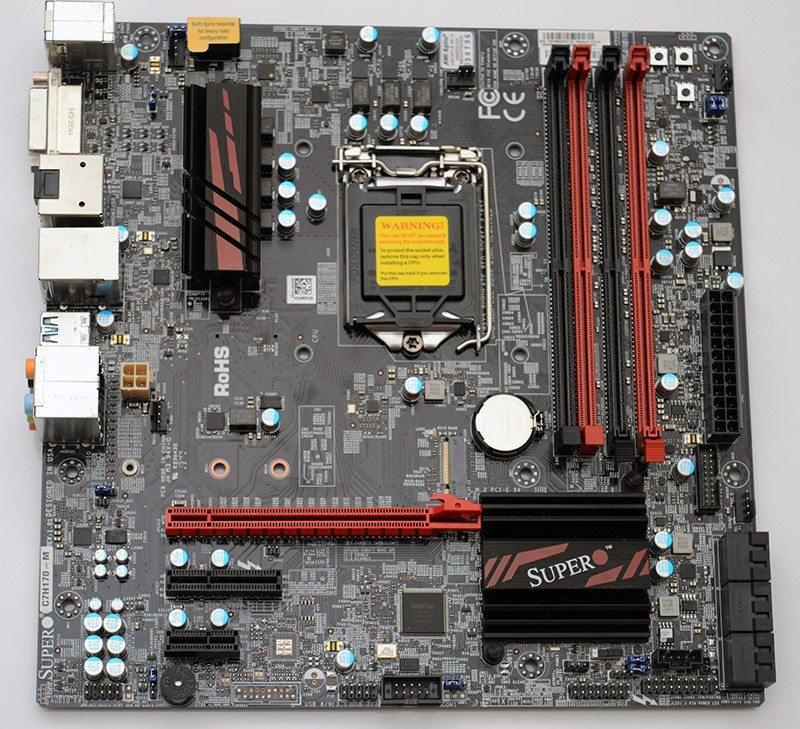
The motherboard adopts a mATX form factor which makes it a suitable choice for compact gaming builds. Aesthetically, the red and black colour scheme suits a traditional gaming setup and should maximize the motherboard’s appeal in this market. Personally, I wish more motherboard companies would move away from this overdone theme and try to create something more inventive. On the other hand, the heatsink design is sophisticated and relies on subtle branding instead of gimmicky LEDs. Overall, the motherboard layout is very clean and relatively easy to work around.
Here we can see the 4 DIMM slots supporting up to 64GB of DDR4 memory. Please note, the H170 chipset only allows for a maximum memory speed of 2133MHz compared to the huge frequency potential on Z170. Typically, H170 motherboards are compatible with kits exceeding 2133MHz and limit the memory speed to the chipset’s maximum capabilities. I did encounter some problems in this area, so I wouldn’t recommend paring this motherboard with anything but 2133MHz DIMMs. Although, this could easily be fixed in a BIOS update and it seems pointless to purchase memory speeds which the chipset is incapable of utilizing.
The 24-pin power connector is housed in its ideal position just next to a USB 3.0 header. Personally, I’d like to see this header closer to the PCB’s edge to improve cable management. This isn’t going to cause any problems though and just a small recommendation for the future.

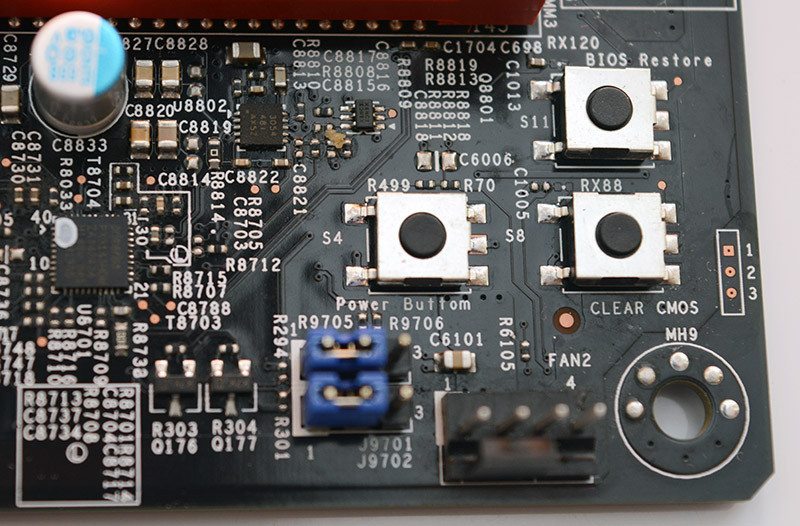
A closer up image of this section shows three incredibly useful buttons; the BIOS Restore, Clear CMOS and Power Button. Even though it wasn’t necessary during the review, the BIOS Restore offers peace of mind when flashing the BIOS. The Clear CMOS feature is so important when working with any overclock and having a manual button makes it so much easier than relying on a jumper. It’s ideally placed for using on a test bench, but quite difficult to reach in a large chassis. The Power Button is a godsend for someone like me who changes motherboards on a regular basis and wants quickly perform stability tests without plugging in the front panel headers.
SuperMicro integrated a Realtek ALC1150 codec and premium audio circuitry. This isn’t the best on-board solution I’ve seen but it should be more than good enough for the typical consumer.
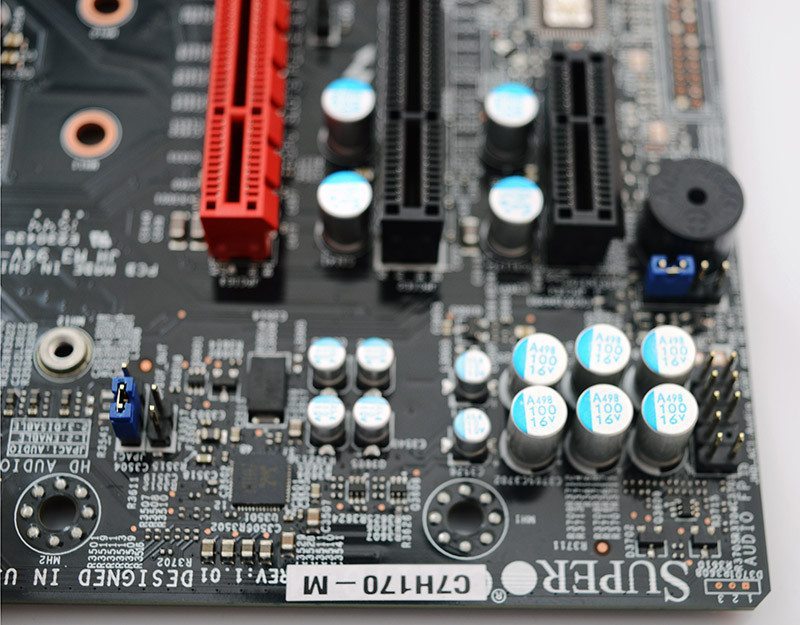
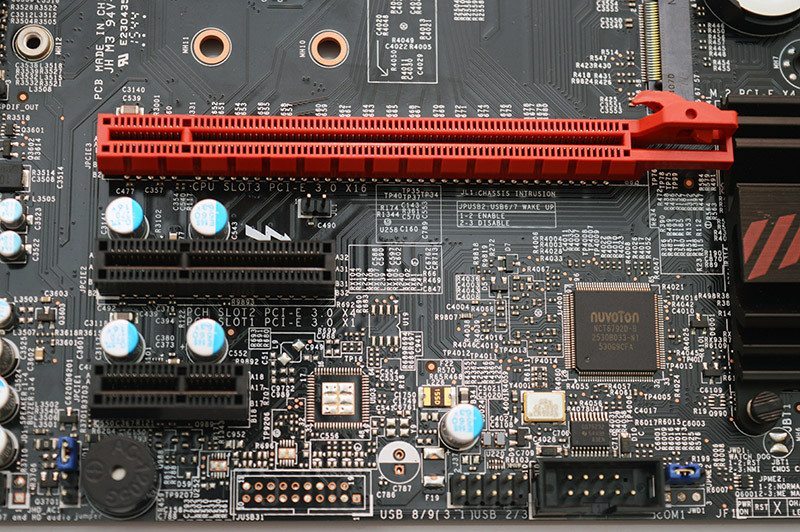
Here is the PCI-E layout which includes a x16, x4 and x1 slot. Just above the main PCI-E graphics slot is a Turbo M.2 connector supporting 32Gb/s. As a result, you can attach ridiculously fast M.2 SSDs and maximize their potential. Towards the bottom, there is the usual array of connectors and a hefty speaker. This helps to diagnose problems and provides information to the end-user. Sadly, there’s no documentation whatsoever explaining what each beep sequence means. SuperMicro really needs to do this or they might become inundated with questions about booting issues.
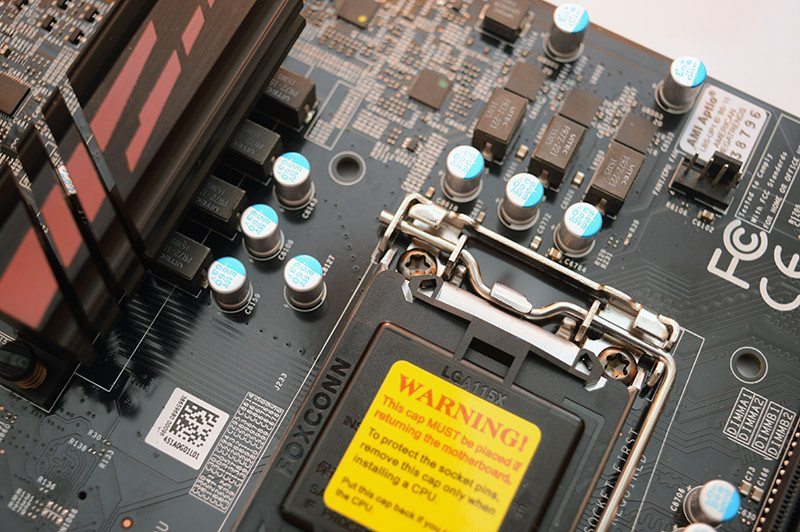
The motherboard’s power delivery comes via server grade Vitec PR72-221 inductors capable of supporting the system in extreme overclocking circumstances. Furthermore, the phases have an operating thermal threshold between -40C to 125C and an a maximum range of 2MHz.
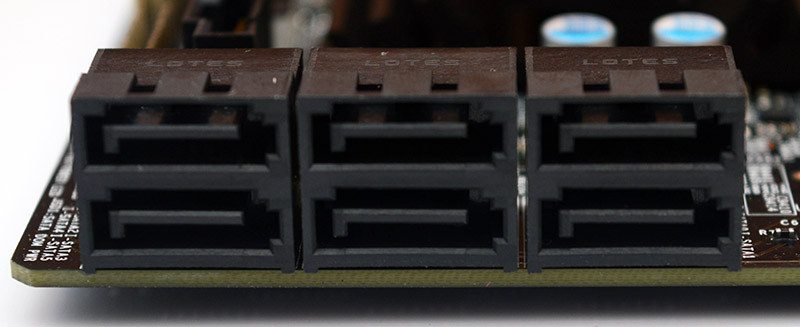
From this image, we can see the PCB’s thickness and six SATA 3 connectors. I’m a little disappointed by the lack of SATA Express, but then again it’s not a format I’ve used very often.
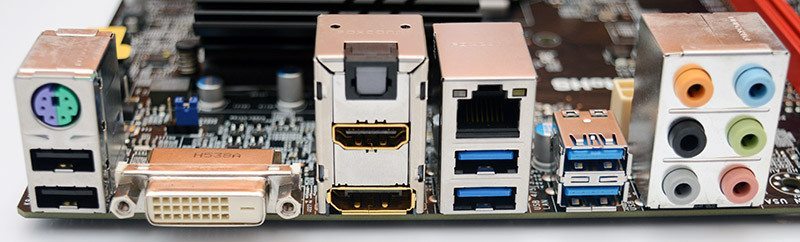
The Rear I/O includes a PS/2 port, two USB 2.0, DVI-D, SPDIF, HDMI, DisplayPort, Ethernet connector, four USB 3.0 and 6-channel audio.
Testing & Methodology
Before we delve into any testing we would like to take this opportunity to review our test system. All tests are conducted three times and the average taken to use in our charts.
Hardware
- Motherboard varies by review
- CPU: Intel Core i7 6700k
- GPU: NVIDIA GTX 980Ti
- RAM: Crucial Elite 16GB (2x8GB) 2666MHz
- Cooling: Thermaltake Water 3.0 AIO with Gelid GC-Extreme
- Case: Lian Li T80 Test Bench
- Storage Drives: Main storage: Crucial MX200 250GB, Test Devices: SanDisk Extreme Pro 240GB SSD, Plextor 256GB M6e M.2 SSD and Patriot SuperSonic Magnum 256GB USB 3.0 Flash Drive
- PSU: be quiet! Dark Power Pro 11 850W
- Operating System: Windows 8.1 64-bit
- Networking: ASUS RT-AC68U router
Software
- SiSoft Sandra Engineer – available here
- WPrime – available here
- Cinebench – available here
- 3DMark – available here
- Bioshock Infinite – available here
- Tomb Raider – available here
- AIDA 64 Engineer – available here
- Latencymon – available here
- Rightmark Audio Analyser – available here
- LAN Speed Test Lite – available here
- Passmark – available here
Memory
For our memory tests, we use the built-in memory benchmarks in AIDA64 Engineer and SiSoft Sandra. For more details on each of the benchmarks please see here and here respectively.
Storage
To test the storage performance in our motherboard reviews we use AIDA’s Disk Benchmark utility built into their AIDA64 Engineer Edition software package and run linear read and write tests. We run each of the benchmark tests on a SATA III, USB 3.0 and M.2 device. For SATA III testing we use a SanDisk Extreme Pro 240GB, for USB 3.0 testing we use the Supersonic Magnum 256 GB USB 3.0 flash drive and for M.2 testing we use Plextor’s 256GB M.2 M6e SSD. The drives are always formatted before use.
Networking
For our networking tests, we connect the test system up to our Intel Gigabit-enabled ASUS Rampage IV Extreme X79 motherboard test system through the ASUS RT-AC68U router and run our tests. We opted for this over a direct point-to-point connection because we wanted to simulate real-world performance. For our WiFi tests we do the same except we connect the test system to the ASUS RT-AC68U router via WiFi at a distance of 2 metres from the router. The testing software we use for these are LAN Speed Test Lite and Passmark, available here and here respectively.
Lan Speed Test
LAN Speed Test was designed from the ground up to be a simple but powerful tool for measuring file transfer, hard drive, USB Drive, and Local Area Network (LAN) speeds (wired & wireless). It does this by building a file in memory, then transfers it both ways (without effects of windows file caching) while keeping track of the time. Download the free Lan Speed Test Lite utility from here.
PassMark
The PassMark Advanced Network Test (which is part of PerformanceTest) is designed to test the data transfer rate between two computers both of which must be running PerformanceTest. One of the computers must act as the server and will sit waiting for a connection. The other computer acts as a client. It connects to the server machine and sends data to it for the duration of the test. You can download a trial version of PerformanceTest from here.
Power Usage
To measure power consumption we, use a “killawatt” meter and measure the total system power draw at the wall. We run three different use-case scenarios for 5 minutes and take the average reading.
RightMark Audio Analyser (RMAA)
RMAA suite is designed for testing quality of analog and digital paths of any audio device. The results are obtained by playing and recording test signals passed through the tested audio path by means of frequency analysis algorithms. A more common mark is also provided for those unfamiliar with measured technical parameters. Available here. We run the RMAA test using a 3.5mm to 3.5mm cable connecting the line out to the line in to test the quality of the motherboard audio codec not any external audio devices. We run the complete playback and recording test at default settings and then get RMAA to interpret the results giving the below outputs. We sync the playback and recording audio devices to the same setting as the test for accurate results.
DPC
DPC is a Windows tool that analyses the capabilities of a computer system to handle real-time data streams properly. It may help to find the cause for interruptions in real-time audio and video streams, also known as drop-outs. This software is available for download free here.
wPrime
wPrime is a leading multithreaded benchmark for x86 processors that tests your processor performance by calculating square roots with a recursive call of Newton’s method for estimating functions. wPrime is a free utility that is available for download here.
Cinebench R15
Cinebench is a widely respected benchmark for testing the performance of x86 CPUs. The program allows you to test single and multi-threaded performance as well as GPU performance by rendering with Open GL. Download here.
3D Mark
The new 3DMark includes everything you need to benchmark your hardware. With three all new tests you can bench everything from smartphones and tablets, to notebooks and home PCs, to the latest high-end, multi-GPU gaming desktops. Download here.
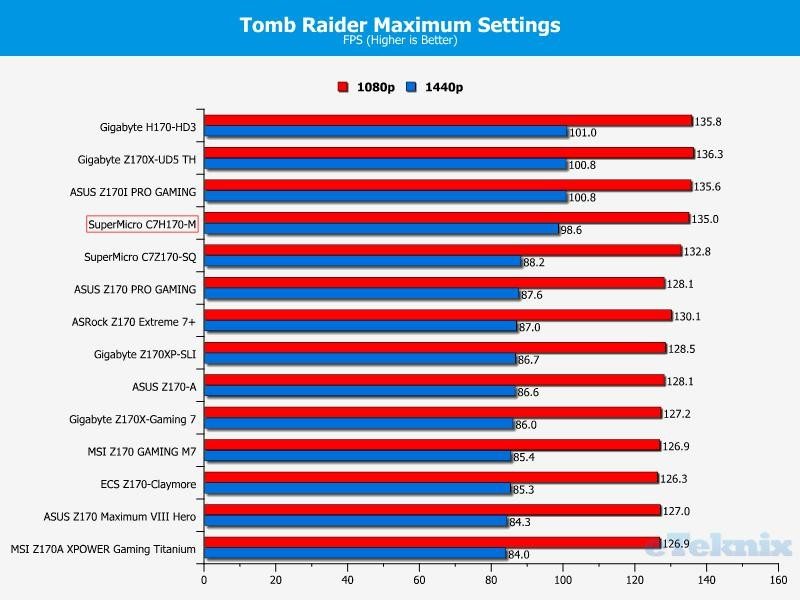
Tomb Raider
In Tomb Raider, the player is confronted with a much younger Lara Croft who is shipwrecked and finds herself stranded on a mysterious island rife with danger, both natural and human. Tomb Raider is a demanding game offering up ultra quality textures, full DirectX 11 support, SSAA, FXAA, MSAA and AMD TressFX technology.
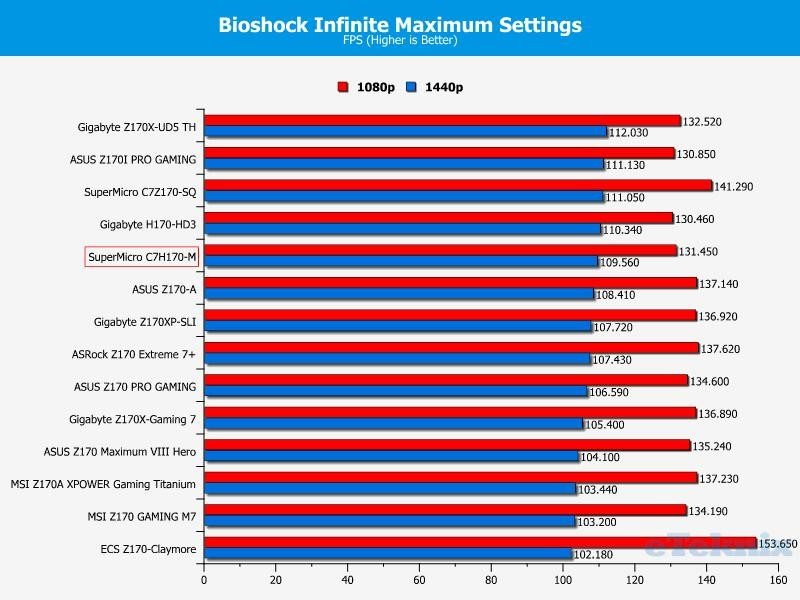
Bioshock
BioShock Infinite is the third and last game in the BioShock series. It is a first-person shooter video game developed by Irrational Games and published by 2K Games. BioShock Infinite supports dynamic shadows, post-processing, light shafts, ambient occlusion, object level of detail, Diffusion Depth of Detail, FOV adjustment controls and other advanced DirectX 11 features.
BIOS and Overclocking
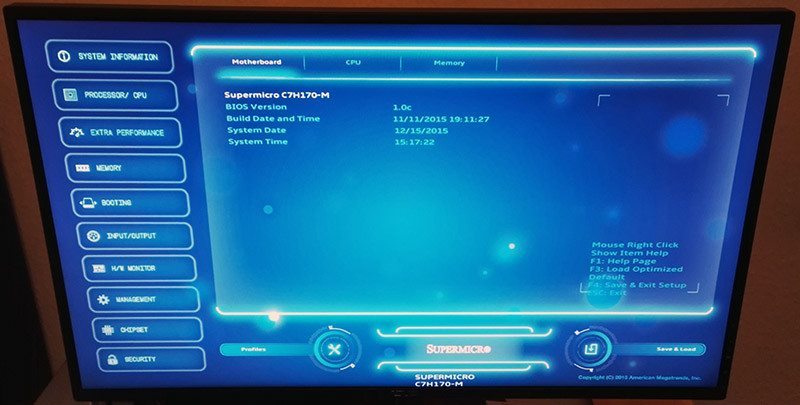
The C7H170-M’s BIOS is a nightmare show for review purposes as there’s no screen capture feature. Furthermore, the bright blue user-interface causes a huge amount of glare when trying to photograph. Unfortunately, this is the best I could manage even after trying to record the monitor from various angles. In comparison to other motherboard vendors, the SuperMicro BIOS isn’t user-friendly and doesn’t explain variables very clearly. It’s designed for users who feel comfortable around an in-depth BIOS screen and confident with many technical terms.
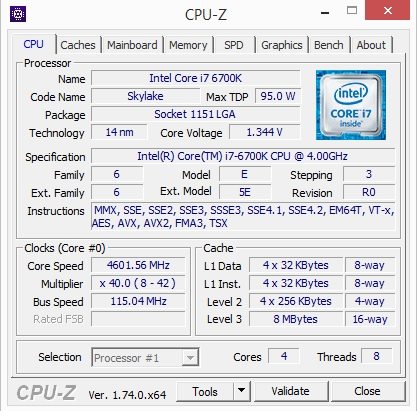
On the start page, there is a great deal of information about the BIOS version, CPU specification and memory frequency. This is useful if you’re unsure what the system values are at stock settings.
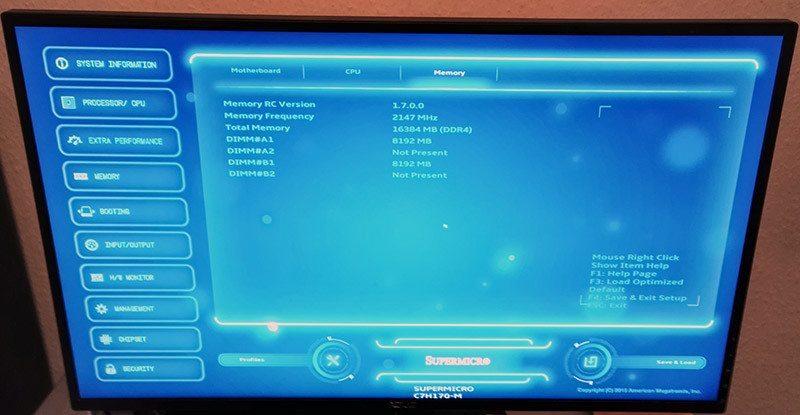
As previously mentioned, the memory tab outlines DIMM capacity, frequency and RC version.
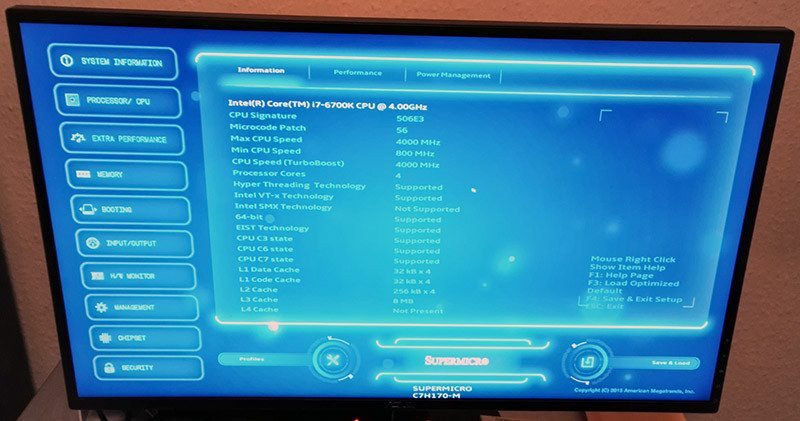
You can access a more in-depth run-down of the CPU if required and find out about its integrated power saving features.
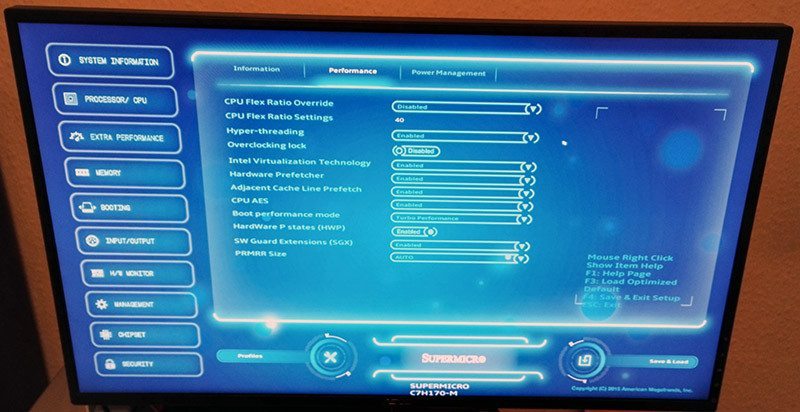
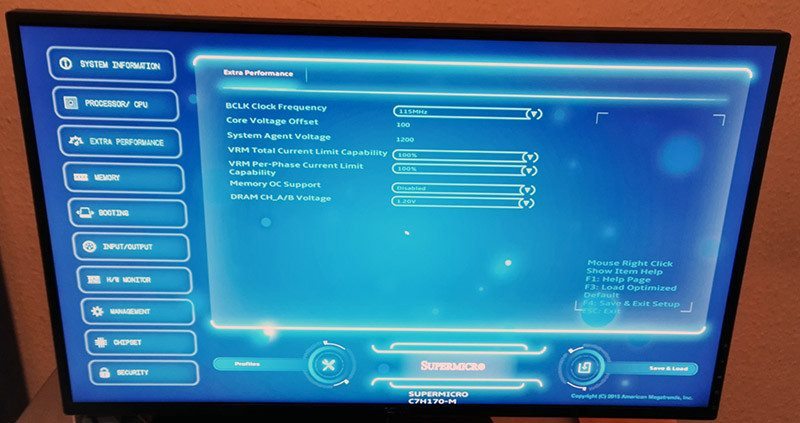
This section isn’t for the faint hearted and provides an impressive selection of tweaks for extreme system tuning. For example, you can force the CPU Flex Ratio to a manual figure and set an overclocking lock. I didn’t spend too much time analysing this area of the BIOS as the overclocking process and enhancements revolves around BCLK changes.
This is the most important tab when trying to overclock on Intel’s H170 platform. Here, you can set the BCLK in multiples of 5 and adjust the Core Voltage Offset to maintain stability. It might also be necessary to increase the System Agent Voltage. This all depends on a number of factors but with the right amount of patience, overclocking via the BIOS shouldn’t pose a problem.
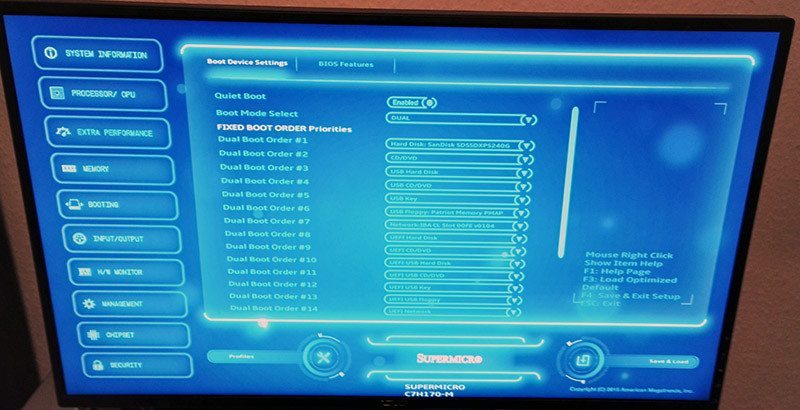
The Boot device tab is useful to organize the boot order of various disk drives. This is a fairly standard addition and works well.
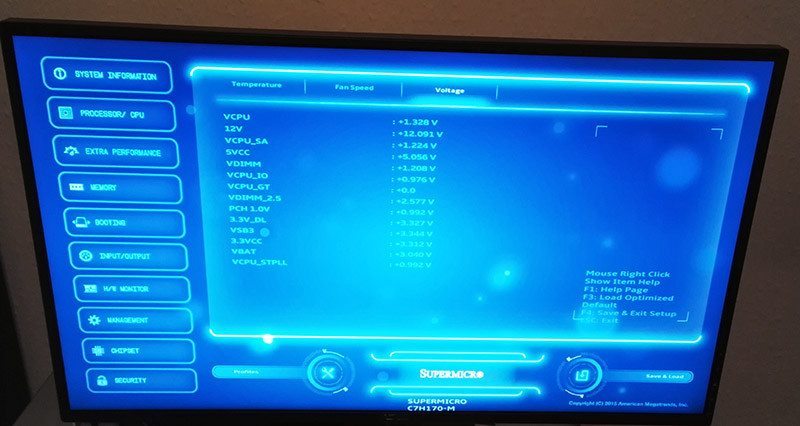
For the more advanced users, it’s possible to monitor system temperatures, fan speeds and individual voltage readouts. This overwhelming number of statistics will almost certainly baffle people who aren’t technically minded. On the other hand, the information helps experts to gauge system stability and find out the impact of a hefty overclock.
Considering the complexity of this BIOS, I’m pleased to see an encryption tool which only grants access with a secure password.

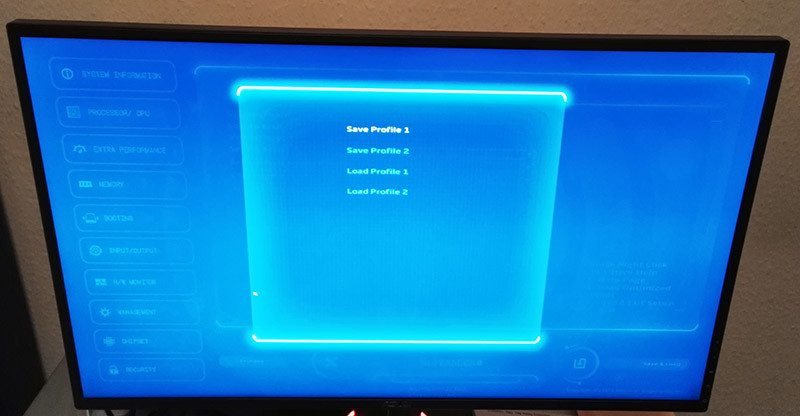
You can also load and save two profiles. Ideally, there should be more than two, especially when you take into account how the overclocking process is unofficial.
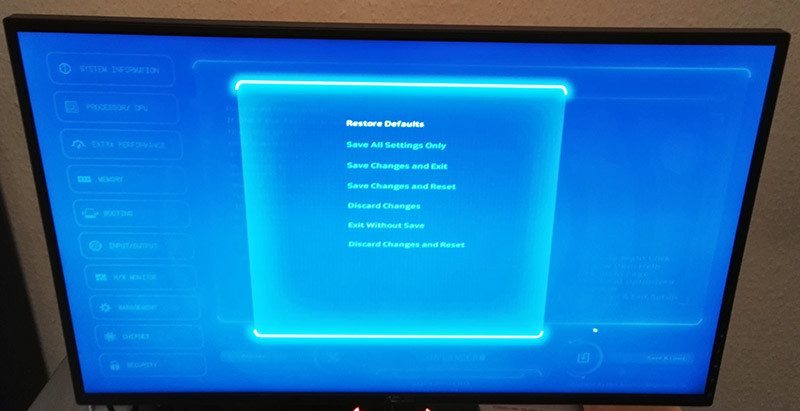
The final page is pretty self-explanatory and contains everything you need to restore the default setup or save manual alterations.
Overclocking
So here’s the moment of truth – contrary to Intel’s chipset limitations, I managed to attain 4.6GHz with a BCLK of 155MHz. Initially, I targeted 4.8GHz with a similar voltage reading to traditional multiplier overclocking. However, this wasn’t possible and despite my best efforts, I couldn’t get the system to post above a 115MHz strap. This was even with the voltage exceeding 1.512V. Once the CPU’s maximum potential was reached, I optimized the vcore back to 1.33V. This is a great result given the improved frequency and very respectable voltage reading.
CPU & GPU Performance
Cinebench
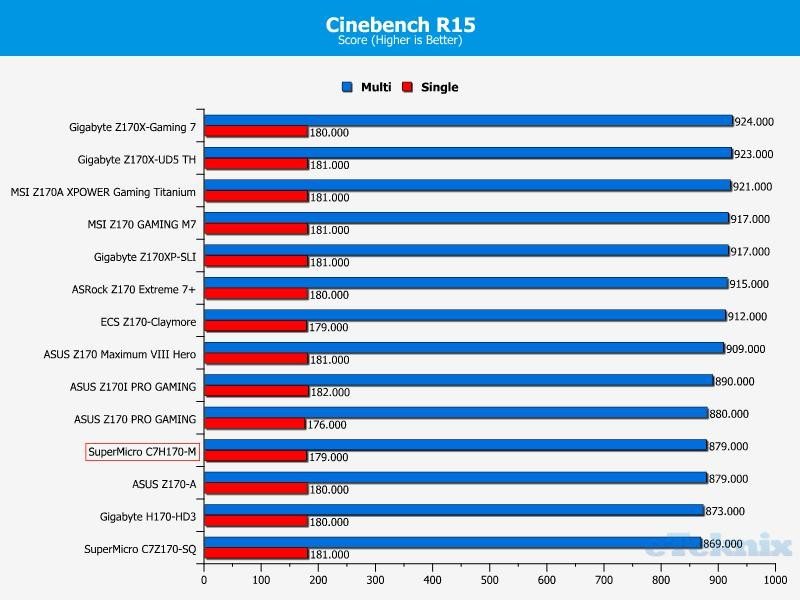
Before we analyse the results, it’s important to reiterate that the H170 motherboards at stock can only use 2133MHz while all the Z170 data was recorded with the memory’s XMP running at 2666MHz. Despite this, the CPU recorded a good score which competed rather well against Intel’s overclocking platform.
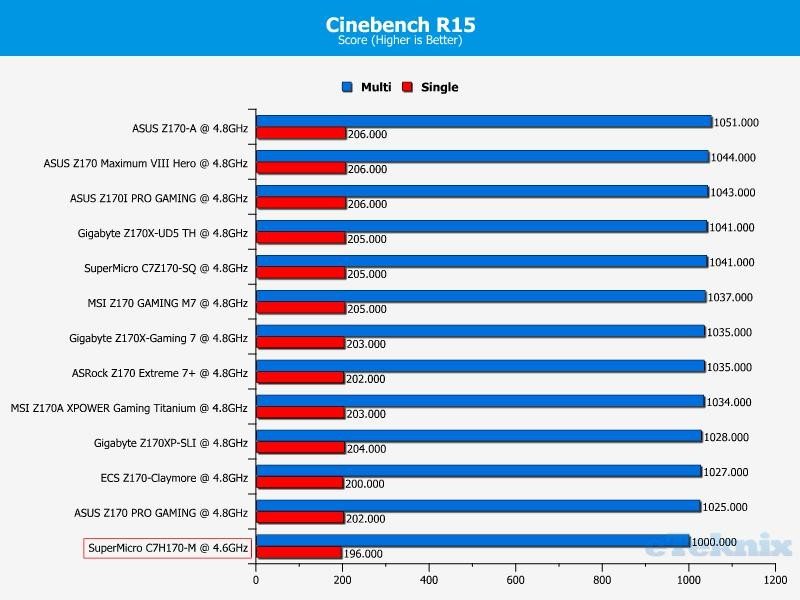
Once overclocked, the CPU isn’t too far away from the other motherboards despite its 200MHz deficit.
WPrime
In WPrime, the motherboard managed a good computational score and almost achieved a mid-table position.
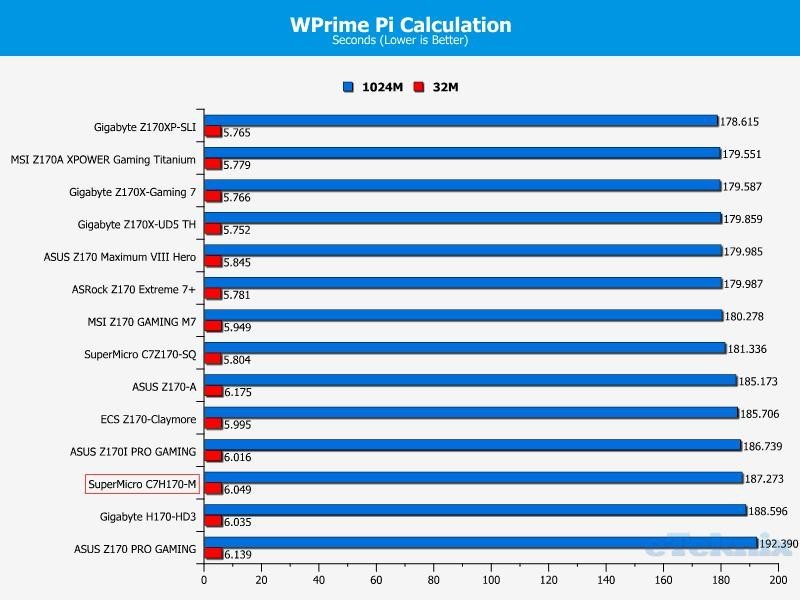
The gap widens somewhat when overclocked, but it’s much less than I anticipated due to the lower frequency. For a H170 motherboard, this is a fantastic score.

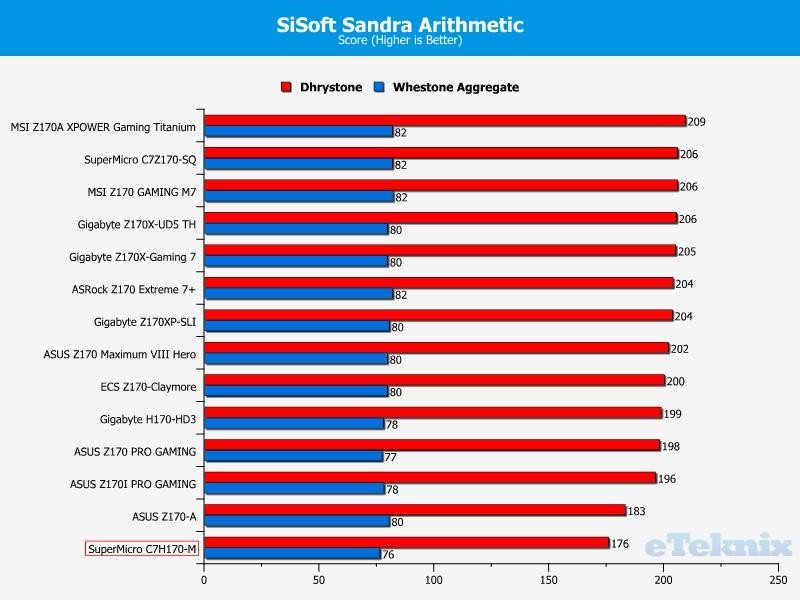
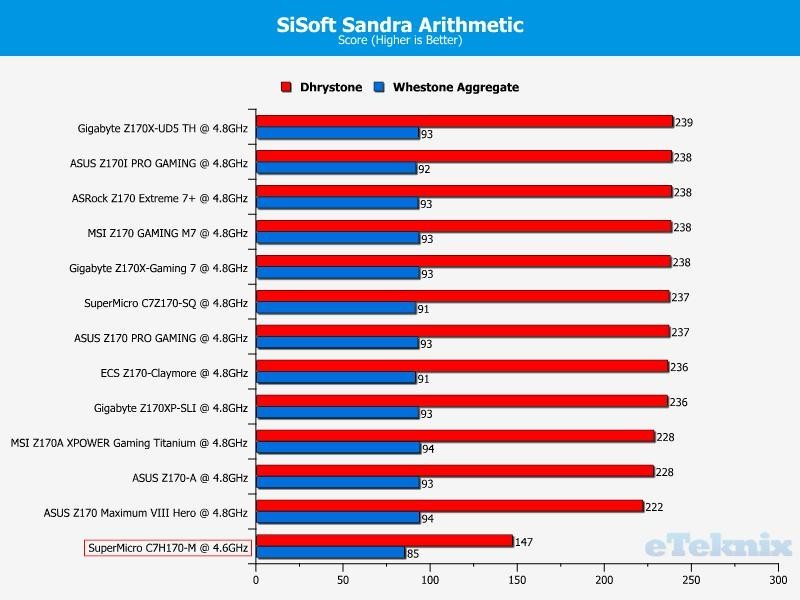
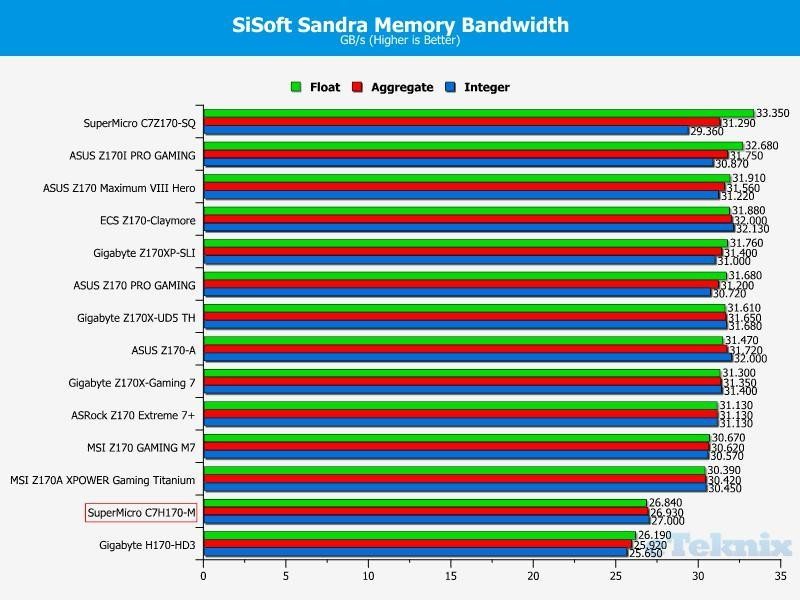
SiSoft Sandra
Unfortunately, the C7H170-M struggles during Dhrystone testing although the Whestone Aggregate score is closer to the kind of range I expected.
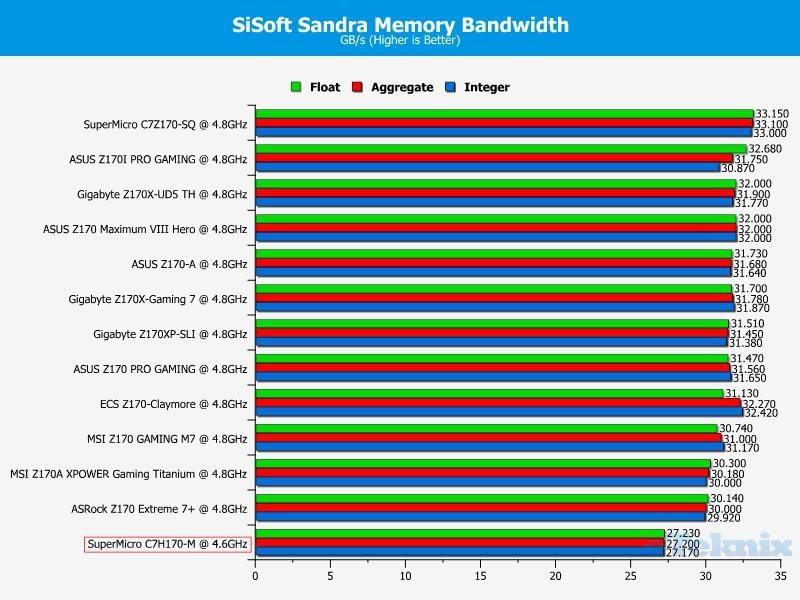
As the only overclocked H170 result, it’s clear that the motherboard cannot compete with products using Intel’s Z170 chipset. To confirm this, I ran the benchmark multiple times and didn’t notice a marked difference.
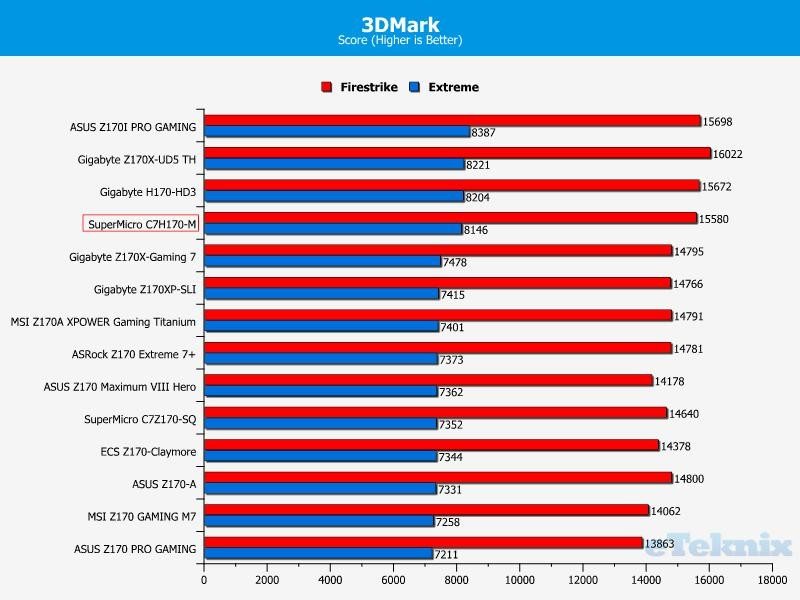
3DMark
3D results are predominately GPU bound and the differences here revolves around driver enhancements from NVIDIA. Saying that, it’s impressive to see a lower-end platform performing so well which exemplifies how unnecessary Z170 can be for the gaming audience.
Tomb Raider
At both 1080P and 1440P, the C7H170-M reported excellent figures.
Bioshock Infinite
Bioshock Infinite is becoming bizarre for benchmark purposes as driver changes appear to dramatically affect the results. Nevertheless, the performance is superb and within touching distance of first place.
Memory Performance
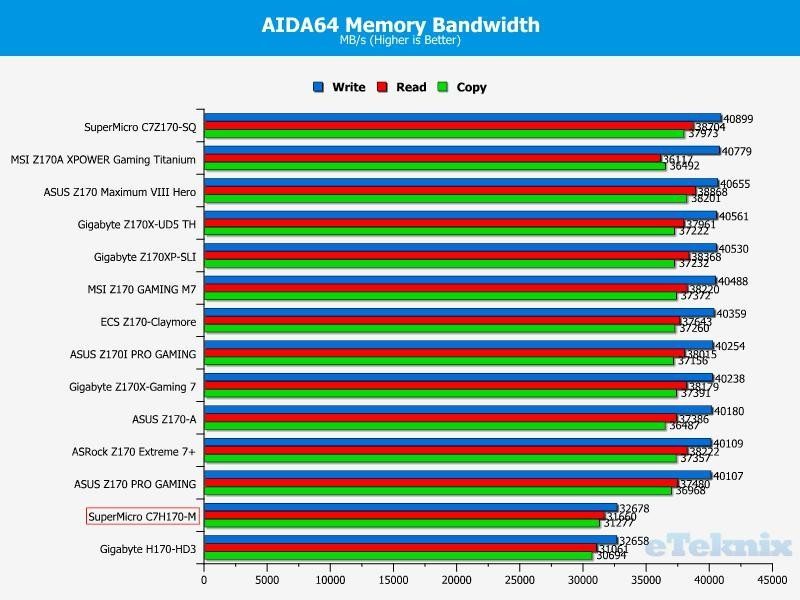
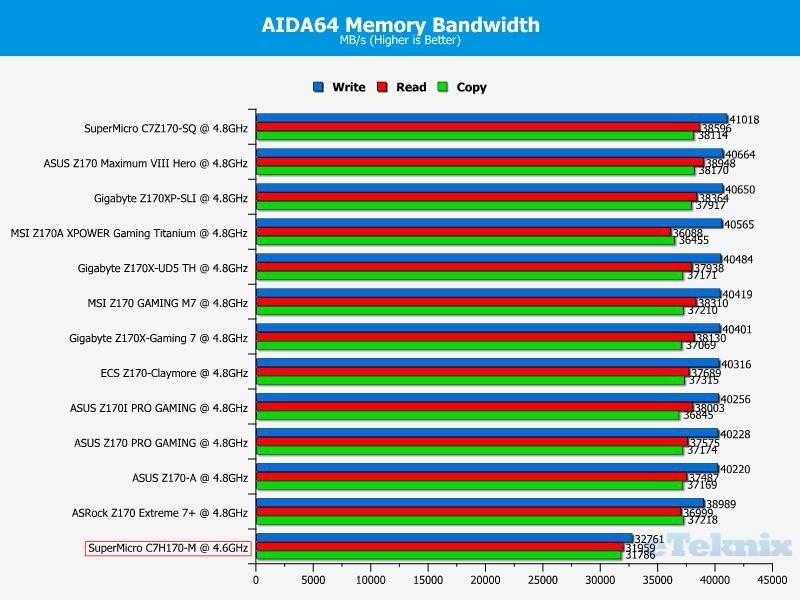
AIDA64 Engineer
The 2133MHz frequency lingers behind 2666MHz results, but we can see the SuperMicro motherboard surpass its closest H170-based rival.
After the overclock has been applied, there is a subtle improvement in memory bandwidth, and it’s unfair to compare this figure to higher frequencies on Z170.
SiSoft Sandra
A similar pattern occurs in Sandra, as the C7H170-M beats the Gigabyte H170-HD3. This is especially in the case during the Integer test.
The overclock improves memory bandwidth by a healthy margin and brings each benchmark result above 27GB/s.
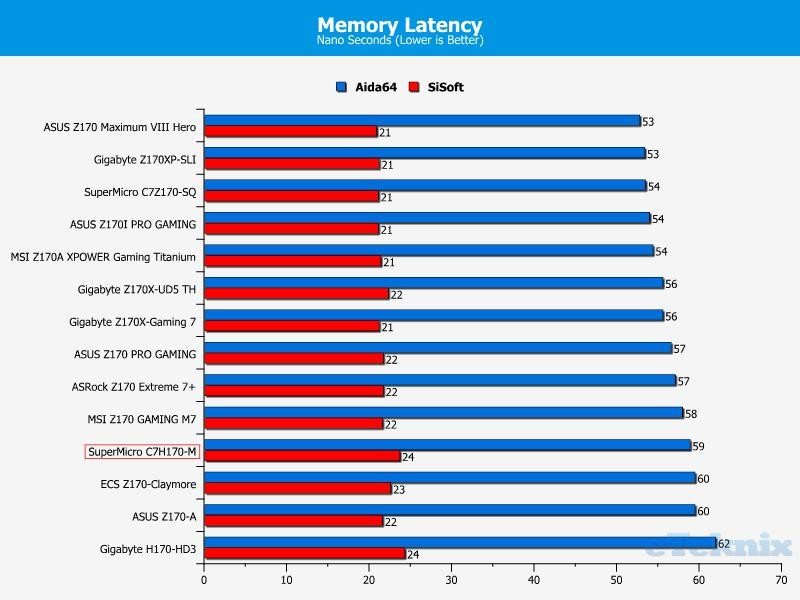
Combined Latency Test
On another note, the memory’s stock latency has some room for improvement although it’s significantly better than the only H170 alternative we’ve reviewed so far.
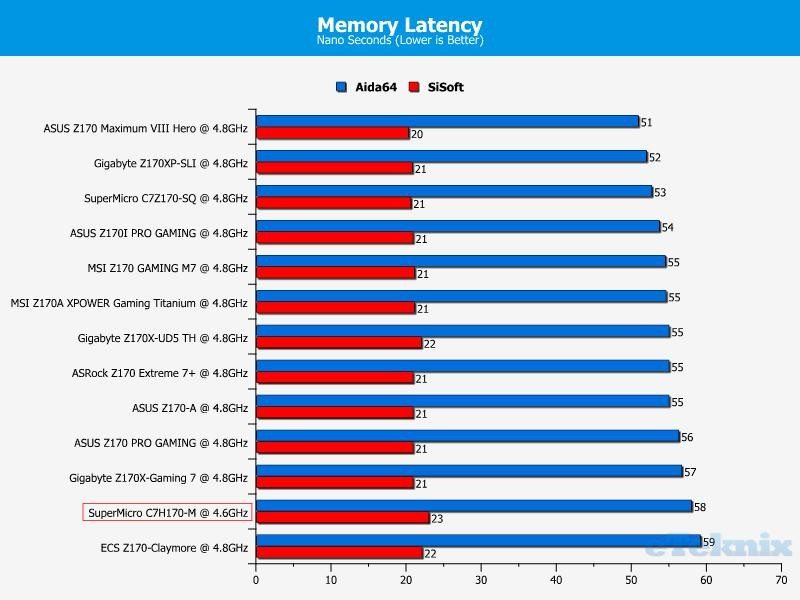
The overclocking process has a minimal effect in memory latency but this is a common occurrence.
Storage Performance
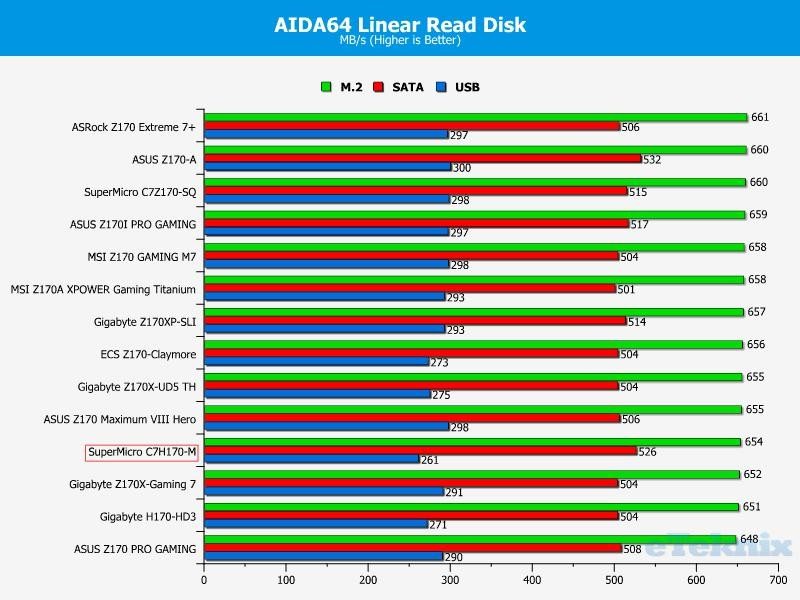
Linear Read
The linear read testing finished with extremely mixed results. For example, the SATA drive reported a marvellous read rate, while the USB and M.2 performance left me feeling disappointed.
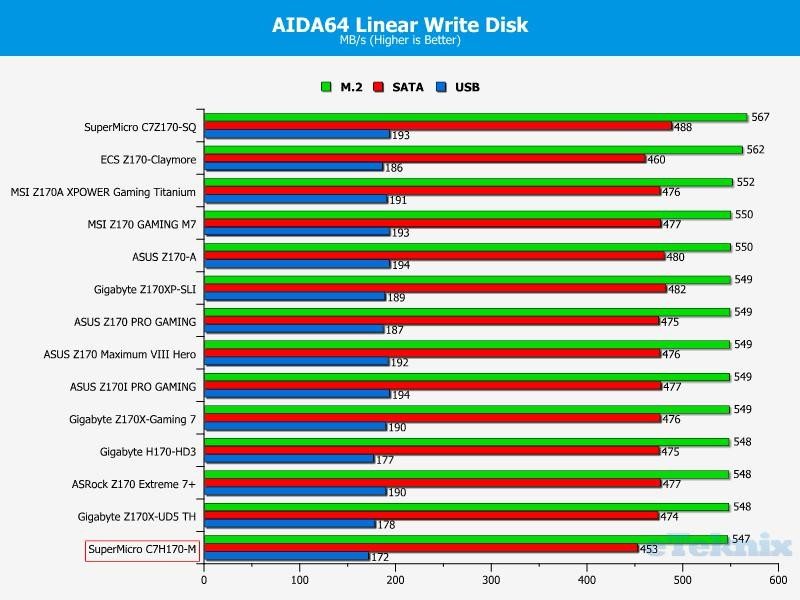
Linear Write
While the linear write benchmarks are most consistent, they all fall towards the lower end spectrum. It’s quite worrying how much of a gap there is between the SATA write rate on this motherboard and other results. Nevertheless, I doubt you’d be able to tell the difference in real-world scenarios.
Networking Performance
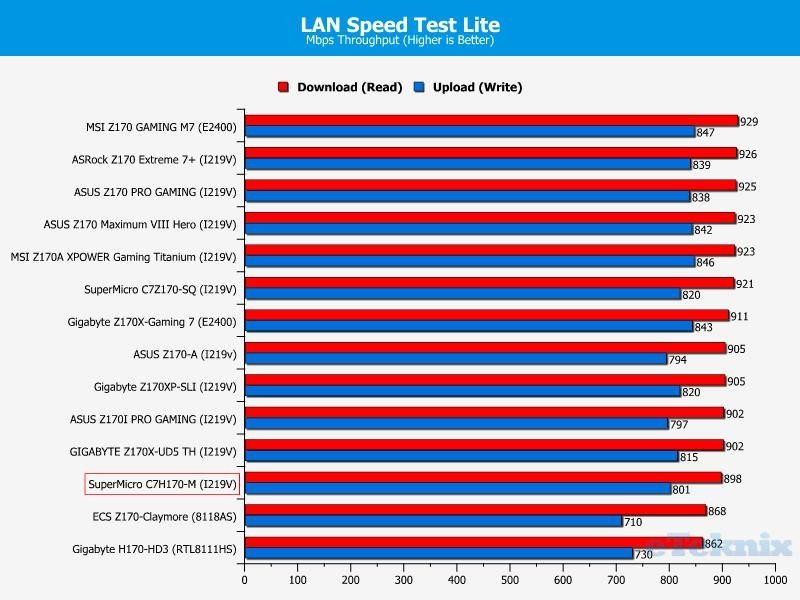
LAN Speed Test Lite
In terms of networking, the motherboard managed a good upload speed which beat the Gigabyte H170-HD3 by a significant amount. However, I would have preferred a more competitive download speed reaching over 900 Mbps.
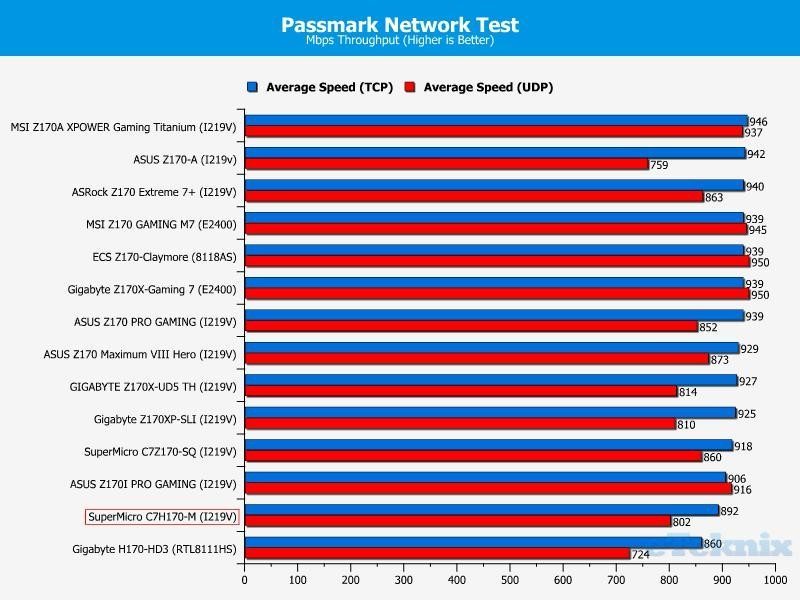
Passmark Performance Test 8 – Ethernet
This pattern also applies to Passmark, as the motherboard’s network chip has some room for improvement.
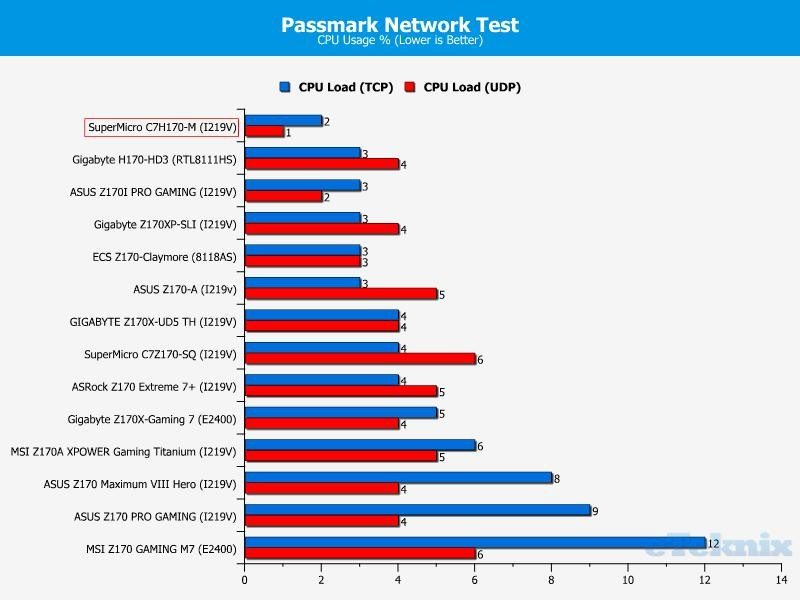
Passmark Performance Test 8 – CPU Work Load
The C7H170-M’s CPU load in networking tasks is phenomenal and extraordinarily difficult to beat.
Audio Performance
Given SuperMicro’s server roots, I didn’t really expect anything ground-breaking in the audio department. Honestly, I’m pleasantly surprised and the audio results across the board are impressive. That’s not to say they’re the best I’ve encountered as performance at 24 bit 96KHz could be enhanced slightly.
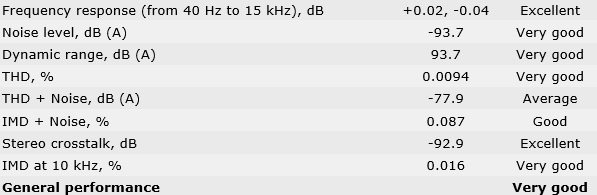
16 Bit, 44KHz (DVD Quality)
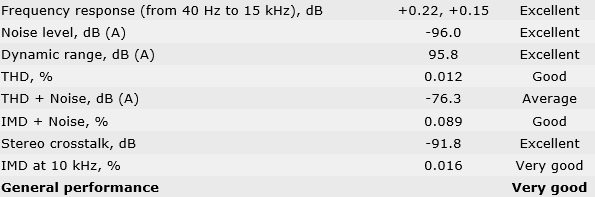
16 Bit, 96KHz (Studio Quality)
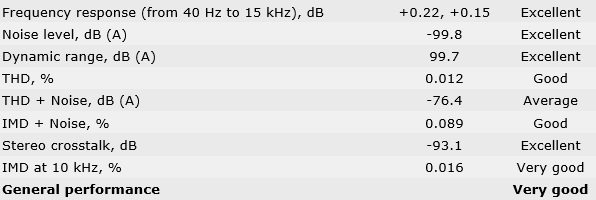
24 Bit, 96KHz (Studio Quality)
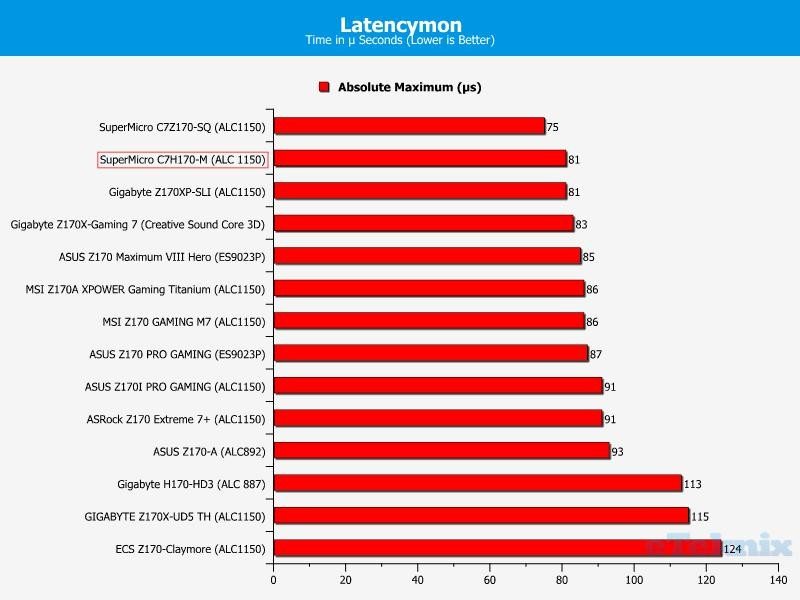
DPC Audio Latency Analyser
Similarly, the audio chipset reported a magnificent latency figure and continues SuperMicro’s domination in this field.
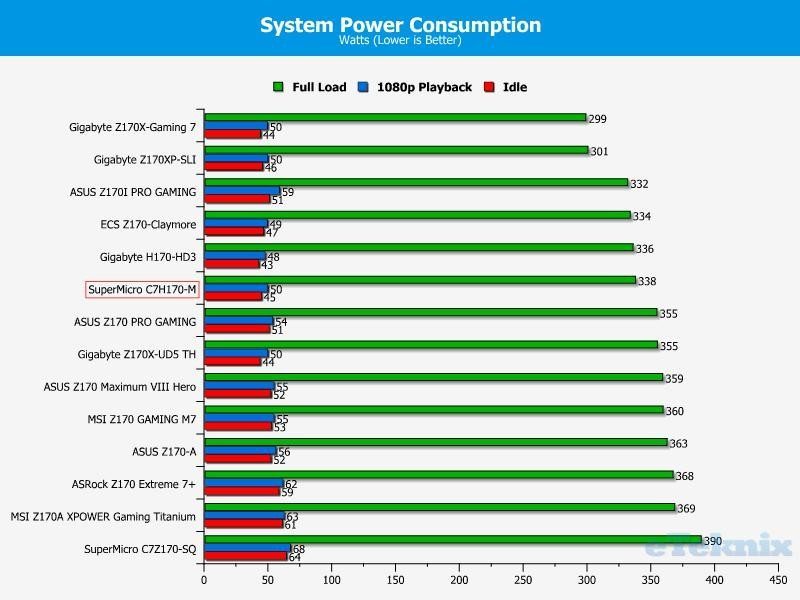
Power Consumption
At stock settings, the motherboard was extremely efficient and stayed under 350 watts during full load.
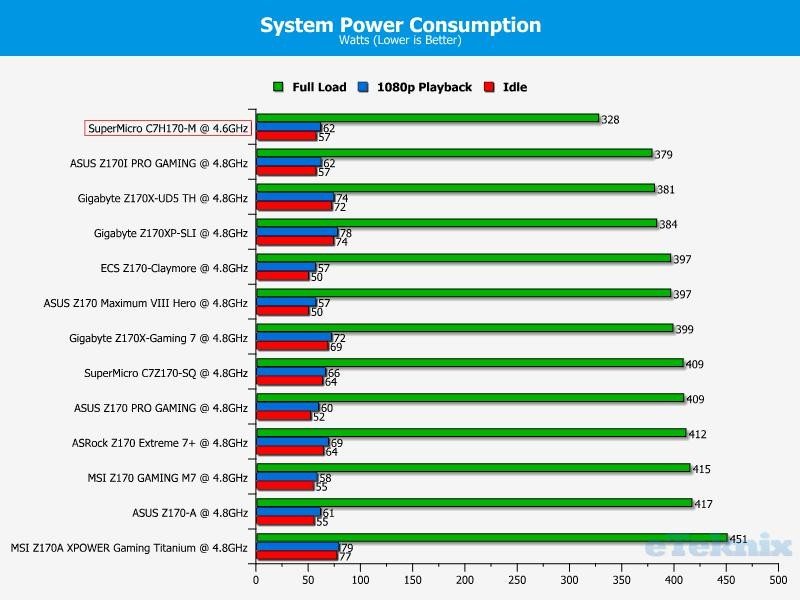
As you might expect, the reduced frequency and lower voltage dramatically affects the system load consumption.
Final Thoughts
Pricing
The SuperMicro C7H170-M isn’t available in the UK or Europe at the time of review and completely out of stock throughout the USA. This is probably due to the furore surrounding non-K CPU overclocking on this particular motherboard. Hopefully, it will be restocked very soon as other motherboard vendors could very easily enable BCLK overclocking via a BIOS update. When it does return to retail, the motherboard should be priced around the $160 mark. In terms of value, it’s a difficult one to recommend for most people as Z170 motherboards offer full multiplier-based overclocking for a similar asking price.
Overview
SuperMicro is a pioneer of server technology and anything they produce has a seal of quality. This is certainly the case with the C7H170-M which offers dependable power circuitry to maximize the overclocking ability of your CPU. The motherboard’s H170 chipset is quite restricted, and doesn’t allow for a simple frequency boost by entering the multiplier and core voltage. In theory, Intel wanted to limit all overclocking ability to K variant CPUs and make people purchase the pricier Z170 platform. However, this motherboard clearly shows that H170 overclocking is achievable even if it requires a slightly higher skill level. Nevertheless, with a patient approach, it shouldn’t be too difficult to reach an impressive frequency boost.
Most of the publicity surrounding BCLK overclocking revolves around frequency improvements on locked multiplier CPUs. However, it’s easy to forget that this also means any H170 motherboard with the correct BIOS can attain an overclock which makes Z170 alternatives a less enticing proposition. Don’t get me wrong, Z170 motherboards still have the benefits of higher frequency memory, simple overclocking and enhanced connectivity. Although this latest development might make enthusiasts think twice about dismissing the cheaper H170 platform.
The SuperMicro BIOS is going to divide opinion and greatly depends on your proficiency with technical terminology. If you enjoy tinkering with every small aspect and want to learn what each parameter does then the BIOS will suit your requirements perfectly. However, it can be daunting at first due to the huge array of options which are explained quite poorly. For example, SuperMicro should put on the right hand side a basic synopsis of each BIOS setting so the end-user can make a better judgement what to alter.
On another note, I would like to see more embedded profiles to save overclocking settings and compare custom configurations. Navigating around the BIOS isn’t the most logical experience but it’s far from being unusable. It only took a few minutes before finding my way around the BIOS and it didn’t appear to favour any particular control scheme. At first the mouse seemed like best method to access each tab, but it’s just as quick to use the keyboard.
In terms of the motherboard layout, SuperMicro has done an excellent job and incorporated a wealth of USB connectors, overclocking themed buttons, impressive audio design and optimal PCI-E layout. During the overclocking procedure, you will need to use the Clear CMOS and Power button on a regular basis. That’s why they are such an important inclusion which makes overclocking much more enjoyable. It removes the frustration factor when having to mess about with jumpers, or remove the internal battery, just to attempt a specific BCLK figure with tweaked values. The most surprising aspect is the audio, which features remarkably low latency and good clarity.
From a visual standpoint, the motherboard’s theme isn’t too flashy and appeals to a gaming audience without moving too far away from SuperMicro’s server roots. What I mean by this is, any kind of over-the-top design might create a negative perception and blend into the other models on the market. It’s important for SuperMicro to retain their professional, quality feel while offering visually appealing products. This is a difficult balancing act but I feel they’ve mastered it quite well on this particular motherboard.
Finally, the motherboard attained the best stock results on Intel’s H170 platform. Admittedly, this is only the second sample we’ve received so far, but there will be many more added in the coming weeks. Once overclocked, I was surprised how close the motherboard got to Z170 products despite having a lower clock speed. Clearly, the H170’s 2133MHz limit made a huge difference in memory benchmarks and it’s unfair to compare motherboards which utilize different speeds. What we can do is analyse products on an identical chipset. One area of disappointment was the linear write speeds which could have been greatly improved for each of the testing storage devices. These aren’t within a margin for error, and larger than I anticipated. On the other hand, a strange background task might have interfered and been using a small percentage of disk utilization.
Pros
- Attractive heatsink design
- Extremely detailed BIOS
- Good audio
- High-end power delivery
- Large BCLK overclocking headroom
- Manual buttons to speed up the overclocking process
- Server-grade reliability
- Superb connectivity options on the rear I/O
Cons
- Expensive for a H170 motherboard
- Linear write results were underwhelming
- Poor worldwide availability
Neutral
- No SATA Express, but generally not needed due to M.2 and PCI-E drives
- Software package is lacking but this might not be a concern to some consumers
“The SuperMicro C7H170-M brings overclocking to non-K series CPUs and the H170 platform while offering server-grade reliability. It may be expensive, but it certainly impresses overall.”
SuperMicro C7H170-M (LGA 1151) Motherboard Review
Thank you SuperMicro for providing us with this sample.


