Supermicro C7Z270-CG LGA1151 Motherboard Review
John Williamson / 7 years ago
Introduction
Supermicro is one of the most prestigious names in the server market and they’ve consistently been relied upon to create rackmounts, networking switches, professional storage solutions and much more. Given the important nature of their clients, it’s essential for Supermicro to uphold the best possible quality control and offer unparalleled reliability. Even though they have a strong foothold in the server market, Supermicro has been steadily releasing motherboards for the consumer platform. Of course, the competition is fierce and behemoths like ASUS, MSI and Gigabyte tend to account for the majority of sales. Nevertheless, Supermicro’s heritage and innovative approach deserve a lot of respect and their motherboards are appealing to enthusiasts who yearn for something different.
One of Supermicro’s Z270 offerings is the C7Z270-CG which features a striking green colour scheme and large, imposing heatsinks. Not only that, the motherboard incorporates two U.2 ports, two M.2 and supports USB 3.1 Type-A and Type-C. On another note, the motherboard contains a large onboard speaker, LED post read-out and buttons for diagnostic purposes. Rather surprisingly, the Supermicro C7Z270-CG’s audio solution is based on the older ALC1150 codec which has been superseded for the latest chipset. Despite this oddity, the motherboard is equipped with an excellent specification which provides server reliability for the gaming audience.
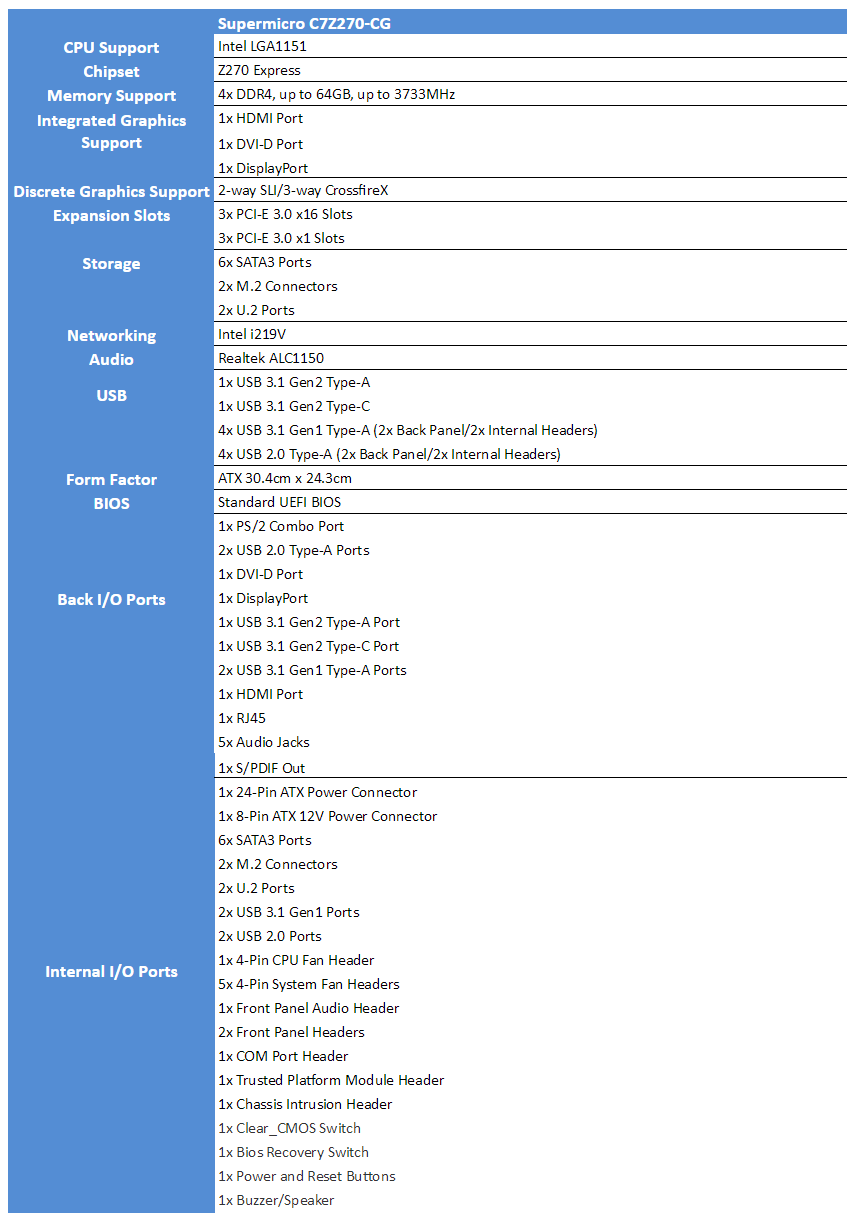
Specifications
Packaging and Accessories
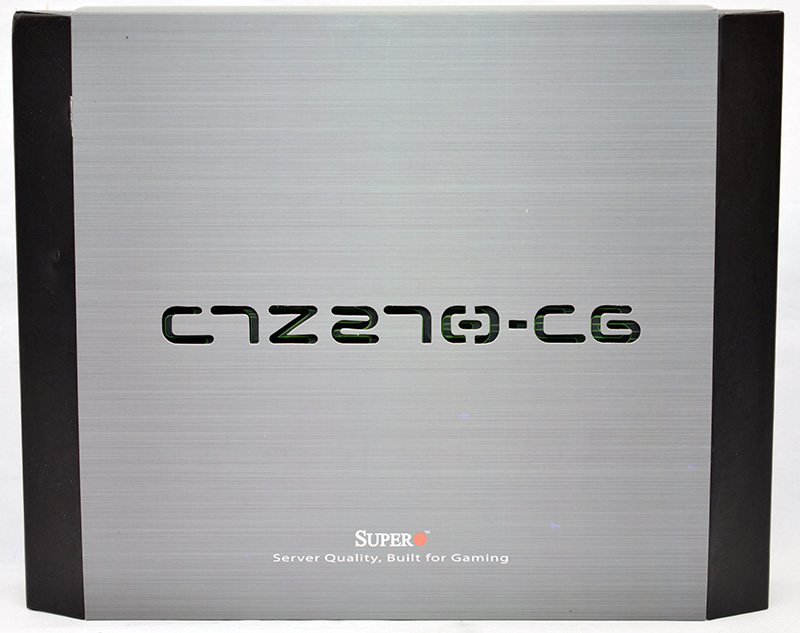
The motherboard comes in a really distinctive box which opts for a slipcover to create an elegant aesthetic. Additionally, the branding remains quite subtle and your focus is drawn to the product’s model name. Personally, I love the brushed grey finish and how it contrasts with the black edges.
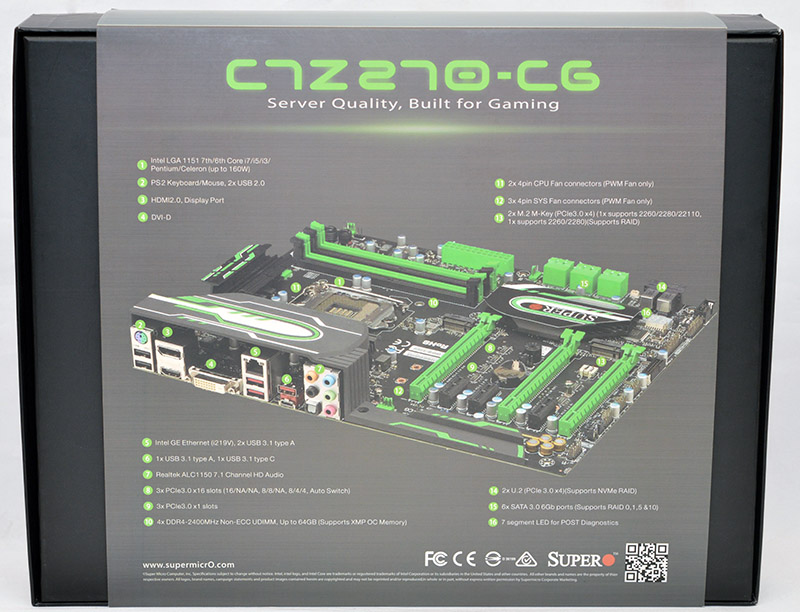
On the rear section, the end-user is provided with an overview of the motherboard’s layout. This simplistic approach works rather nicely and it’s refreshing to see a box without an almost endless supply of marketing images.
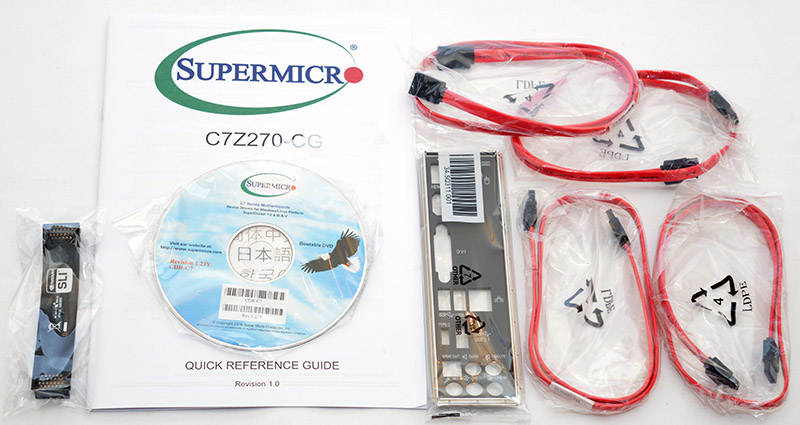
In terms of accessories, the motherboard is bundled with a flexible SLI bridge, drivers/utilities disk, quick reference guide, I/O shield and four flat-headed long-length SATA cables. As expected, the quick reference guide is quite brief and doesn’t explain the motherboard’s key features, software package or BIOS layout. It’s just a technical layout description which lists the various headers and other connectors. Honestly, I’d like to see Supermicro adopt a different approach which widens the product’s appeal by helping those without a great deal of technical knowledge.
A Closer Look
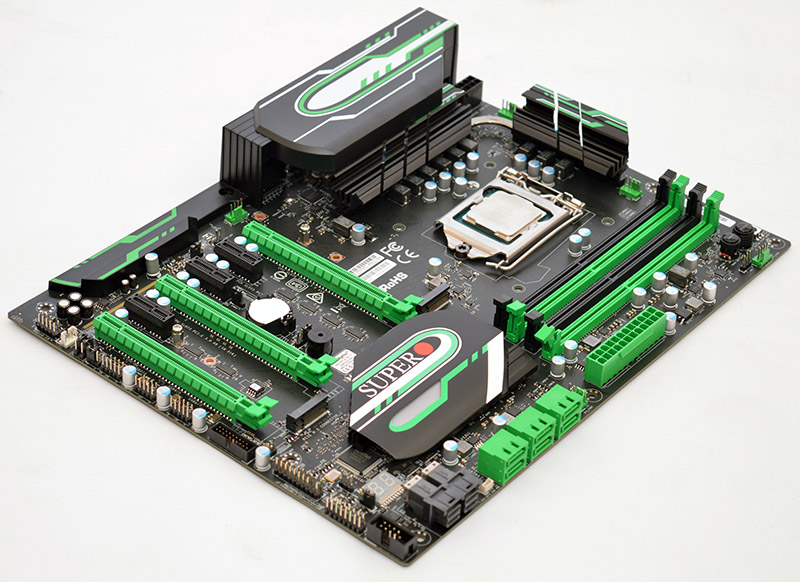
From a visual standpoint, the Supermicro C7Z270-CG is the polar opposite to pretty much every Z270 motherboard I’ve assessed for today’s launch. Instead of utilising a neutral colour scheme and adding a more vibrant touch through customisable RGB lighting, Supermicro went down a different route and formulated a truly eye-opening aesthetic. Even though the vivid green colour might not be suitable for certain configurations, it’s a joy to look at and always brings a smile to my face. Evidently, Supermicro hasn’t taken the safe option and compiled something really unique.
Out of all the motherboards released during the past year or so, this is probably my favourite due to the gorgeous green and black colour contrast and unusual decal on the I/O cover. Injecting a whiter shade alongside the motherboard’s main theme was a cogent move and catapults the product’s beauty to another level. On another note, the colourful Supermicro pattern on the PCH is absolutely stunning and I adore the audio shielding cover’s two tone finish. Taste is certainly a subjective matter but I do think Supermicro should be commended for bringing back green motherboards which are a rarity in the modern market.
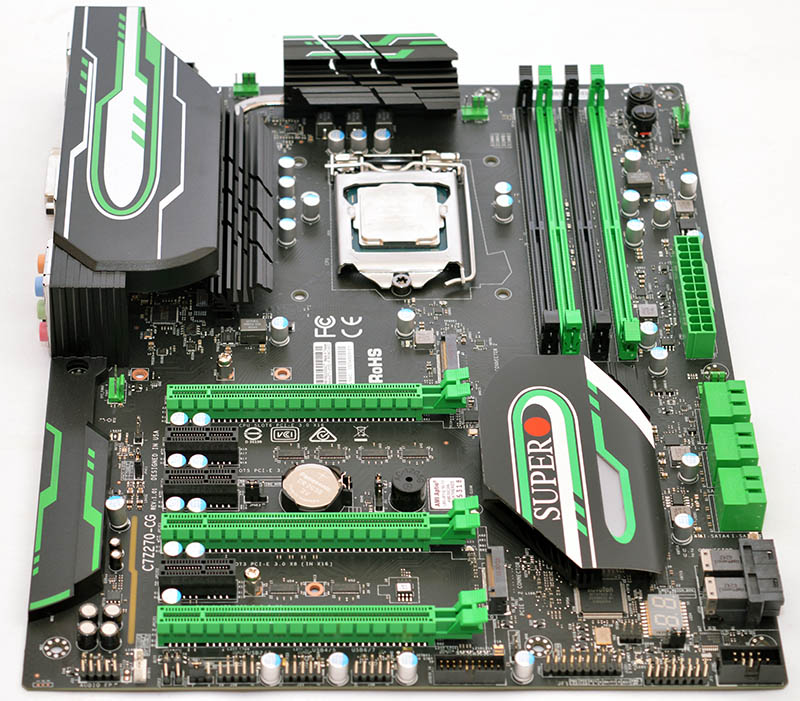
In total, the Supermicro C7Z270-CG utilises a premium 12-phase power delivery in the form of the Vitec 59PR72-151 chokes. These have an operating frequency up to 2MHz and a thermal range between -40C and 125C. The robust SMD package is capable of withstanding the most aggressive SMT assembly process. Additionally, the chokes have a saturation current of 66A at 25C, 56A at 100C and 53A at 125C. To compliment the extremely high-quality chokes, SuperMicro deployed the Primarion PXE1610BDN and PXC1410BPM. The motherboard has an ample supply of capacitors with a high thermal tolerance and long lifespan. Interestingly, there’s an Asmedia ASM1142 controller hidden underneath the I/O to deal with USB 3.1 duties. Supermicro positioned six 4-pin fans across the motherboard which allows you to easily connect a whole host of cooling devices including a water pump.
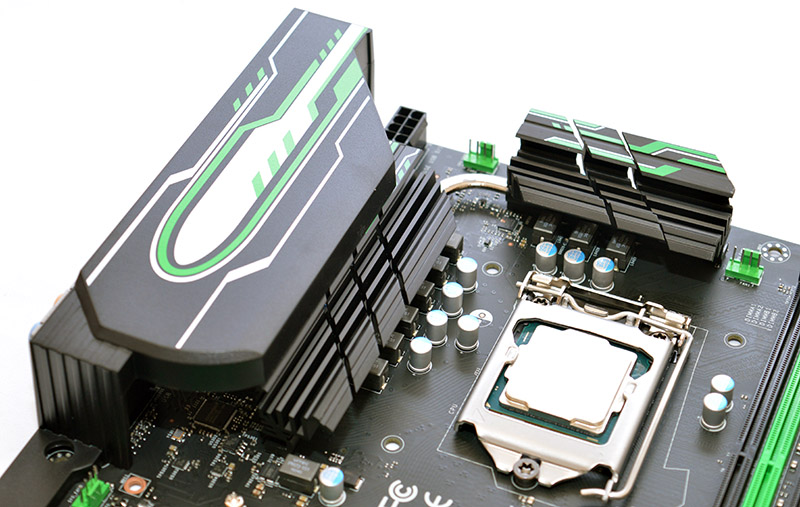
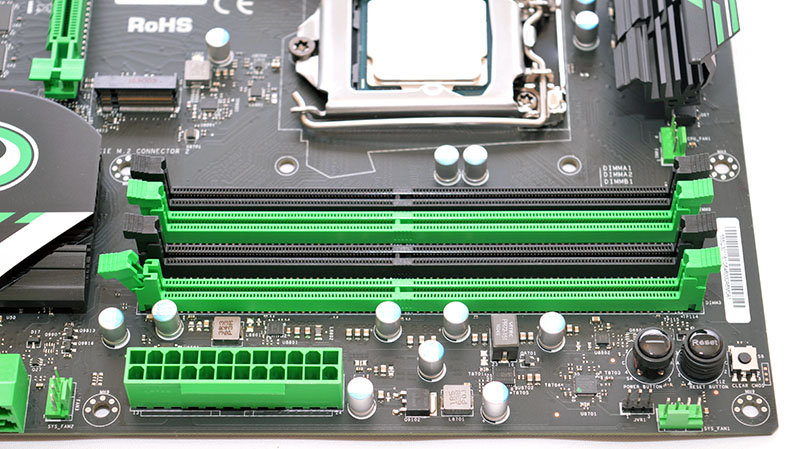
When it comes to memory options, the motherboard supports up to 64GB and speeds in excess of 3733MHz providing the memory controller can maintain such a hefty frequency. Unlike other products on the market, the motherboard doesn’t employ any kind of stainless shield shielding to reduce electromagnetic interference. Next to the DIMM slots is a reset button, Clear_CMOS button and power button. I’m not entirely sure why the power button icon is a horizontal line, especially since the reset button is clearly labelled. Nevertheless, they’re really useful to quickly test an overclock’s stability and restore default values within a single click.
As mentioned earlier, the Supermicro C7Z270-CG’s audio chipset is based on the Realtek ALC1150 codec. This is somewhat surprising because motherboard vendors have included the ALC1220 codec on their latest Z270 creations. It’s not a huge issue because the ALC1150 codec is pretty decent and was widely used on Z170 motherboards. Saying that, it doesn’t seem a sensible approach to deploy older technology. Nevertheless, the audio chipset is positioned on a separate PCB line to reduce electromagnetic inference caused by the frequency of other key components. Furthermore, premium audio capacitors are used to deliver a clear, vibrant sound while limiting the signal loss.
The PCI-E arrangement is suitable for multi-card setups in either a 2-way SLI or 3-way Crossfire configuration via x8/x8 and x8/x4/x4. The PCI-E spacing aids airflow and ensures the graphics cards can run at acceptable thermal levels without causing concern. In between the top x16 slots is an AC-1205G magnetic buzzer which outlines the root cause of any posting problems such as memory incompatibility and CPU initialisation failure. Even though there’s a post LED which performs a similar function, it’s handy to have a failsafe which acts as a second source of information.

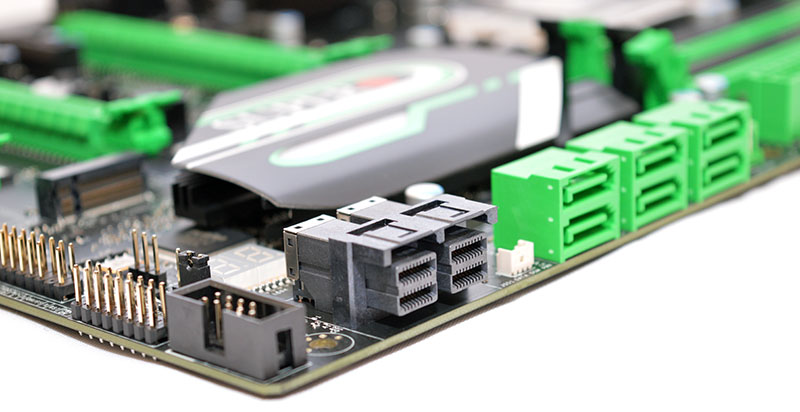
Connectivity-wise, the motherboard incorporates two U.2 ports and two M.2 connectors. One of the M.2 slots has a fairly limited support for type 2260/2280 while the second allows you to install type 2260/2280/22110 storage devices. Of course, it’s possible to configure an NVMe RAID0 array and achieve astounding read/write speeds. Sadly, there’s no Thunderbolt 3 or SATA Express functionality, although the latter is very rarely used.
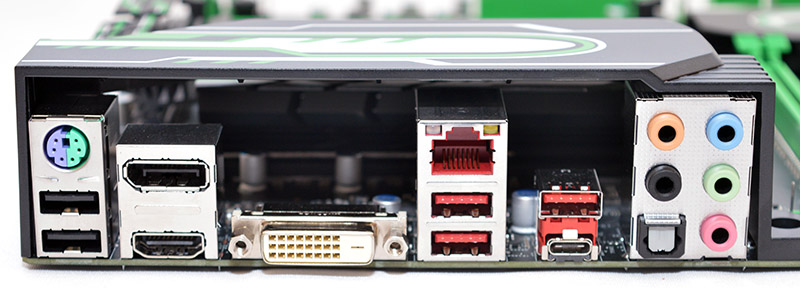
On the rear I/O, there’s a PS/2 combo port, two USB 2.0, DisplayPort, HDMI, DVI-D, Intel i219V Gigabit LAN, three USB 3.1 Type-A, USB 3.1 Type-C, 5-audio jacks and S/PDIF Out.
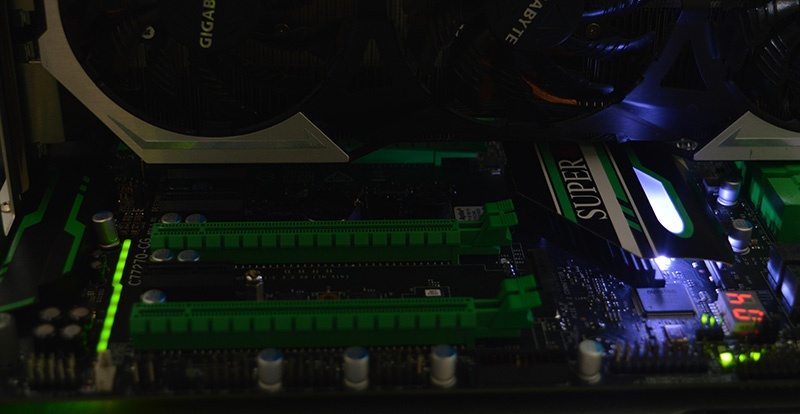
Once powered on, a beautiful white LED strip embedded into the PCH shines brightly and the audio isolation line also lightens up in a lovely green shade.
Testing & Methodology
Here is the test bench used for all Z270 motherboard reviews:
Hardware
- Motherboard varies by review
- CPU: Intel Core i7-7700K
- GPU: Gigabyte G1 Gaming GTX 980Ti 6GB GDDR5
- RAM: Crucial Elite 16GB (2x8GB) 2666MHz
- Cooling: Thermaltake Water 3.0 AIO with Gelid GC-Extreme
- Case: Lian Li T80 Test Bench
- Storage Drives: Main storage: Toshiba OCZ VX500 500GB SATA, Test Devices: Toshiba OCZ VX500 500GB SATA , Toshiba OCZ RD400 512GB NVMe M.2 and Patriot SuperSonic Magnum 256GB USB 3.0 Flash Drive
- PSU: Be Quiet! Dark Power Pro 11 850W
- Operating System: Windows 10 64-bit
- Networking: ASUS RT-AC68U router
Software
- SiSoft Sandra Engineer – available here
- WPrime – available here
- Cinebench – available here
- 3DMark – available here
- AIDA 64 Engineer – available here
- Latencymon – available here
- Rightmark Audio Analyser – available here
- Passmark – available here
Memory
For our memory tests, we use the built-in memory benchmarks in AIDA64 Engineer and SiSoft Sandra. For more details on each of the benchmarks please see here and here respectively.
Storage
To test the storage performance in our motherboard reviews we use AIDA’s Disk Benchmark utility built into their AIDA64 Engineer Edition software package and run linear read and write tests. We run each of the benchmark tests on a SATA III, USB 3.0 and M.2 device. For SATA III testing we use a SanDisk Extreme Pro 240GB, for USB 3.0 testing we use the Supersonic Magnum 256 GB USB 3.0 flash drive and for M.2 testing we use Plextor’s 256GB M.2 M6e SSD. The drives are always formatted before use.
Networking
For our networking tests we connect the test system up to our Intel Gigabit-enabled ASUS Rampage IV Extreme X79 motherboard test system through the ASUS RT-AC68U router and run our tests. We opted for this over a direct point-to-point connection because we wanted to simulate real-world performance. For our WiFi tests we do the same except we connect the test system to the ASUS RT-AC68U router via WiFi at a distance of 2 metres from the router. The testing is conducted using PassMark’s Advanced Network Test detailed below.
PassMark
The PassMark Advanced Network Test (which is part of PerformanceTest) is designed to test the data transfer rate between two computers both of which must be running PerformanceTest. One of the computers must act as the server and will sit waiting for a connection. The other computer acts as a client. It connects to the server machine and sends data to it for the duration of the test. You can download a trial version of PerformanceTest from here.
Power Usage
To measure power consumption we, use a “killawatt” meter and measure the total system power draw at the wall. We run three different use-case scenarios for 5 minutes and take the average reading.
RightMark Audio Analyser (RMAA)
RMAA suite is designed for testing quality of analog and digital paths of any audio device. The results are obtained by playing and recording test signals passed through the tested audio path by means of frequency analysis algorithms. A more common mark is also provided for those unfamiliar with measured technical parameters. Available here. We run the RMAA test using a 3.5mm to 3.5mm cable connecting the line out to the line in to test the quality of the motherboard audio codec, not any external audio devices. We run the complete playback and recording test at default settings and then get RMAA to interpret the results giving the below outputs. We sync the playback and recording audio devices to the same setting as the test for accurate results.
DPC
DPC is a Windows tool that analyses the capabilities of a computer system to handle real-time data streams properly. It may help to find the cause for interruptions in real-time audio and video streams, also known as drop-outs. This software is available for download free here.
wPrime
wPrime is a leading multithreaded benchmark for x86 processors that tests your processor performance by calculating square roots with a recursive call of Newton’s method for estimating functions. wPrime is a free utility that is available for download here.
Cinebench R15
Cinebench is a widely respected benchmark for testing the performance of x86 CPUs. The program allows you to test single and multi-threaded performance as well as GPU performance by rendering with Open GL. Download here.
3D Mark
The new 3DMark includes everything you need to benchmark your hardware. With three all new tests you can bench everything from smartphones and tablets to notebooks and home PCs, to the latest high-end, multi-GPU gaming desktops. Download here.
Deus Ex: Mankind Divided
Deus Ex: Mankind Divided is an action role-playing stealth video game developed by Eidos Montreal and published by Square Enix. Set in a cyberpunk-themed dystopian world in 2029, two years after the events of Human Revolution, Mankind Divided features the return of Adam Jensen from the previous game, Deus Ex: Human Revolution, with new technology and body augmentations.
Rise of the Tomb Raider
Rise of the Tomb Raider is a third-person action-adventure game that features similar gameplay found in 2013’s Tomb Raider. Players control Lara Croft through various environments, battling enemies, and completing puzzle-platforming sections while using improvised weapons and gadgets in order to progress through the story. The game is run on the Very High preset with FXAA enabled. Please note, the DirectX 12 API has been selected and an average from 3 benchmark runs is taken for the final result.
BIOS and Overclocking
Since the previous Supermicro consumer motherboard review, the BIOS’ layout has been dramatically changed and sports a new graphical interface. Finally, the BIOS contains a screen capture function to share overclock settings with friends and easily refer to a specific configuration at a later date. Furthermore, it means I can properly show the BIOS without photographing the monitor which always looks terrible due to reflections. Despite attempting to adopt a more stylish BIOS design, the end result is fairly clumsy as demonstrated by the gaudy, oversized text and cluttered layout. Rather annoyingly, some elements of the UI are cut-off such as the final digit of the time and K when outlining the CPU model.
On another note, the BIOS has a monumental learning curve and will even outwit those with exceptional technical knowledge. The BIOS sometimes lists settings in sub-menus which should be on the initial page. For instance, the XMP profile is under overclocking instead of the default menu page. The mouse movement creates a frustrating experience due to the constant judder and the keyboard navigation is even worse. Don’t get me wrong, I’m glad Supermicro is trying to update their consumer BIOS and making errors is the first step to finding a better, well-crafted solution. At this time, it needs work to become faster, easier-to-use and less intimidating to people familiar with the intuitive layout on motherboards from other vendors. Here we can see the CPU menu which allows you to tweak the acoustic noise settings:
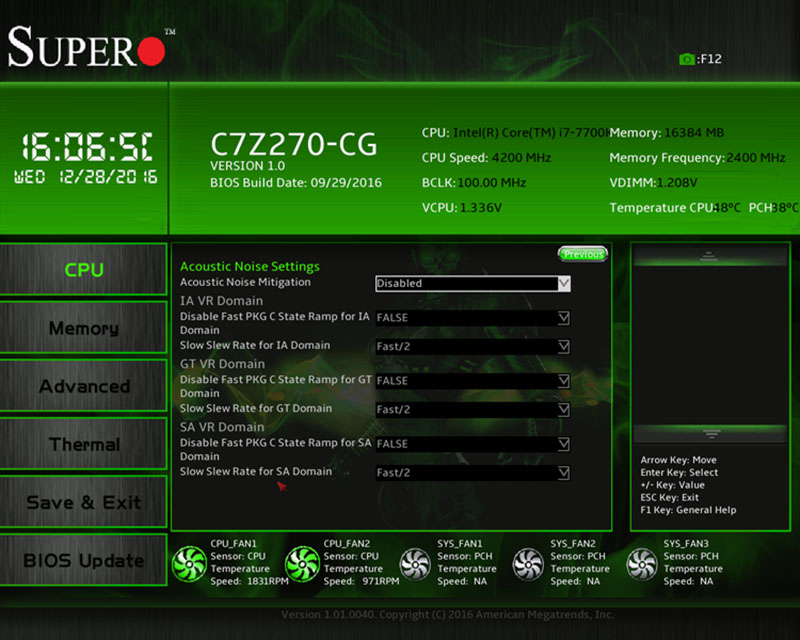
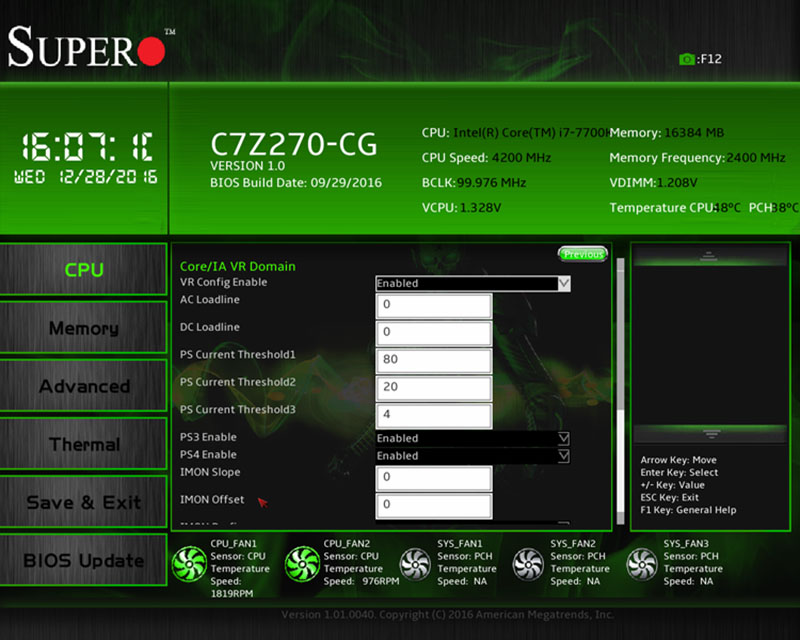
During the overclocking process, you can adjust the AC Loadline, P5 Current Threshold1 and other extremely advanced characteristics. This is superb for those wanting the tweak every aspect of their CPU, but the huge array of options might be overwhelming to some. Perhaps, segmenting the BIOS into two modes would have been beneficial.
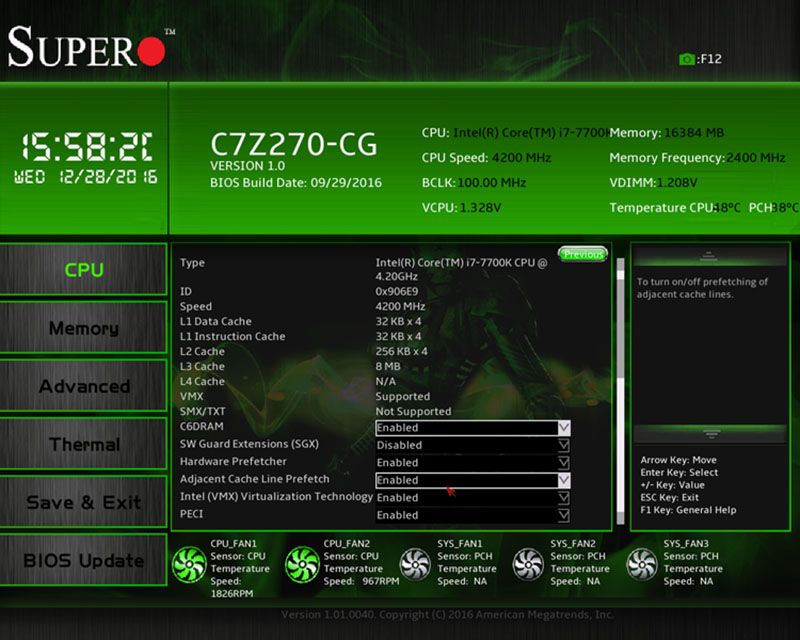
The welcome page lists the CPU ID, base frequency, L3 cache and other important statistics. Furthermore, there’s the option to enable or disable CPU features including VMX, Adjacent Cache Line Prefetch and PECI.
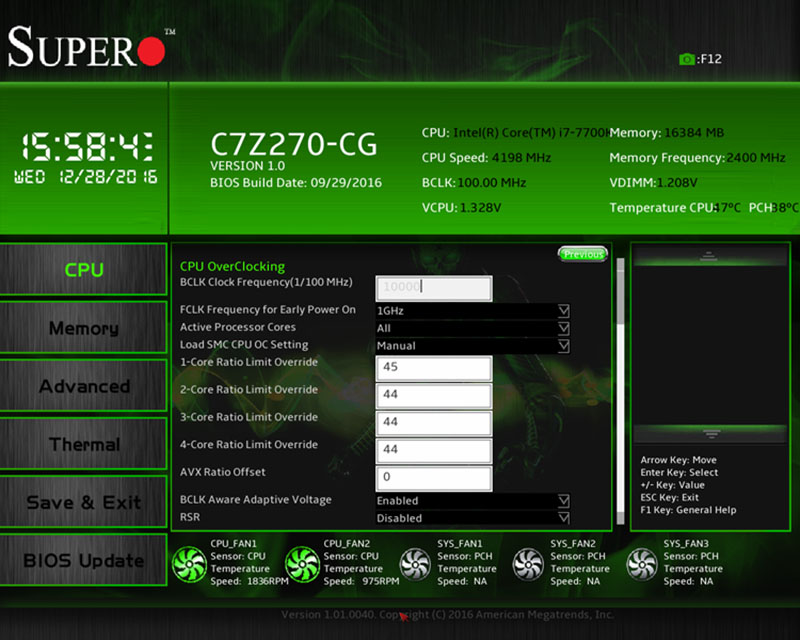
To perform a basic overclock, you’ll want to configure the BCLK and set the ratio per core. The ability to dynamically adjust the cores with different frequencies is really good and ensures you can prioritise the better performing cores to aid stability. Once again, Supermicro provides you with an almost endless supply of options to maximise the CPU’s potential. Adjusting the CPU’s voltage requires an Adaptive mode or Override. Both of these revolve around the vCore increase being inputted instead of a final figure.
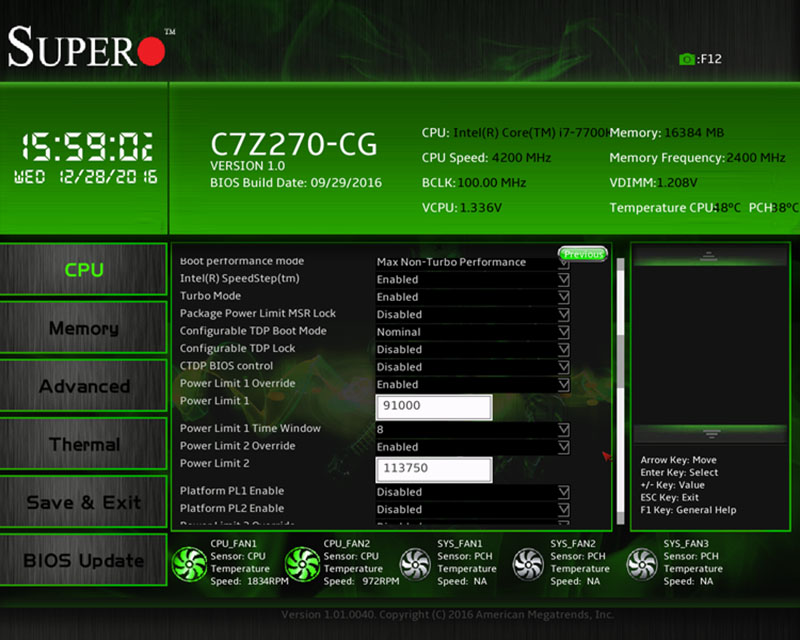
Further down the CPU overclocking menu, it’s possible to customise the power limits and enable/disable the Turbo Mode.
Next up is the memory page which outlines the main timings and sub-timings as well as the default frequency. Additionally, you can adjust the voltage, QCLK Odd Ratio and enable an XMP profile. As previously mentioned, I wouldn’t have expected XMP to come under overclocking because it’s a simple alteration verified by the modules themselves.
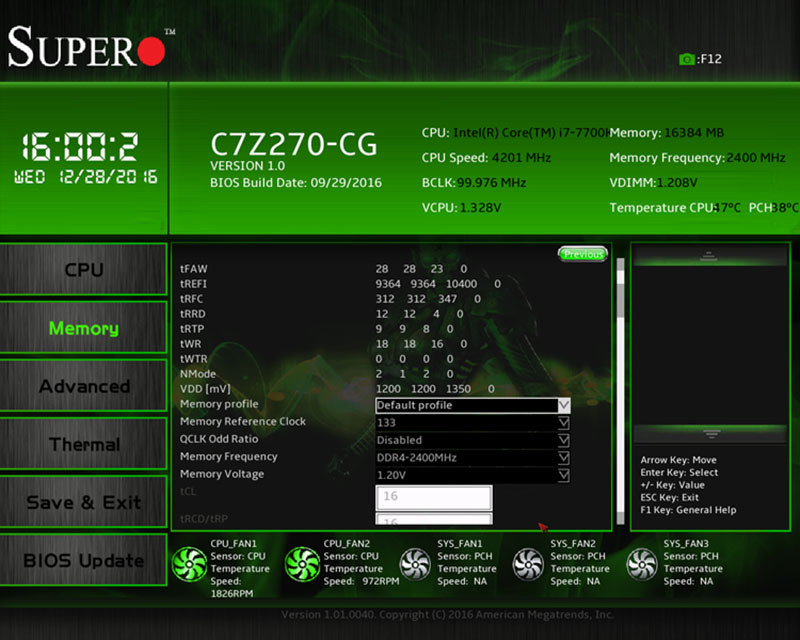
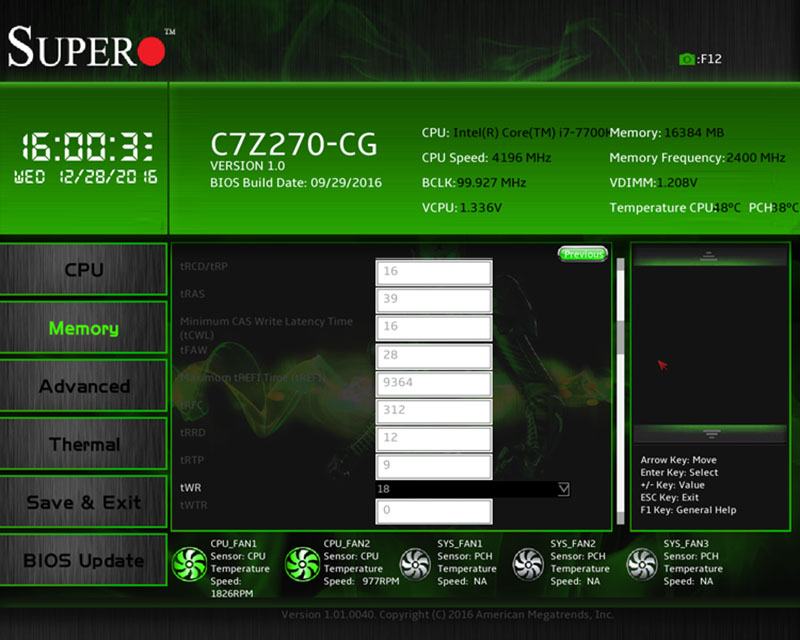
Here we can see the BIOS contains an impressive selection of memory overclocking settings ranging from the tRRD to the tWTR.
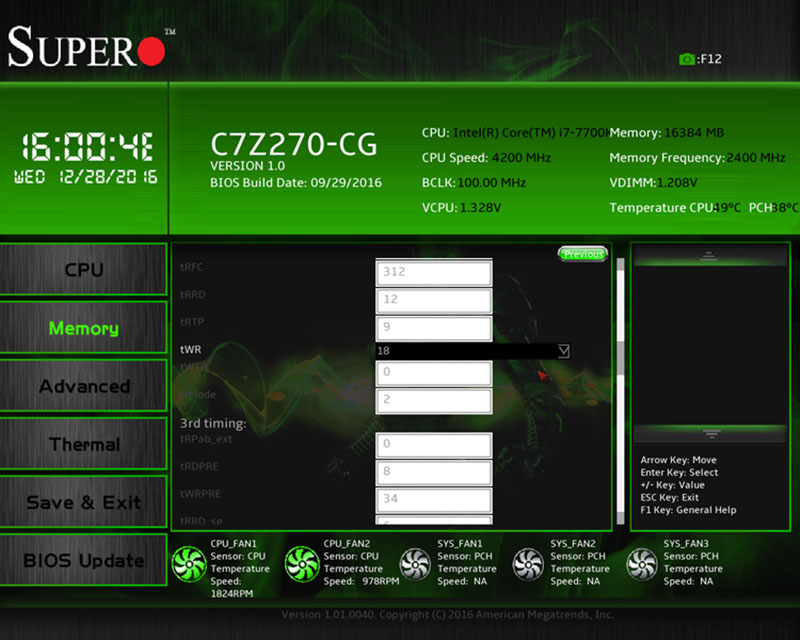
There’s also the opportunity to modify the 3rd timing which gives you complete control of the memory overclocking process.
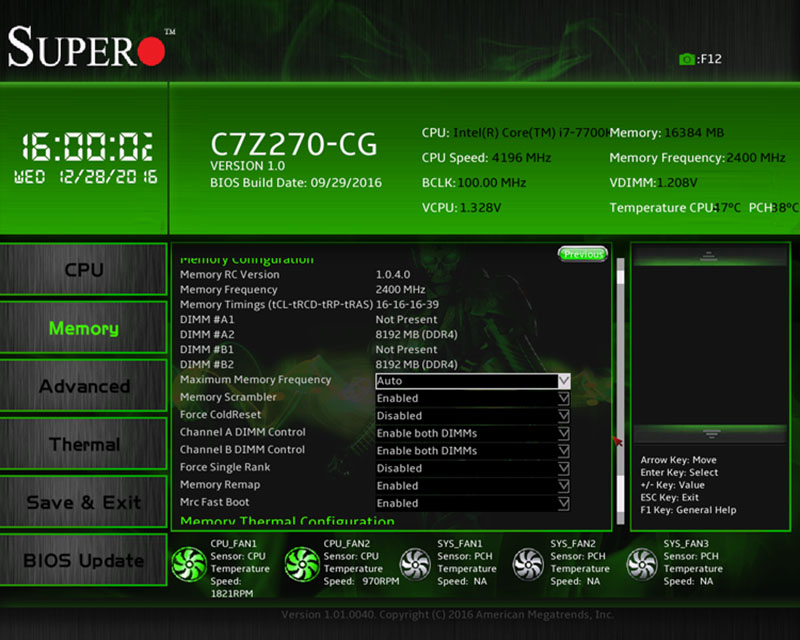
On another note, the memory configuration page allows you to enable the memory scrambler and disable certain DIMM slots. Just in case you were wondering, the memory scrambler alternates data patterns to reduce the effect of load transients and noise on the memory bus.
In the advanced section, you can access various sub-menus to change the SATA configuration, PCH-IO, Graphics and System Agent.

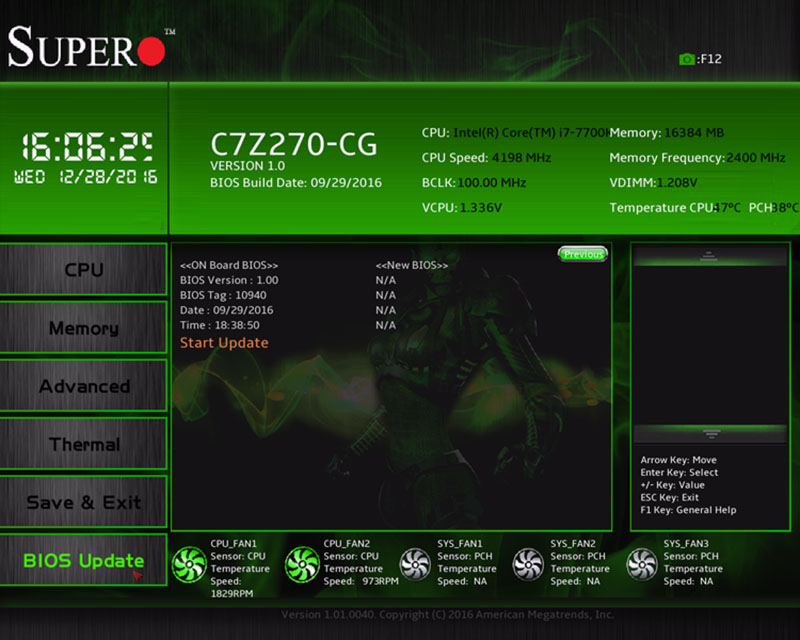
The BIOS Update utility doesn’t explain things particularly well but it’s functional and ensures you can update the BIOS from a properly formatted USB drive.
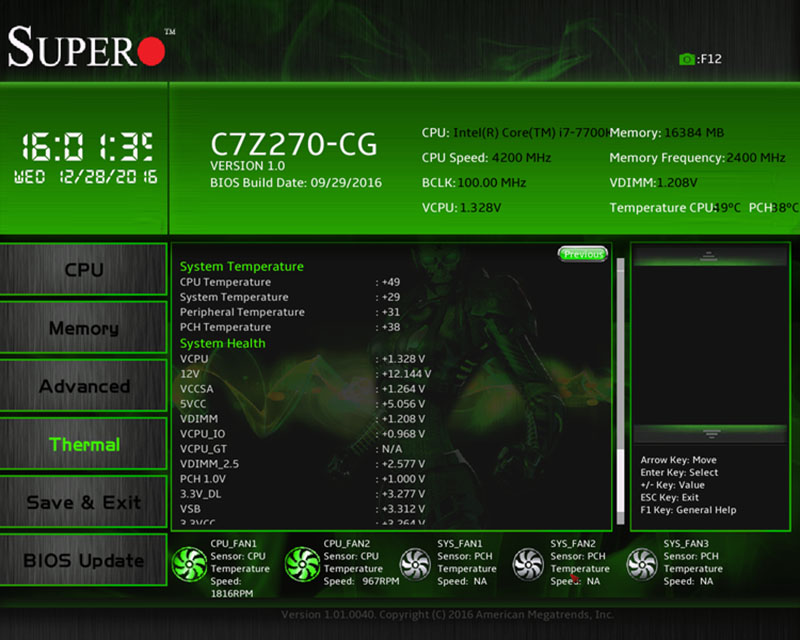
The thermal tab outlines key system readings including the CPU temperature, 12V voltage, VDIMM and PCH 1.0V.
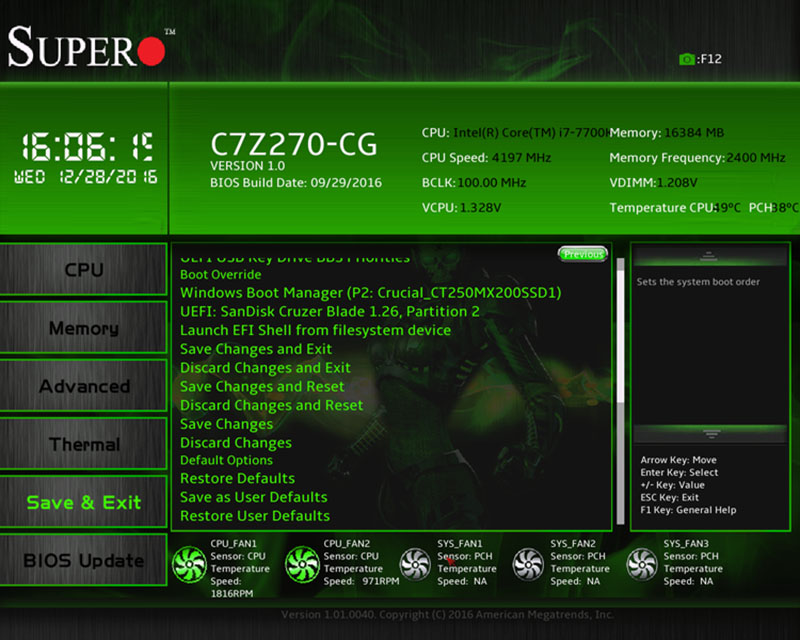
On the final page, the end-user can cycle between UEFI or LEGACY modes, combine both as well as altering the default boot order.
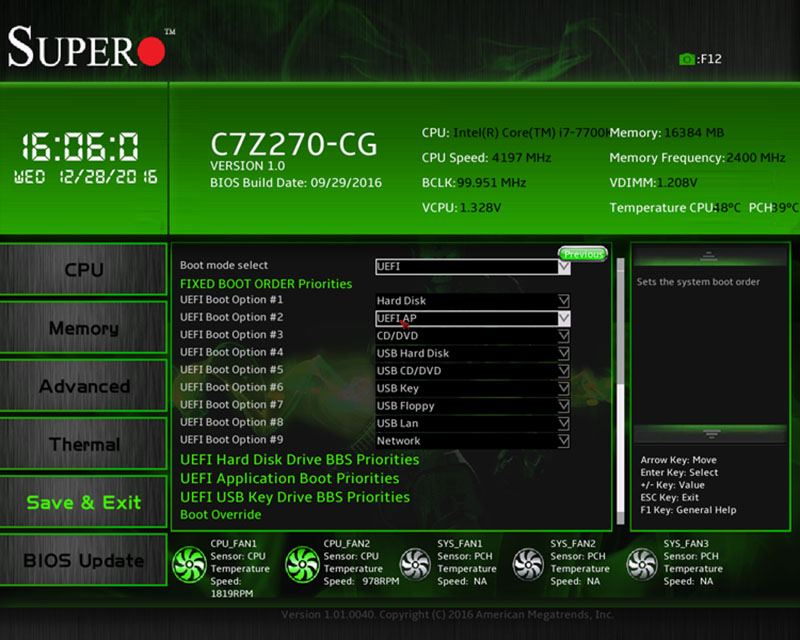
Of course, it’s relatively simple to boot from a chosen device, save any changes in the current session and restore optimal defaults.
Overclocking
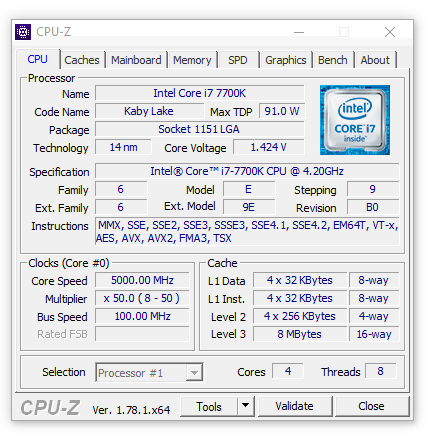
The overclocking process wasn’t particularly difficult although the BIOS layout may confuse some people who are accustomed to a simpler user interface. Nevertheless, I managed to dial-in a 5.0GHz result at 1.424V which is the CPU’s maximum potential. Sadly, the retail CPU used for testing isn’t a good overclocker and requires a lot of voltage to keep 5.0GHz stable. Therefore, the chip is the limiting factor and doesn’t properly demonstrate the motherboard’s overclocking abilities. Interestingly, the voltage appeared to fluctuate in a really unpredictable mamner but I’m presuming this is down to CPU-Z misreading the values.
Software Overview
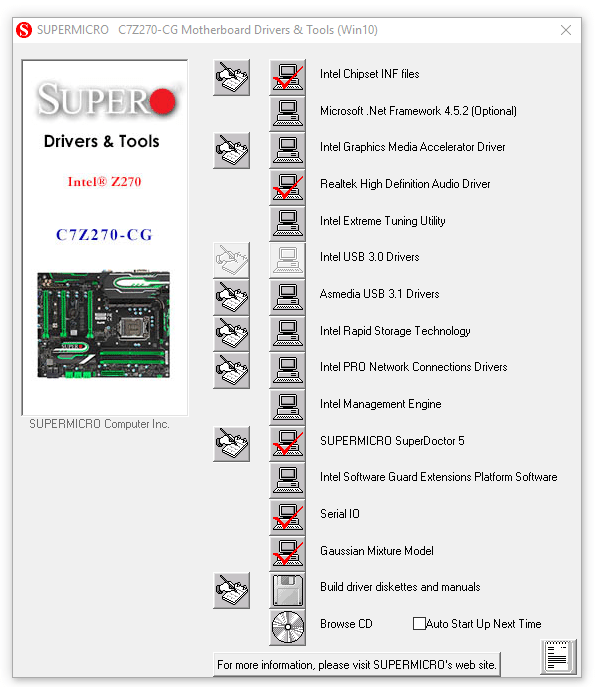
Supermicro doesn’t include a wide range of utilities and the bundled motherboard disk focuses on drivers. This isn’t a terrible idea because a large proportion of users prefer to install freeware programs instead of vendor-designed software or ignore the bundled tools to prevent the operating system from becoming cluttered.
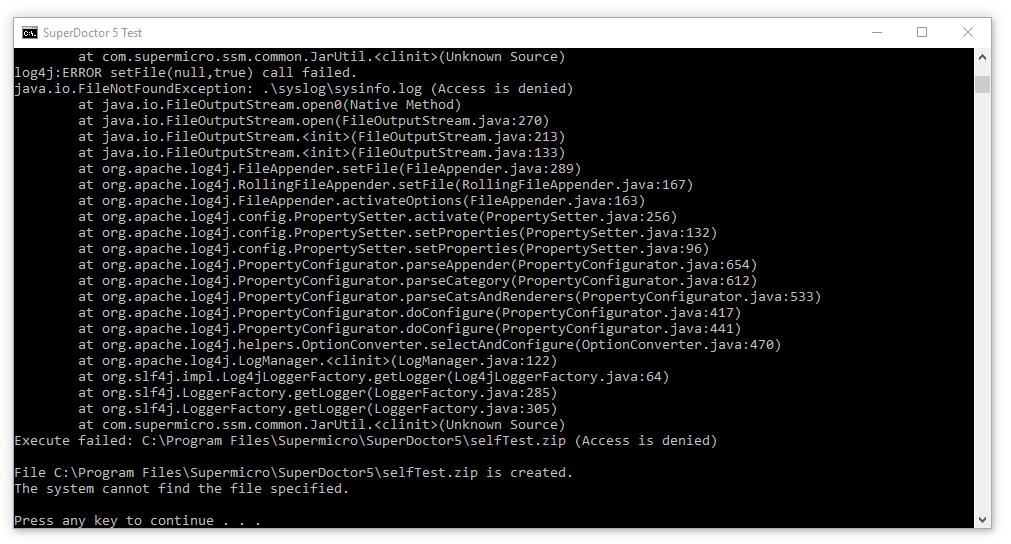
The SuperDoctor 5 application monitors a system’s health and relays the information back to Supermicro to apply any fixes. This ranges from the voltage read-outs, HDD health, memory stability and much more. As you can see, I couldn’t get the software to run correctly and investigate its key features first hand. I’m guessing the error is down to the Java plugin as denoted by the access denied log.
CPU & GPU Performance
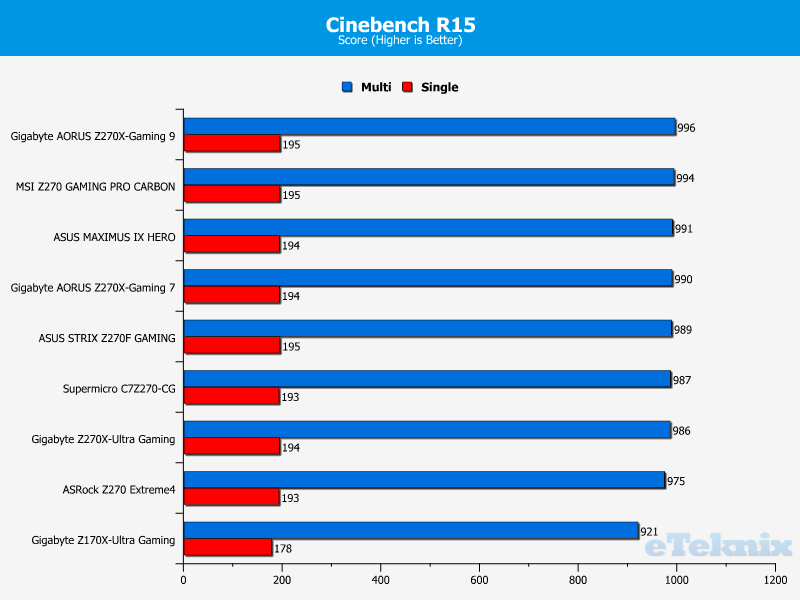
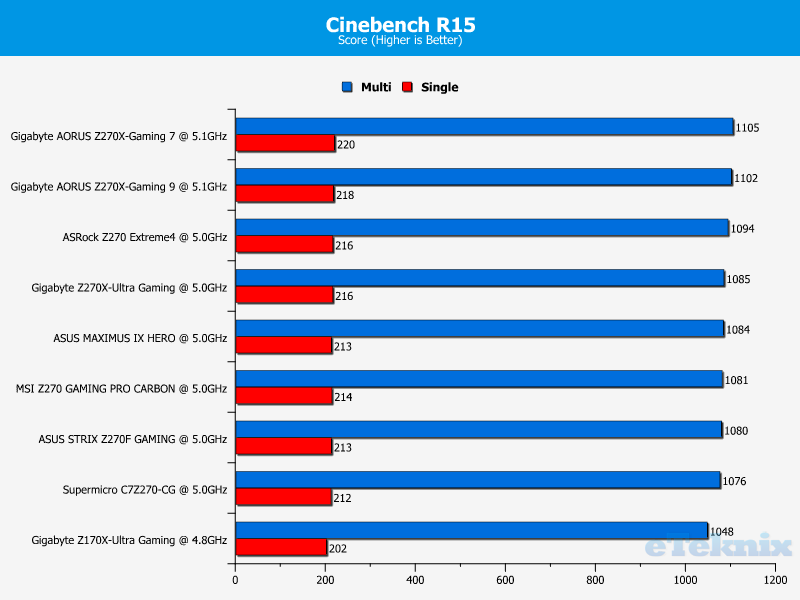
Cinebench
In Cinebench R15, the motherboard achieves an excellent set of scores and remains within touching distance of the top spot. Once overclocked, the performance increases considerably although the product begins to lag behind other options.
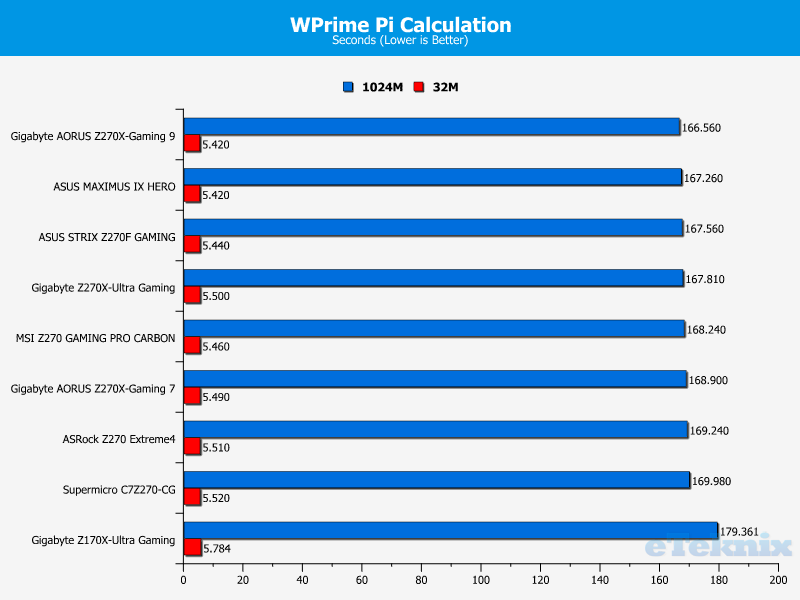
WPrime
Here we can see the motherboard completes the Pi calculation tasks in a very respectable time and provides a good boost compared to the previous generation chipset. Overclocking the CPU to 5.0GHz yields great results and brings the 1024M calculation time around the 150-second mark.

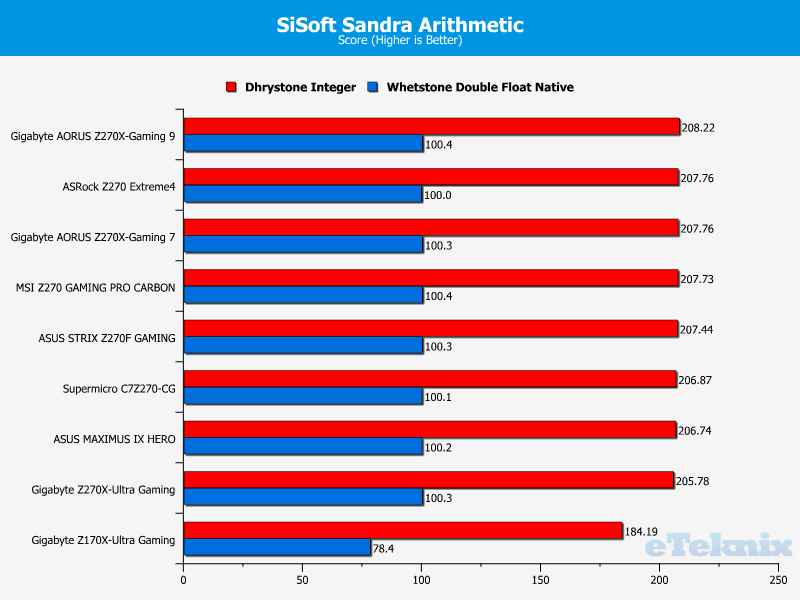
SiSoft Sandra
Next up is SiSoft Sandra’s Arithmetic benchmark which clearly illustrates the choice of motherboard doesn’t make a huge performance impact. Of course, overclocking the i7-7700K is recommended to reach much higher synthetic scores.

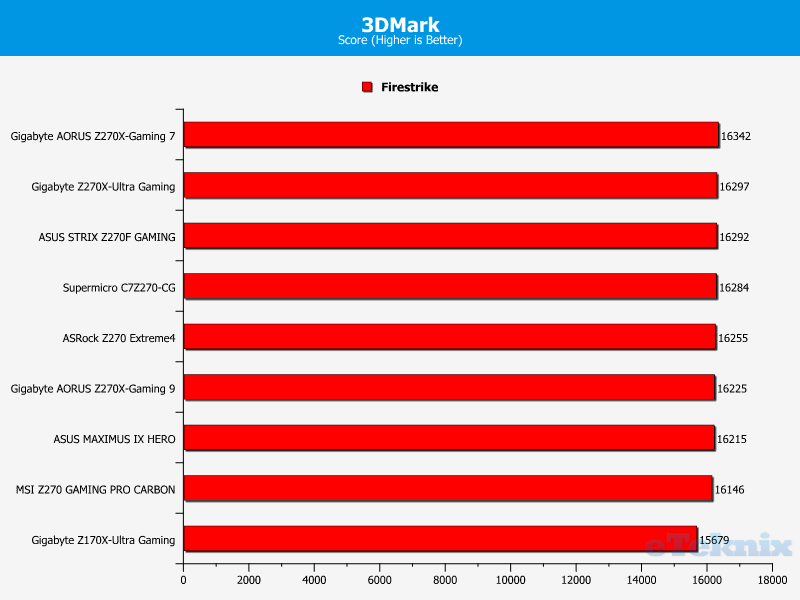
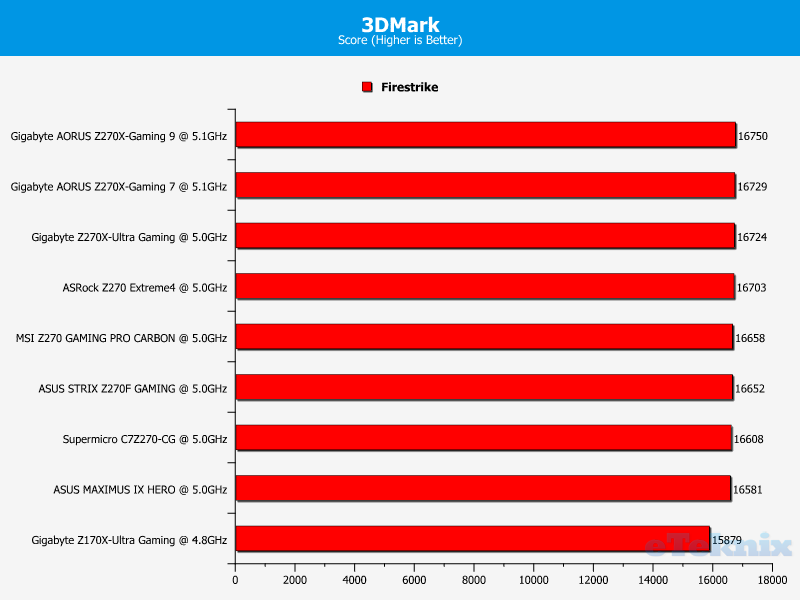
3DMark
On a similar note, the motherboard fares pretty well during the 3DMark Firestrike test and doesn’t hold back the GTX 980Ti in any way, shape or form. Overclocking improves the synthetic scores by a decent margin.
Deus Ex: Mankind Divided
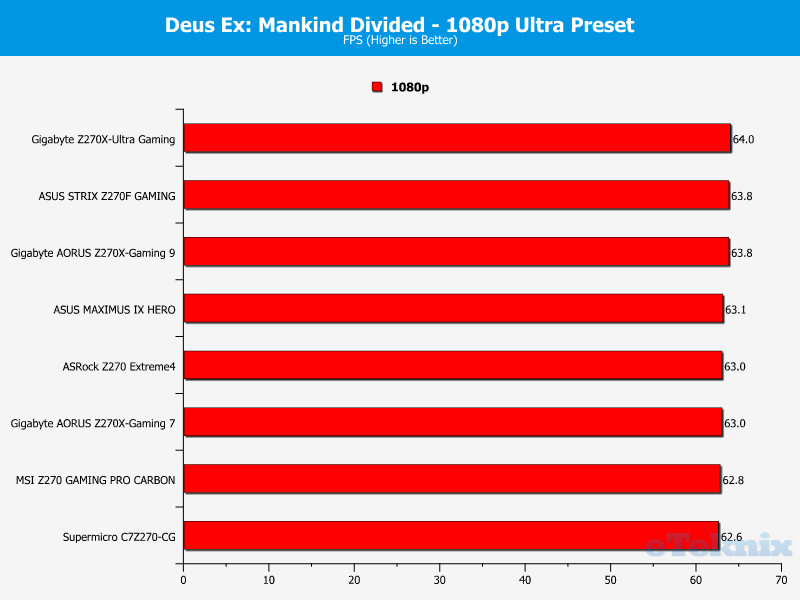
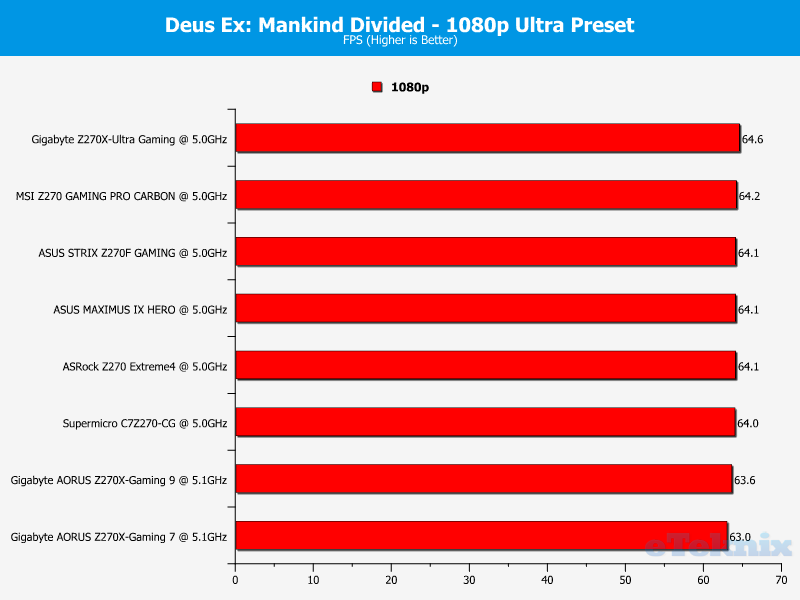
In Deus Ex: Mankind Divided, the motherboard finishes in the bottom spot. However, it’s within a margin of error and the small gap doesn’t change the gaming experience whatsoever. Once overclocked, the motherboard reported a slightly higher frame-rate.
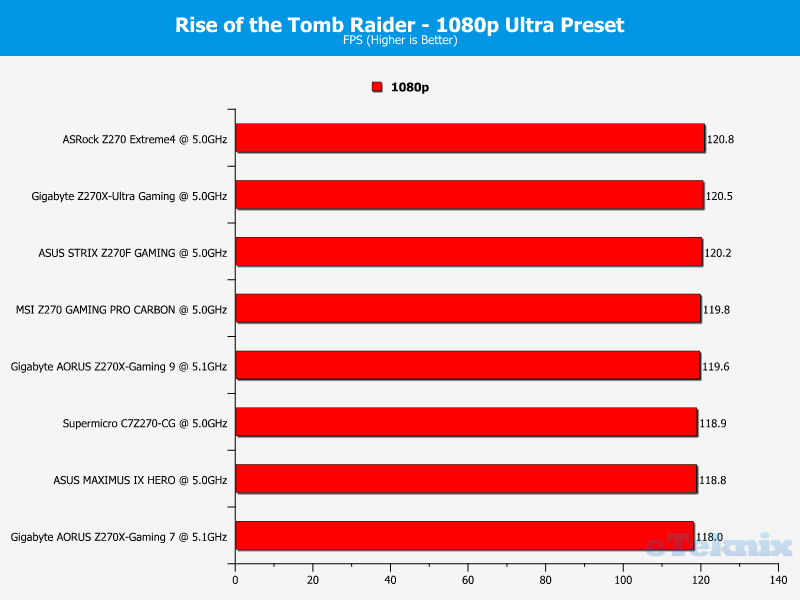
Rise of the Tomb Raider
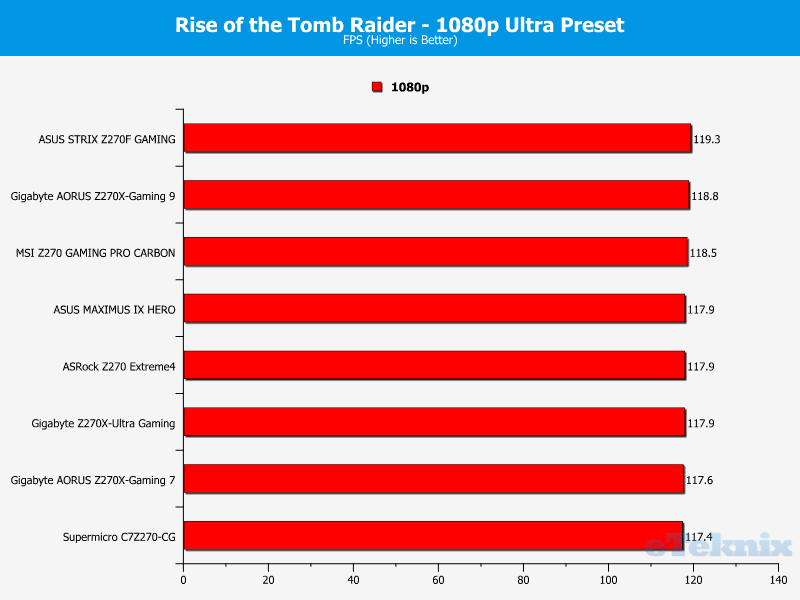
A similar situation occurs in Rise of the Tomb Raider and the motherboard is just edged by rival products. Overclocking has a minimal effect but it’s enough to change the ranking order ever so slightly.
Memory Performance
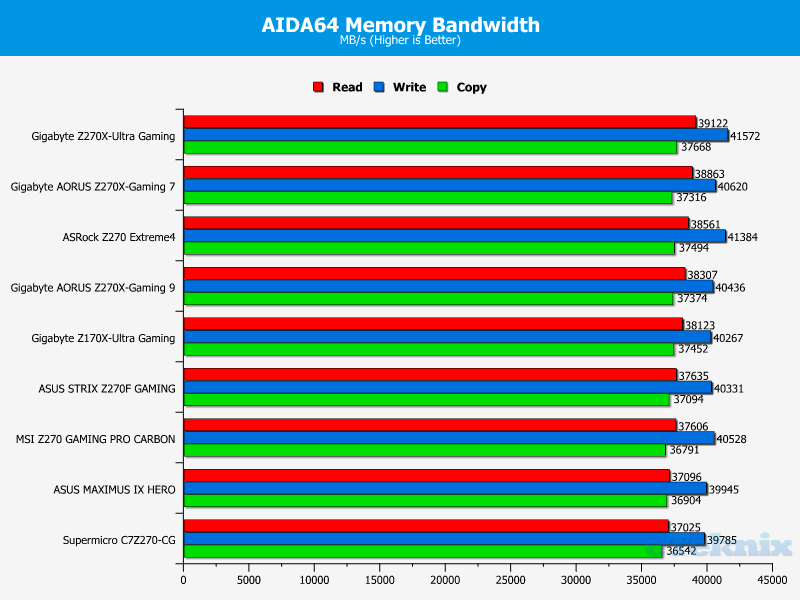
AIDA64 Engineer
In terms of memory bandwidth, the motherboard obtains consistent read, write and copy rates. Seeing it at the bottom is a little unfair because the gap to other motherboards can be put down to a margin of error.
SiSoft Sandra
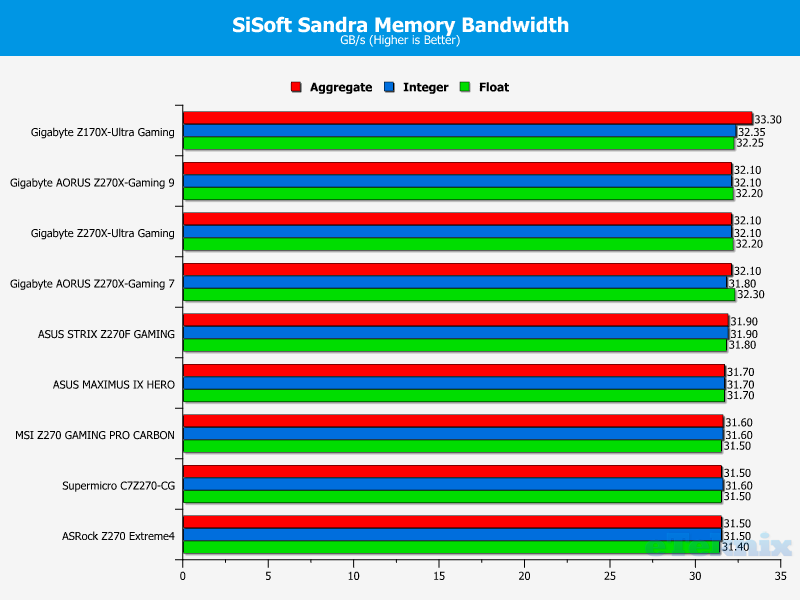
This time, the motherboard finishes ahead of the ASRock Z270 Extreme4 and upholds very stable numbers.
Combined Latency Test
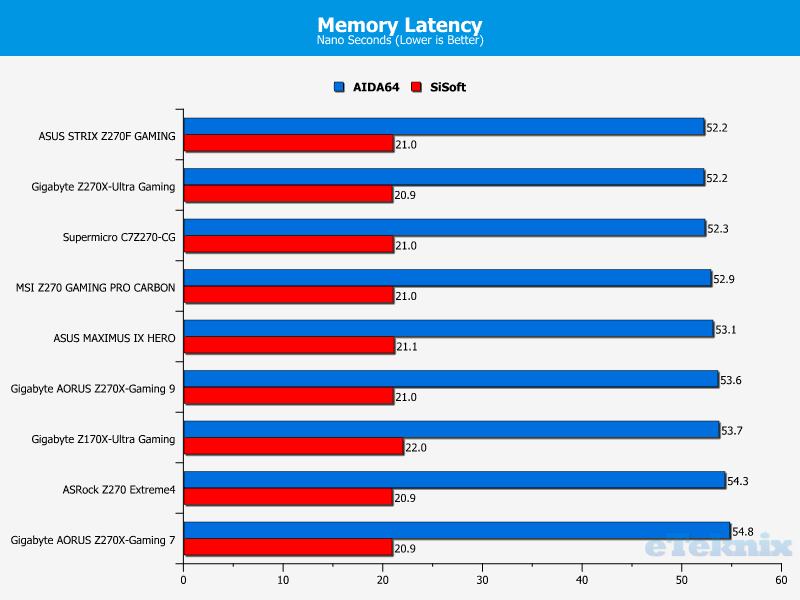
The memory latency during two widely-used benchmarks is exceptional and almost enough top finish in the top spot.
Storage Performance
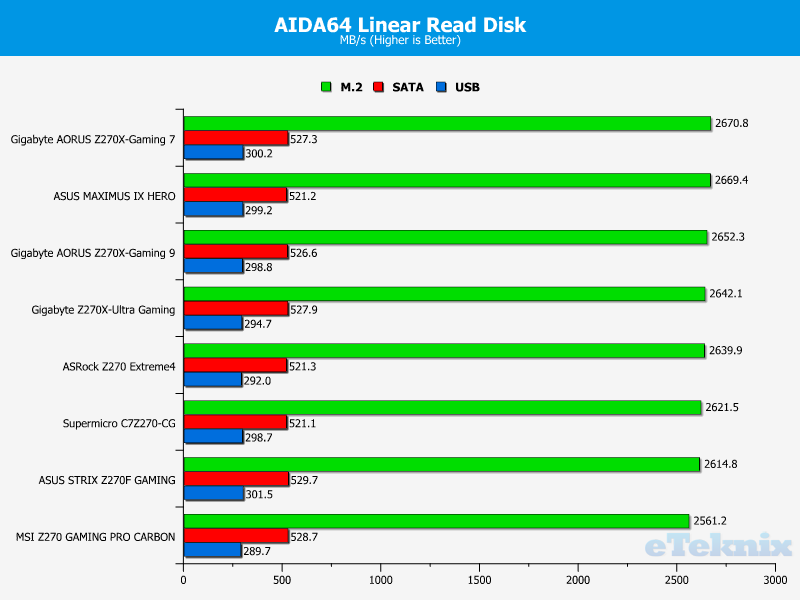
Linear Read
As you can see, the Supermicro C7Z270-CG offers an extremely fast M.2 read rate and the SATA performance is just as competitive. On another note, the USB 3.0 read rate was good and didn’t drop off in a sudden manner.
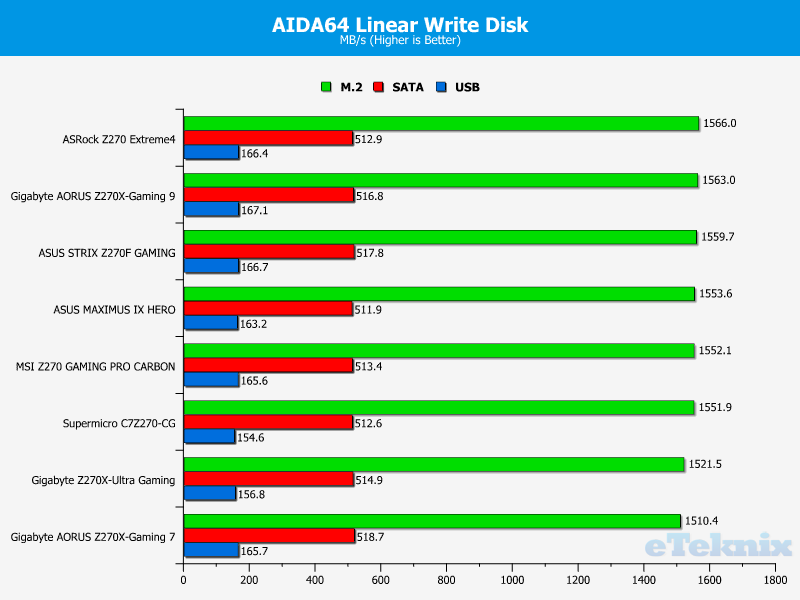
Linear Write
The motherboard’s write performance deserves a lot of praise because it takes advantage of various storage protocols rather nicely.
Networking Performance
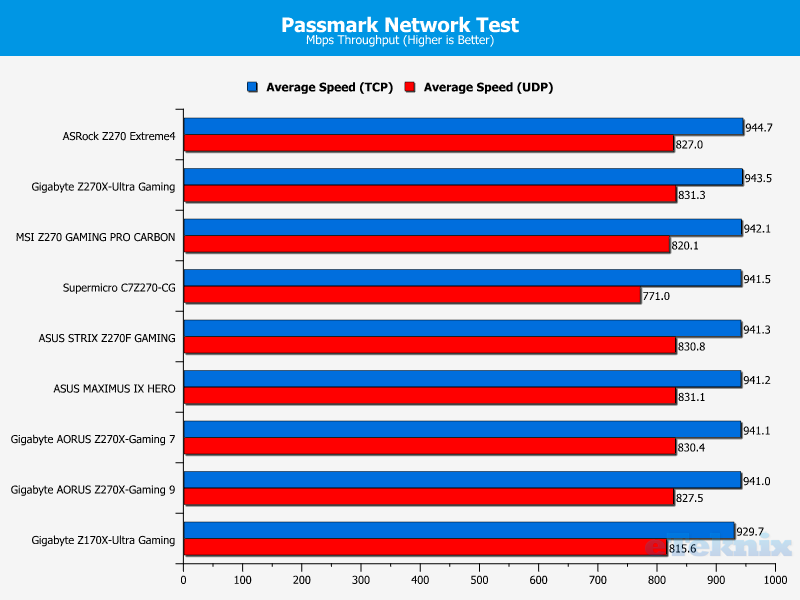
Passmark Performance Test 8 – Ethernet
When it comes to networking, the motherboard’s TCP speeds were superb, although the UDP rate left a lot to be desired.
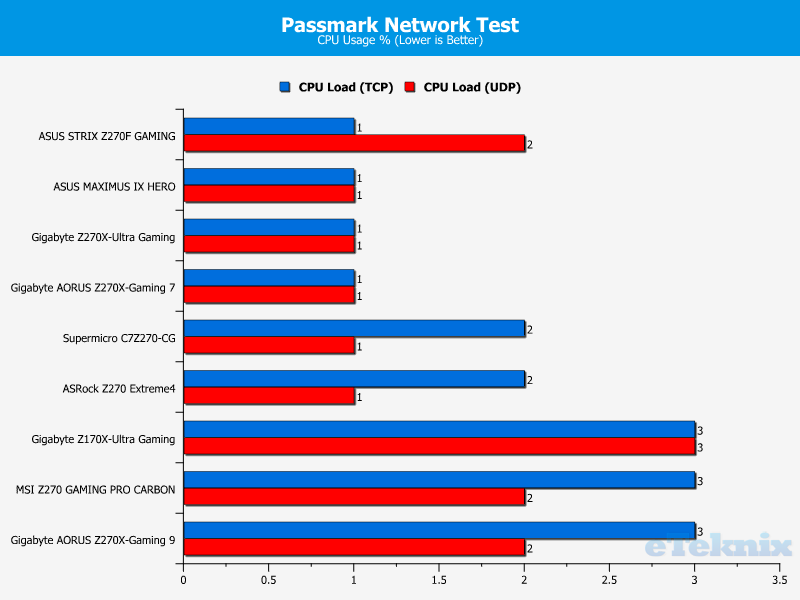
Passmark Performance Test 8 – CPU Work Load
The CPU utilisation in both TCP and UDP testing stays under 3 percent.
Audio Performance
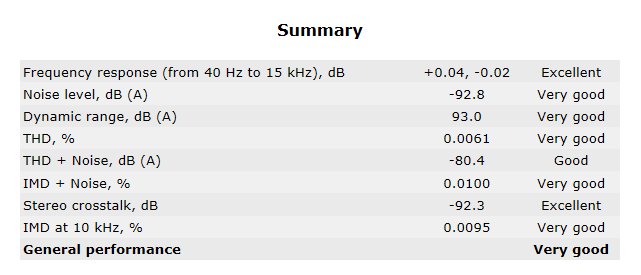
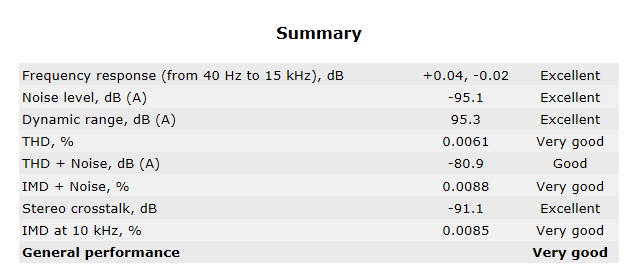
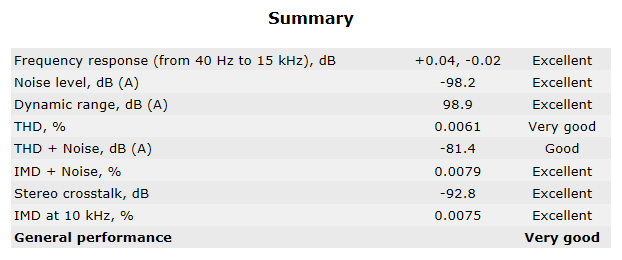
Despite utilising the older Realtek ALC1150 codec, the audio performance was splendid and greatly exceeded my expectations. The motherboard has an excellent frequency response, dynamic range and stereo crosstalk at various bit-rates. Not only that, the THD% was great and there’s very little to complain about.
16 Bit, 44KHz (DVD Quality)
16 Bit, 96KHz (Studio Quality)
24 Bit, 96KHz (Studio Quality)
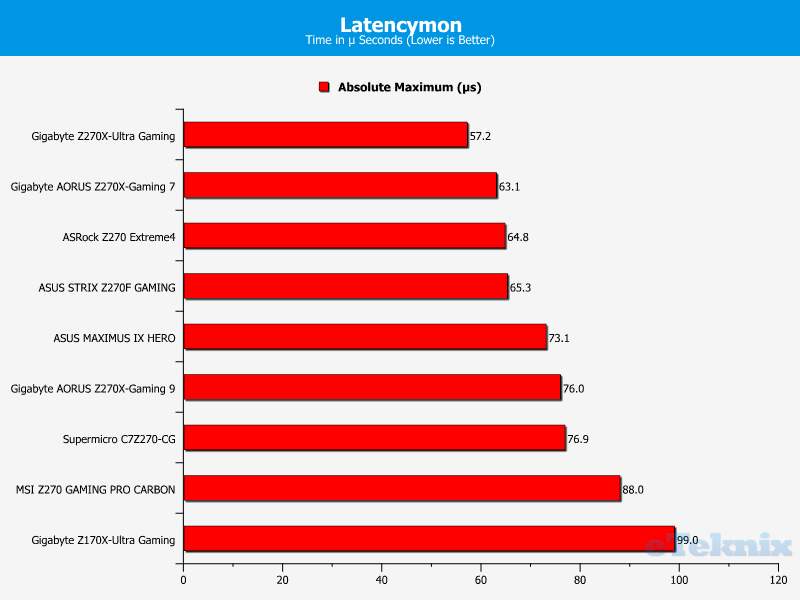
DPC Audio Latency Analyser
Here we can see the motherboard’s audio latency is pretty decent and easily forged ahead of the MSI Z270 GAMING PRO CARBON.
Power Consumption
When using the CPU’s default frequency, the total power draw is higher than many other Z270 motherboards. Saying that, it’s not the most power hungry motherboard tested for today’s launch. After the overclock was applied, the motherboard’s power consumption only increased by a small amount because the stock running employs a similar voltage under load.
Final Thoughts
Pricing
Unfortunately, there’s been a complete lack of information regarding the Z270 motherboards and their retail prices. As a result, it’s impossible to conduct a fair comparison between numerous products and assess the value proposition. Rest assured, once the full Z270 range is available to purchase, I’ll be adding the appropriate links and revisiting the pricing analysis. According to my sources, it’s likely vendors will add approximately £10-£30 compared to the previous generation. However, this doesn’t help matters when a company unveils something completely new and the predecessor can’t be researched to gauge a pricing estimate. Honestly, I’d expect more details to emerge during CES when PR contacts return from the holiday break.
Overview
The Supermicro C7Z270-CG’s colourful, bright green aesthetic is absolutely stunning and has a certain charm. Instead of opting for a neutral, understated visual style, the motherboard adopts a lavish finish which instantly captures your attention. Even though it might not be suitable for certain builds due to a colour clash, it’s Supermicro’s most attractive consumer motherboard by a considerable margin. Personally, I love the green PCI-E slots, imposing I/O cover and inventive PCH logo. Not only that, the audio segment’s shielding cover is a joy to look at and upholds a great level of synergy across the motherboard’s surface area. The colour contrast is flawless and the lack of RGB illumination didn’t prove to be a huge issue. If anything, infusing certain shades alongside the motherboard’s unusual colour scheme wouldn’t have helped matters. Of course, there is a white LED strip embedded in the PCH and the isolation trace lights up in a vibrant green hue.
As mentioned earlier, the motherboard utilises the finest quality components including Vitec 59PR72-151 chokes which have a -40C to 125C thermal range. Furthermore, the motherboard has a Primarion PXE1610BDN, PXC1410BPM and high-frequency power inductors. The capacitors are engineered to contend with extreme thermal variation and greatly improve the motherboard’s reliability. Interestingly, Supermicro incorporated as ASMedia ASM1142 controller to provide USB 3.1 Type-A and Type-C functionality. Speaking of storage options, the motherboard has dual M.2 support and two U2 ports. As a result, it’s possible to configure a ridiculously fast NVMe RAID0 array. On another note, the motherboard’s design is fantastic for overclocking enthusiasts due to the onboard buttons, diagnostic LED and buzzer. Rather surprisingly, the motherboard relies on the previous generation Realtek ALC1150, but it’s perfectly suitable for the task and excelled during RMAA testing.
Moving onto the BIOS, I have quite a lot of complaints but at least Supermicro didn’t rest on their laurels and tried to update the user interface. Unfortunately, the BIOS is still far too complex for its own good and likely to bamboozle users without exceptional technical knowledge. On the one hand, Supermicro products are tailored towards knowledgeable enthusiasts with a penchant for the finer details. However, the company surely wants to go beyond their core user base and encourage regular consumers to consider a Supermicro motherboard for the very first time. There are other problems too such as the drop down menu failing to show which particular setting has been selected and the larger header text being not being aligned properly. Thankfully some of these are easy fixes and would go some way to improve people’s comfort when browsing different sections of the BIOS. Overall, I think Supermicro is moving in the right direction and it’s a matter of when not if in regards to making the BIOS more polished.
In terms of performance, the motherboard fares pretty well and doesn’t have any major weaknesses barring the mediocre UDP networking speeds. Even though it’s unable to top the charts, the performance deficit is exceedingly small and you’re not going to reap any substantial benefits by purchasing the product in first place. Evidently, the motherboard choice doesn’t inhibit the gaming experience or multi-threaded capabilities. One area that should be considered carefully is the ease of overclocking. Unlike some of the other options being launched today, you can’t simply dial in the core ratio and insert the desired voltage. To be clear, the motherboard’s power circuitry is excellent and the limitation stems from the CPU itself. On the other hand, overclocking on a Supermicro motherboard isn’t as user-friendly. If you can accept this and employ a patient approach, the motherboard will easily fulfil your needs.
Pros
- Consistent storage speeds
- Daring aesthetic design
- Excellent NVMe storage options including M.2 and U.2
- Good memory latency
- Great selection of onboard tools for overclocking
- Impeccable power circuitry
- Onboard buzzer is helpful for troubleshooting
- Server-grade reliability
- Superb audio results despite using older ALC1150 codec
Cons
- BIOS layout is a little cumbersome and intimidating to newcomers
- BIOS needing tweaking to accept a simple XMP profile
- Lacklustre UDP networking speeds
“Supermicro has created another extremely reliable, feature-rich motherboard which brings server quality to the consumer market. While I love the vibrant green colour scheme, the BIOS needs tweaking to welcome those without prior experience of Supermicro products.”

Supermicro C7Z270-CG LGA1151 Motherboard Review
Thank you Supermicro for providing us with this sample.


