Corsair 460X RGB White Tempered Glass Chassis Review
Peter Donnell / 5 years ago
A Closer Look – Interior
Removing the glass is easy enough, just undo the four thumbscrews in the corners and lift it away. By doing this, you can easily install all of your hardware. This is an ATX chassis, and it does have impressive support, but it is also just a little compact too. This is a good thing, as it has a smaller footprint, but just be sure to measure twice to ensure your hardware will all fit as it can quickly get snug in there.

Below the motherboard, there’s a two-part white plastic PSU shroud. You can lift this out to easily install your PSU, then put it back in place to hide all those nasty cables out of sight. Cable routing is important in such a clean looking chassis with big windows on the side.

Rear Cooling Mount
In the back, there’s easily room for a 120mm fan, but more so a 120mm radiator such as an AIO. The elongated screw holes mean you can adjust the height of the fan/radiator too, ensuring maximum compatibility. I like that the PCIe brackets and other fittings are black too, it just breaks up white a little bit, giving some contrast.

There are plentiful cable routing options around the motherboard, as well as large routing grommets to the right. There’s even a huge CPU cooler mounting cut-out behind the motherboard, which should ease the installation process.

RGB Fans
The three fans are pre-installed in the front, but there’s no reason why you can’t move them elsewhere in the chassis. They’re all 120mm, although the chassis does have fittings for 140mm in the front too; something I’ll be taking advantage of in my build today.
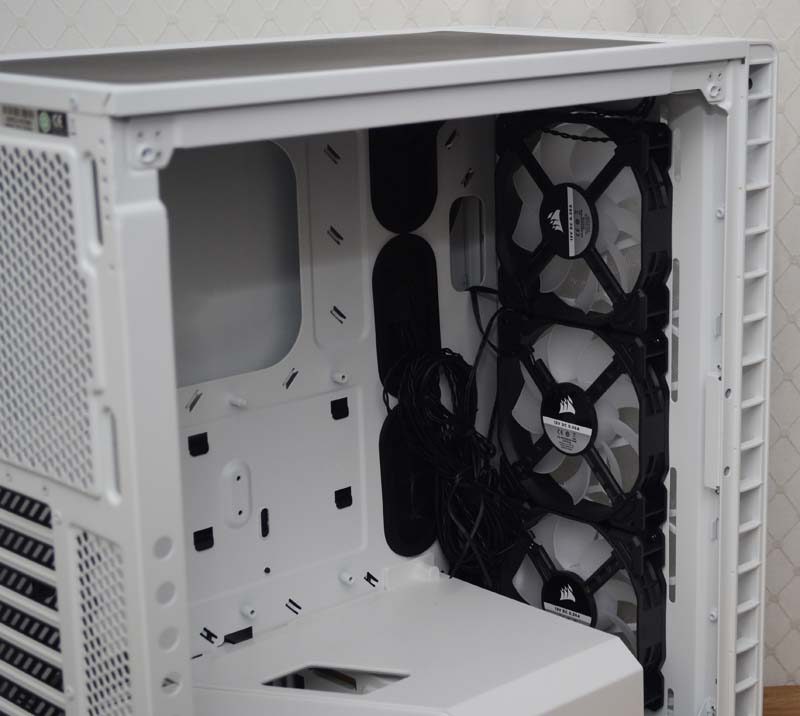
There’s a small cut-away towards the front of the shroud too, which improves support for front panel radiators, as well as giving the fans room to do their job.

Behind the Motherboard
There are even more things going on behind the motherboard too. With extensive cable routing ties down points, and routing holes to keep things as tidy as possible.
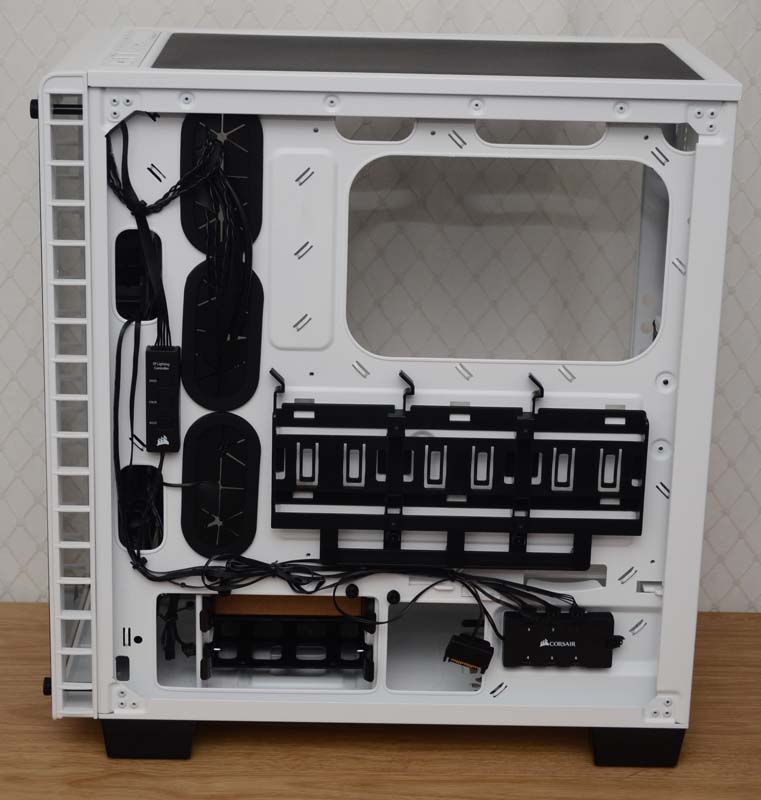
All of the storage bays are hidden out of sight on this chassis. You’ll find three dedicated 2.5″ tool-free mounts right behind the motherboard; perfect for your SSDs.

However, there are also two 3.5″ drive mounts tucked under the PSU shroud, giving you five drive mounts in total.

The RGB lighting can be controlled front the front panel, but also runs through an internal controller. Not sure why you need two controllers, but I’m not going to complain.

That control then runs to a 6 port RGB lighting hub which is powered by a single SATA cable. This means you can control up to 6 x Corsair RGB fans with ease.


