OWC Drive Dock with Thunderbolt 2 & USB 3.1 Review
Bohs Hansen / 7 years ago
Introduction
OWC‘s Drive Dock with Thunderbolt 2 and USB 3.1 isn’t the cheapest docking solution on the market, but it does also bring more features than the average drive dock. We get a dual setup for SATA-based drives and a dual connectivity too.
Connection Options
With the USB 3.1 connector, you’re able to connect the OWC Drive Dock to pretty much any system. The unit itself is using a Type-B connector, and the included cable has a Type-A connector for the system end. The USB protocol is only USB 3.1 Gen.1 so that you won’t get more than 5Gbps max throughput here.
The second connection is what sets this unit apart from the rest. The Drive Dock also features a Thunderbolt 2 connector with a theoretical throughput of up to 20Gbps. This type of connector is more for the Mac OS users than Windows users, but not exclusively. Thunderbolt does bring other advantages over USB such as the ability to run a software RAID on a Windows-based system.
With USB, the Drive Dock can deliver up to 430MB/s, and with Thunderbolt it can deliver up to 520MB/s throughput.
Drive Support
The OWC Drive Dock supports all types of SATA-based drives, well almost. You won’t be able to plug in a micro SATA or module, but you’re covered for the rest. Whether you want to use the Drive Dock for large capacity hard disk drives or speedy solid state drives, the Drive Dock will handle them.
Modern large-capacity drives with 10TB capacity isn’t an issue for the Drive Dock. So you’re covered in that regard. SSDs are also fully supported, but we do have the connection options speed limitations here. With the Thunderbolt connection, we also get close to the full speed of the SSD. But we’ll take an in depth look at the performance itself on the following pages.
Supports RAID, but with limitations
As mentioned earlier, software RAID is an option for the OWC Drive Dock. Mac OS and Linux users won’t have any issues at all, but Windows users will run into some limitations. The drives need to be converted to dynamic disks for software RAID and that most likely won’t work under Windows, at least if you’re using the USB connection. With Thunderbolt, Windows can handle software RAID with dynamic disks just fine.
Feature Highlights
- Thunderbolt 2 and USB 3.1 Gen.1
- Supports two drives at once
- Supports software RAID (with limitations)
- Built-in power supply for a clean setup
- Daisy Chaining of devices through Thunderbolt
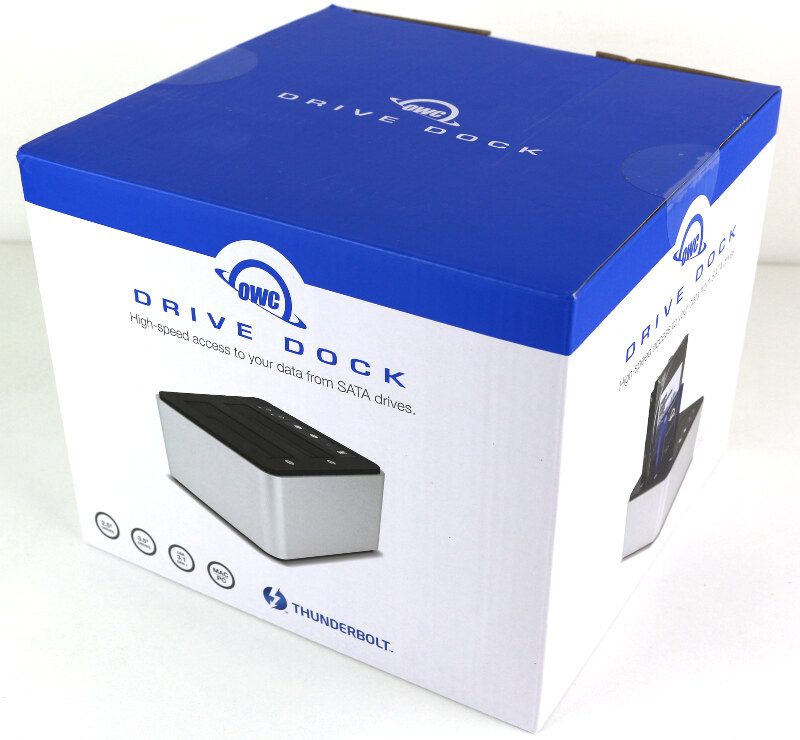
Package and Accessories
The package is simple, but also good looking. The name and drive dock itself are pictured on most sides along with the main feature highlights.
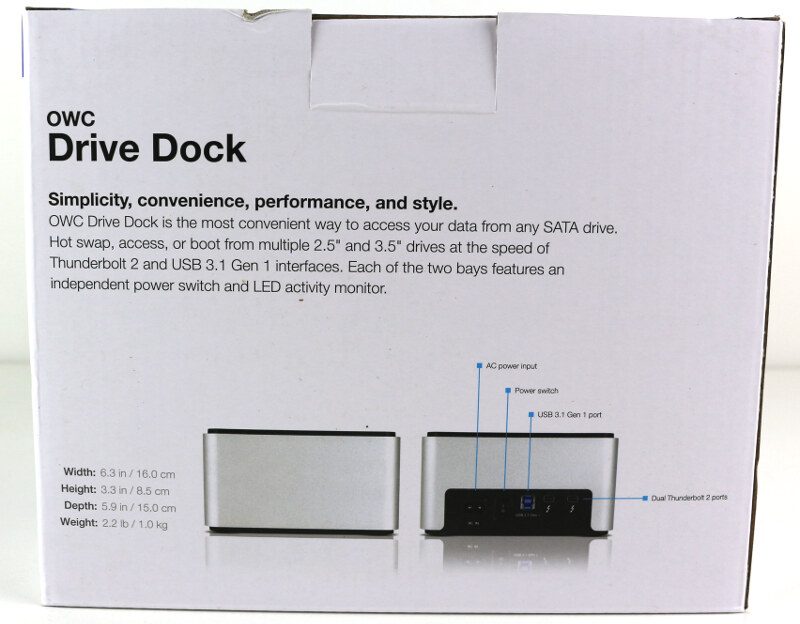
The rear side has a few more details, and it also shows the connection options of the Drive Dock.
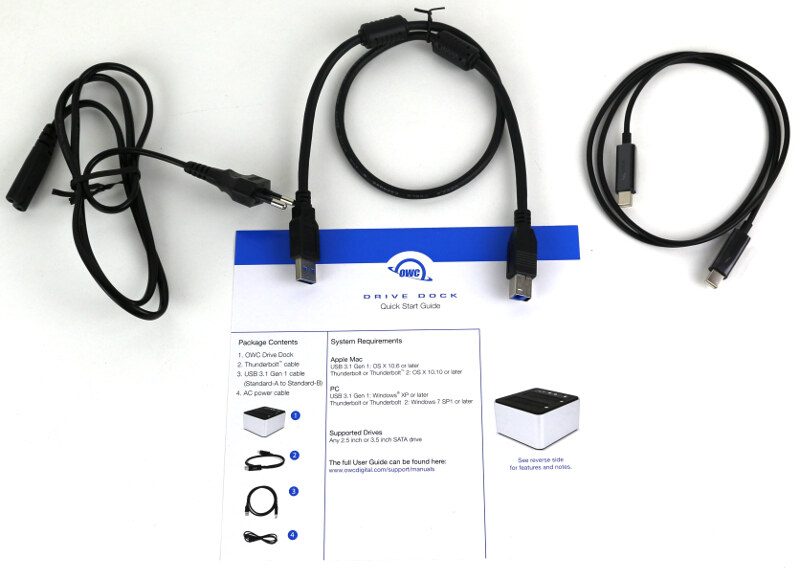
Included is a power cable for your region, in this case, an EU cable. There’s also a USB and a Thunderbolt cable. Especially the included Thunderbolt cable is a nice addition as that isn’t a given for all products. There’s also a small quick start guide in case you need that.
A Closer Look.
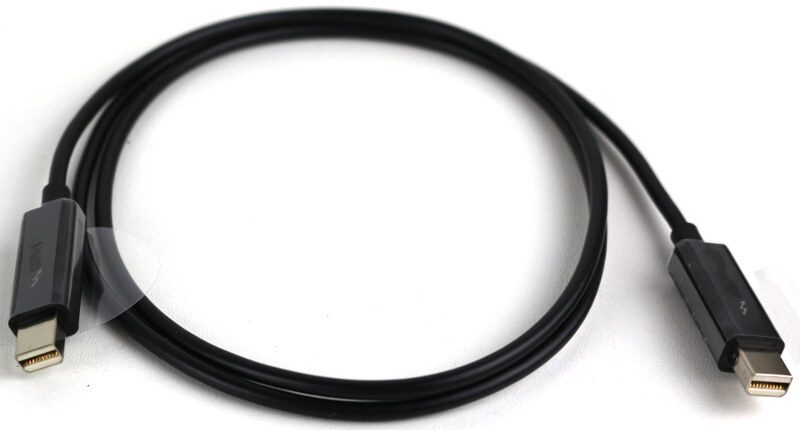
Before we get to the actual testing, let us have a closer look at the device and its accessories. The included Thunderbolt cable is 1 meter long and a great bonus to get with the device. Most Thunderbolt devices come without a cable and require you to get them yourself.
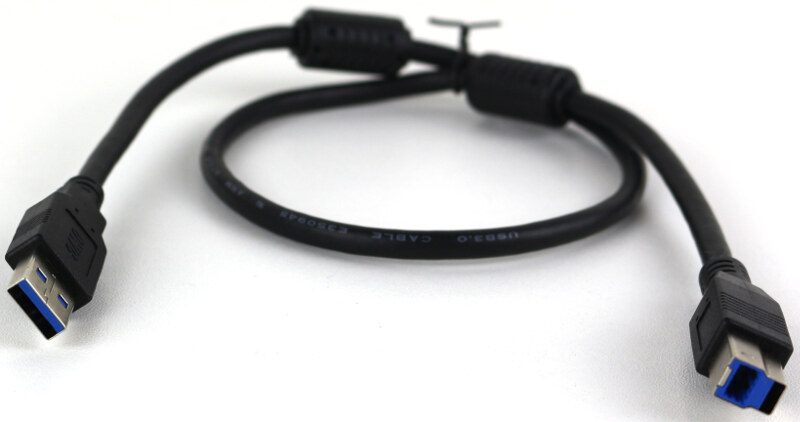
The included USB cable is a little shorter with just 60cm length. It is a classic Type-B to Type-A cable which is the strongest option. While the large plugs make for a sturdy connection, it also offers compatibility with almost any USB host.
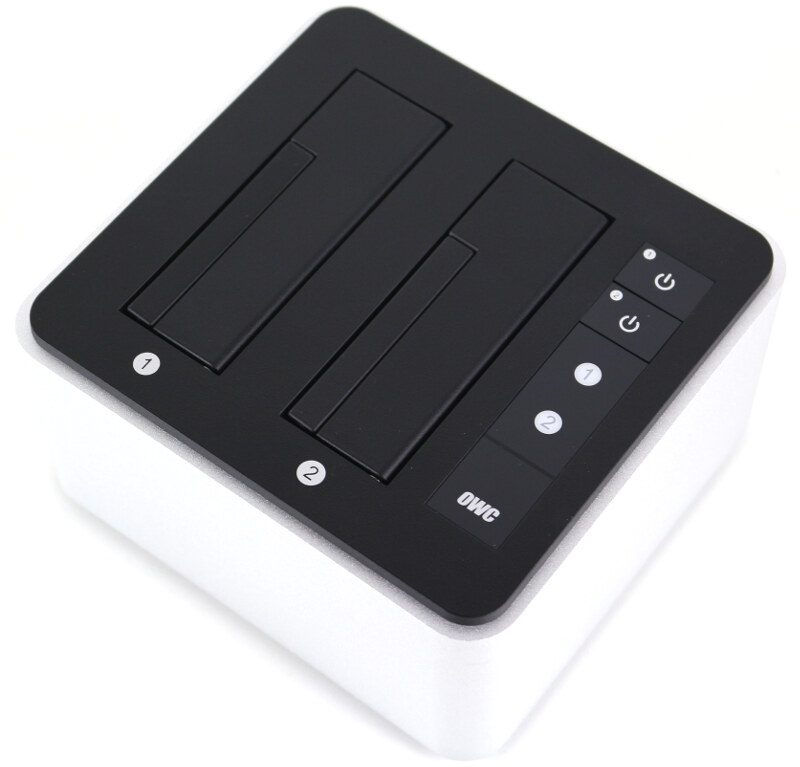
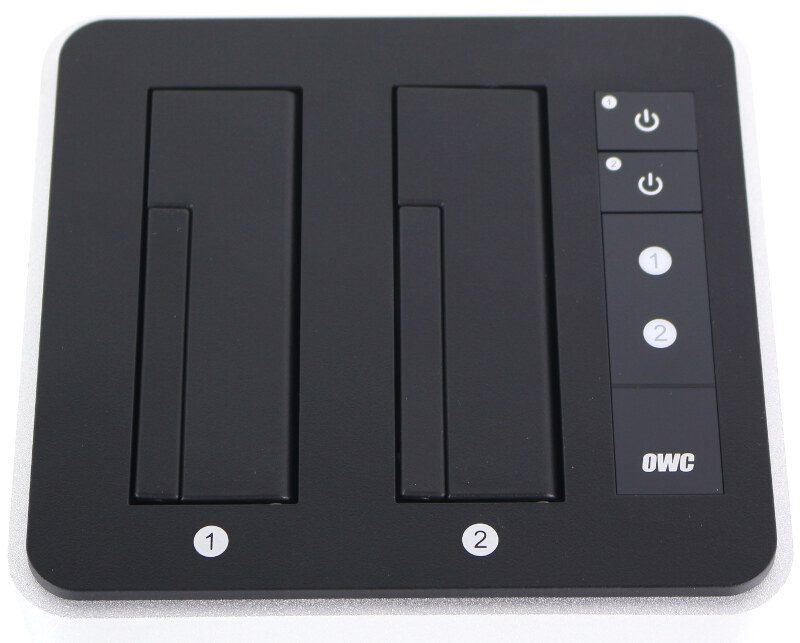
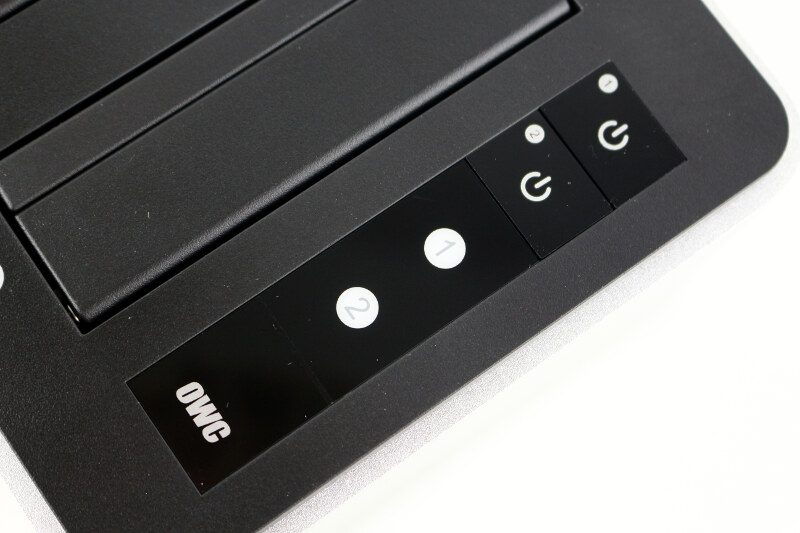
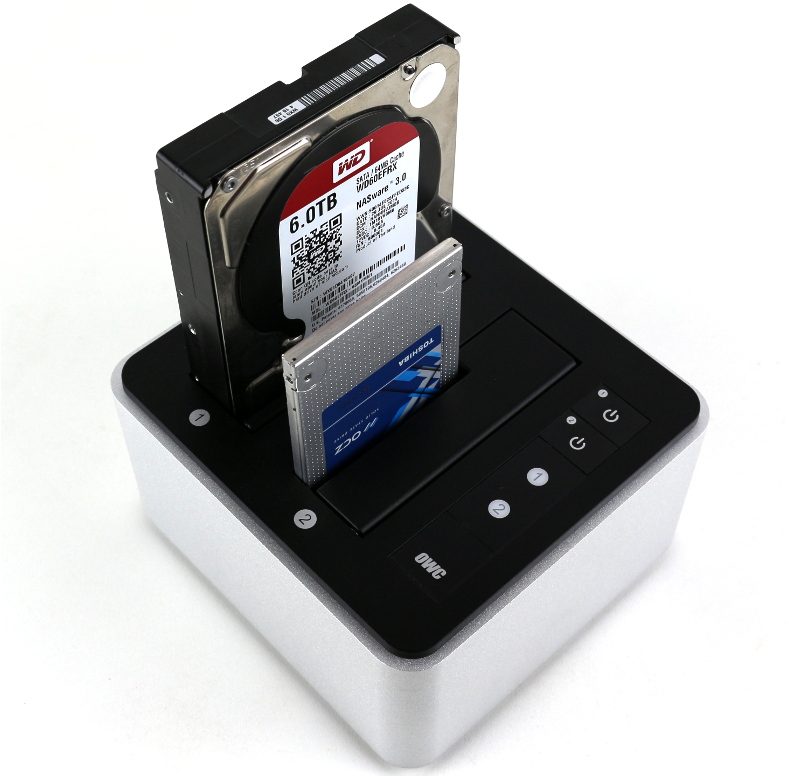
Top of the Drive Dock
The top of the Drive Dock features multi-coloured activity LEDs for each drive and a soft power button for them. The individual power buttons are great as it allows you to turn a single drive on and off as you need to.
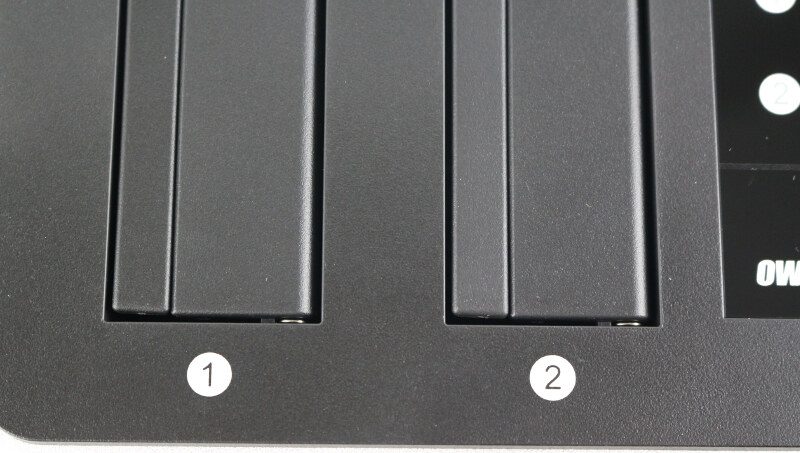
Each drive bay is marked with a number, making sure you always know which drive is which.
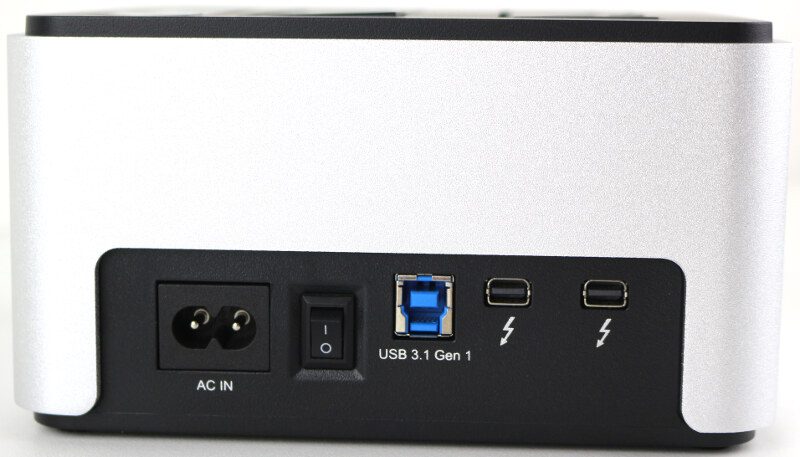
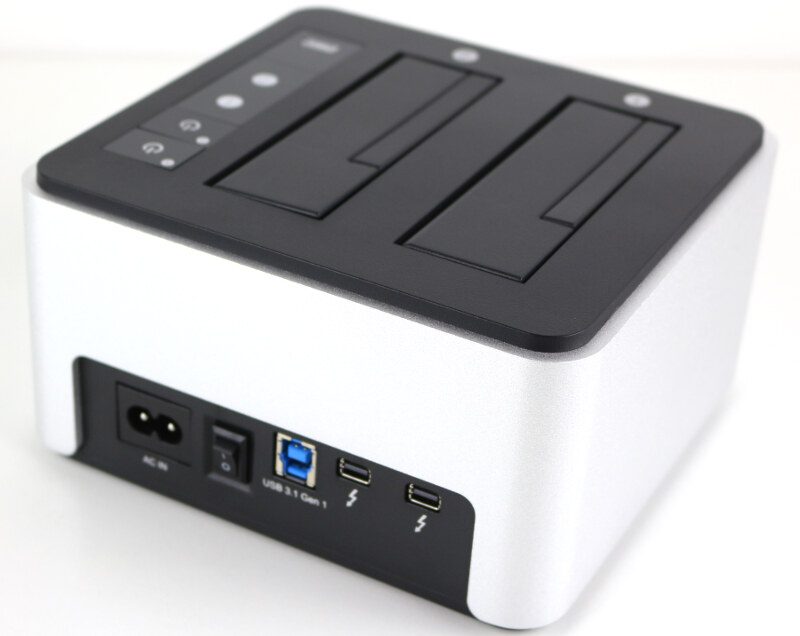
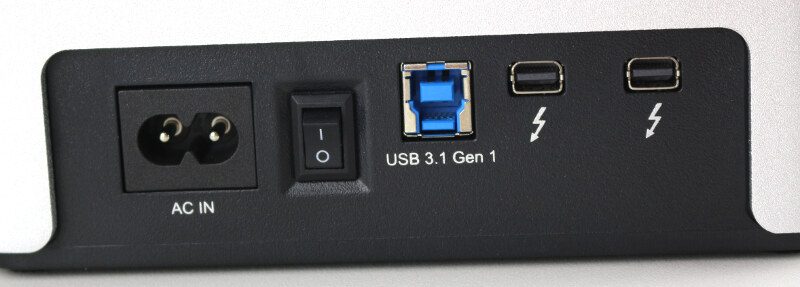
Rear of the Drive Dock
The rear side has all the connectors. The PSU is built-in which makes the unit a bit heavier. The larger weight makes for a better stand on your desk, and it also delivers a cleaner setup. There is no need for extra power bricks and external PSUs to be located around your workstation with the Drive Dock.
The rear side also features a hard-power button for the entire unit along with the USB 3.1 and two Thunderbolt 2 connectors.
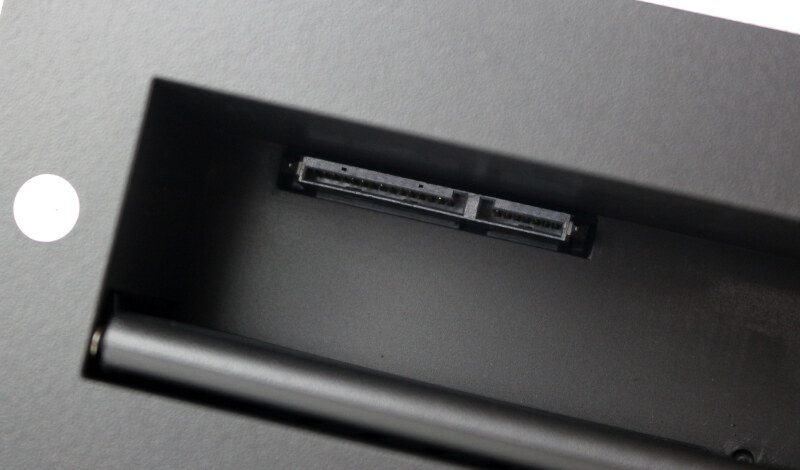
The drives connect to a standard SATA connector inside the unit. You can plug any standard SATA 2.5 or 3.5-inch drives into this unit.
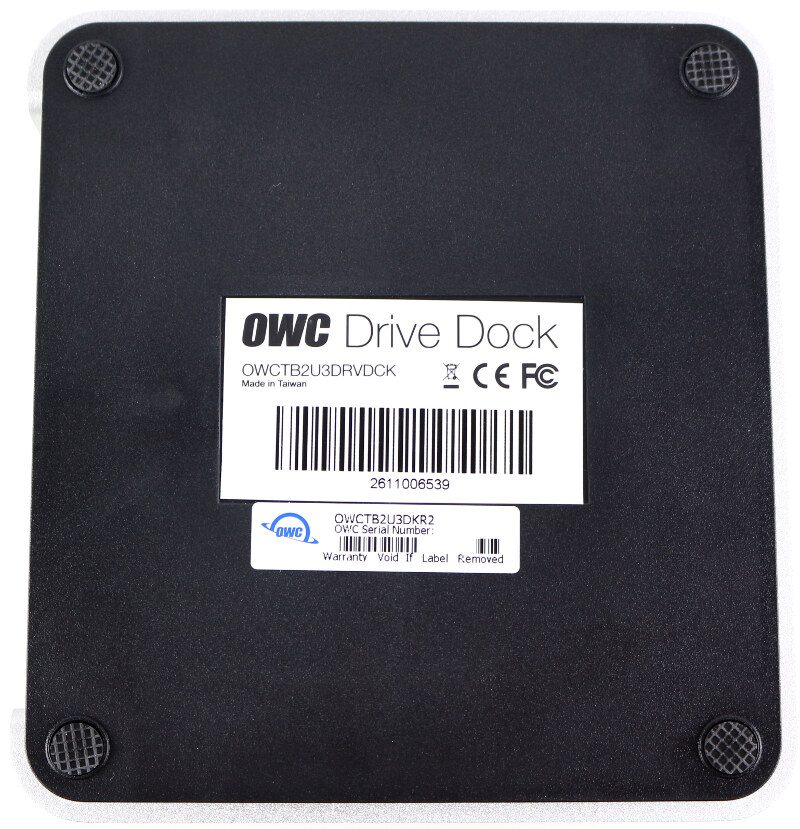
Bottom of the Drive Dock
The bottom of the unit doesn’t feature a lot, but that’s no surprise here. There are a couple of stickers with the product and serial numbers and four small rubber feet. The feet make sure that the unit stays where you place it and also capture some of the vibrations that mechanical drives make.
Test System, Software & Methodology.
For this kind of reviews, I use two types of drives whenever it is possible, HDDs and SSDs. Hard drives have the capacity advantage while SSDs provide the better performance. Both have their merits, and it depends on your usage scenario which you’ll opt to get and use.
The drives will be tested in all available drive modes. In this case, we only have software RAID and with limitations. I will still test this as it is a possible usage scenario for users down the road. Each drive mode is tested with a variety of benchmark apps before it’s destroyed and I move onto the next mode. That will give you a great view of a possible setup’s performance and comparable values to other reviews and devices.
Some of our benchmark applications can’t deal with dynamic disks and software RAID. That includes AS SSD and AIDA64. For those tests, I’ll leave out the two apps as the results will be same as a single drive setup.
Test system for USB:
- Gigabyte Z79X UD5H-BK
- Intel Core i7-4790K
- G.Skill Ares DDR3 1866MHz (2x4GB)
- Toshiba OCZ VX500 512GB SSD
- CoolerMaster Silent Pro Hybrid 850W
- Noctua NH-D15S
- Dimastech Easy V3
- Windows 10 Pro
Test system for Thunderbolt:
- Supermicro C7Z87-OCE
- Intel Xeon E3-1230Lv3
- Corsair Vengeance 1866MHz (2x4GB)
- OCZ VX500 512GB SSD
- Sapphire R7 240 2GB
- be quiet! Dark Power Pro 11 1200W
- Noctua NH-D15S
- Lian Li PC-T60
- Windows 7 Ultimate
Software used:
- AIDA64 Storage Benchmark
- Anvil’s Storage Utilities
- ATTO Disk Benchmark
- AS SSD Benchmark
- CrystalDiskMark 64bit
Storage Drives used:
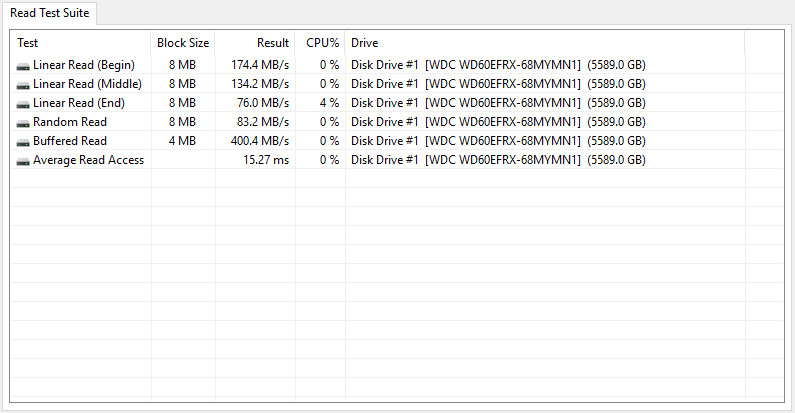
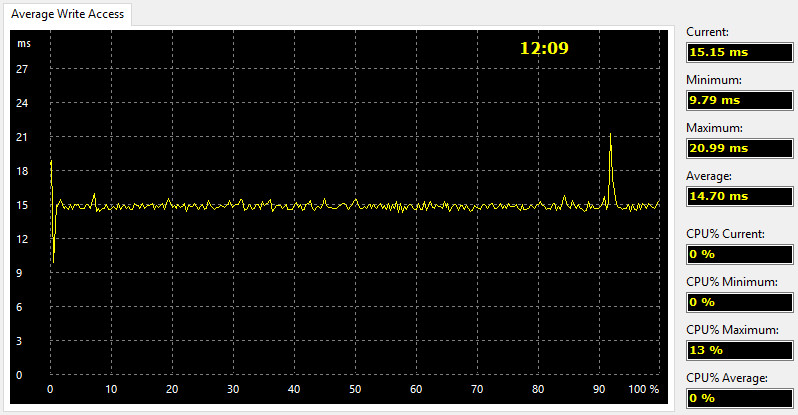
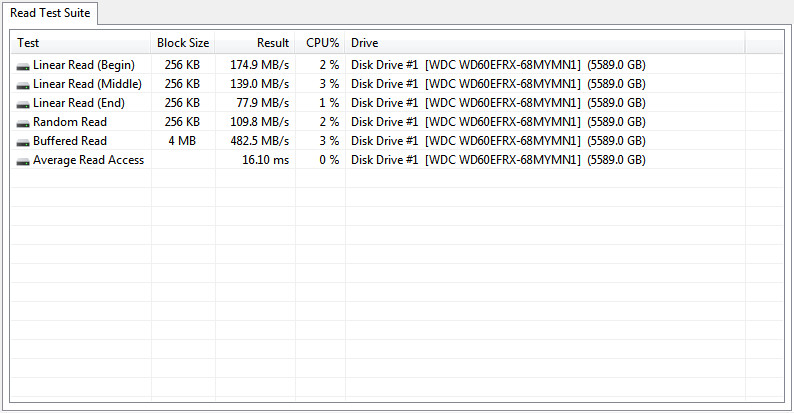
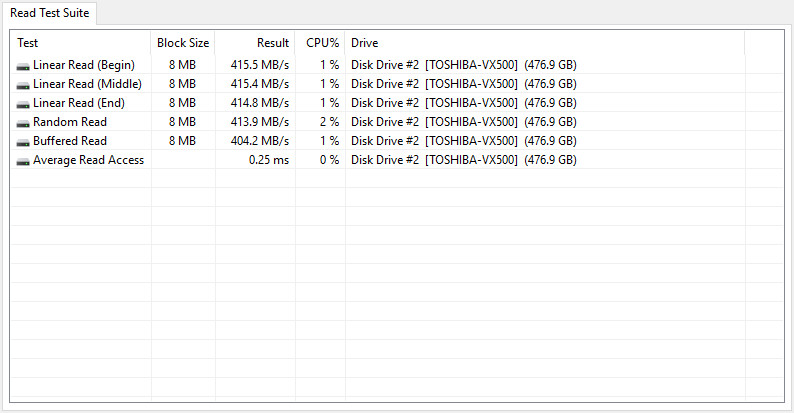
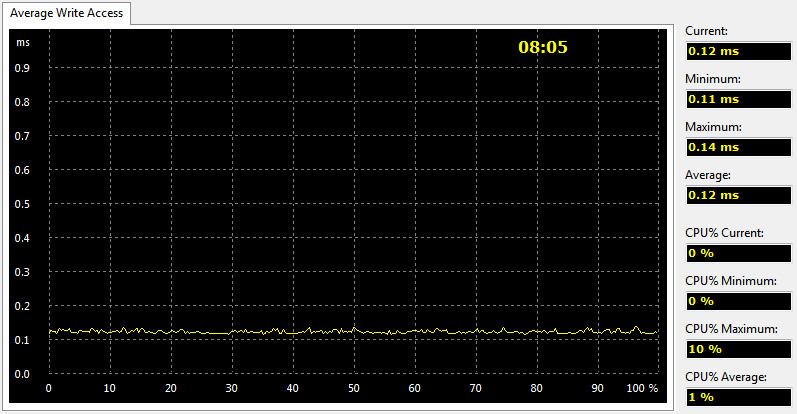
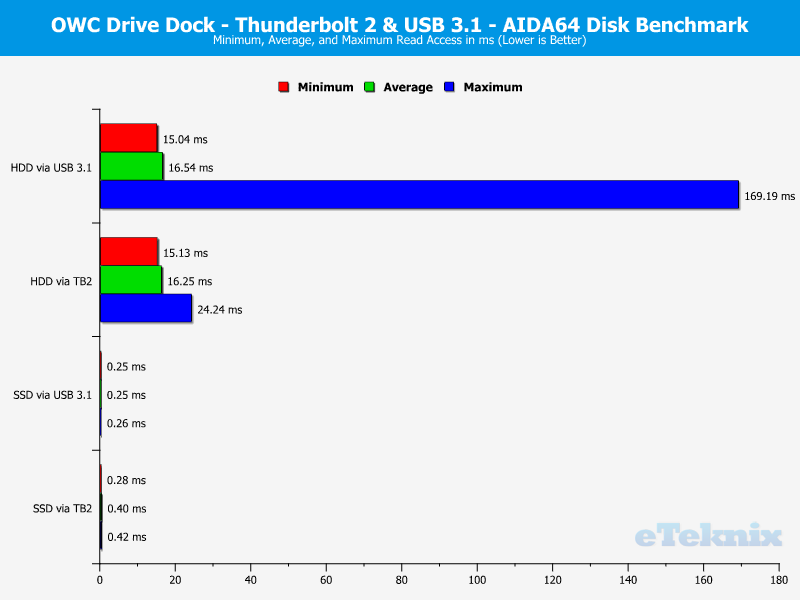
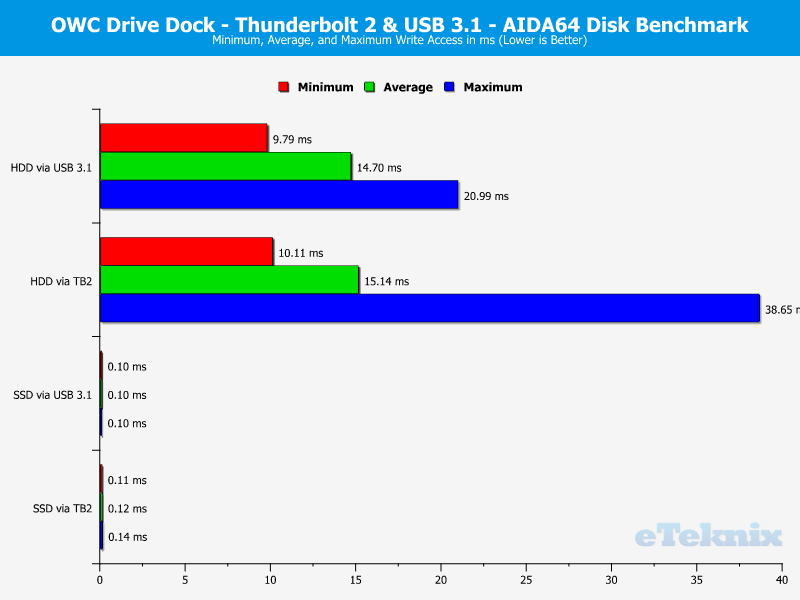
AIDA64 Storage Utilities
AIDA64 is a streamlined Windows diagnostic and benchmarking software for home users with a broad range of features to assist in overclocking, hardware error diagnosis, stress testing, and sensor monitoring.
The app has unique capabilities to assess the performance of the processor, system memory, and disk drives and is compatible with most Microsoft Windows operating systems. It also has a disk benchmark tool, and that is the one I’ll be using.
HDD via USB 3.1
Single drive setup connected to an Intel controlled motherboard port.

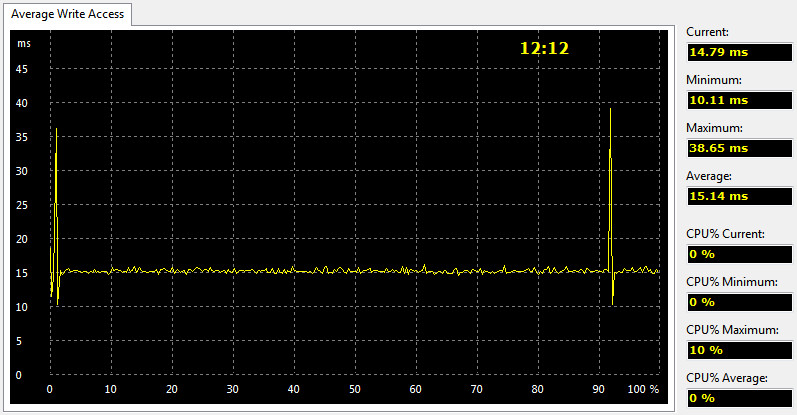
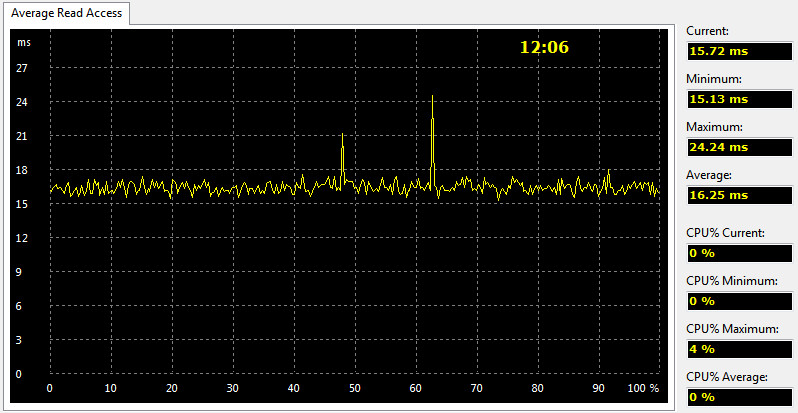
HDD via TB2
Single drive setup connected to an onboard Thunderbolt 2 controller.
SSD via USB 3.1
Single drive setup connected to an Intel controlled motherboard port.
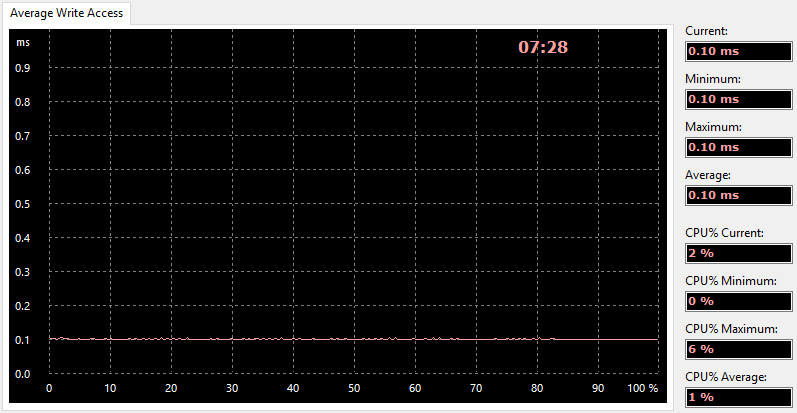
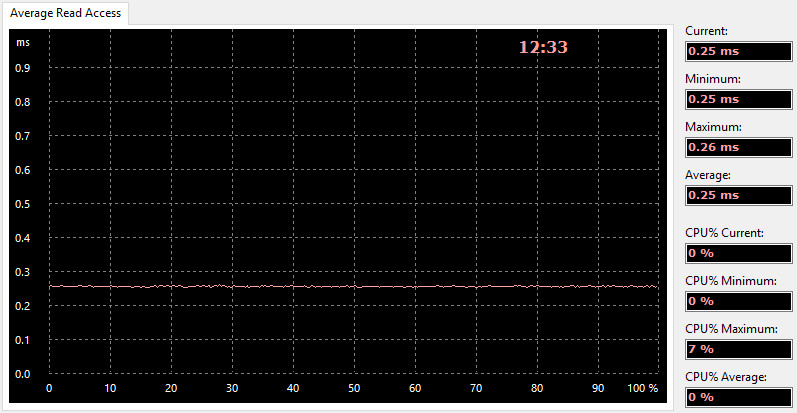
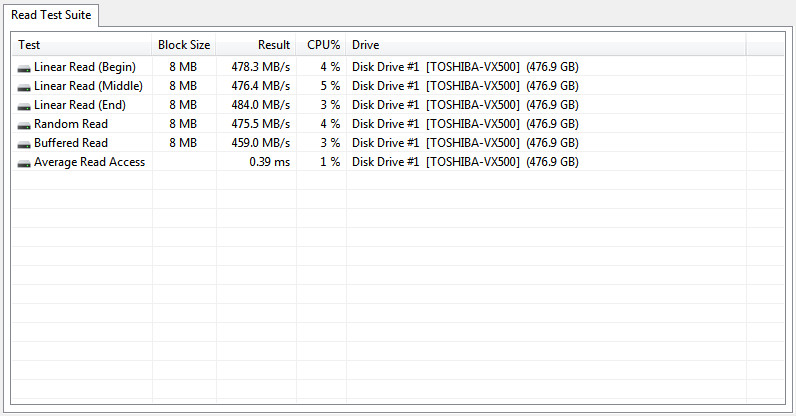
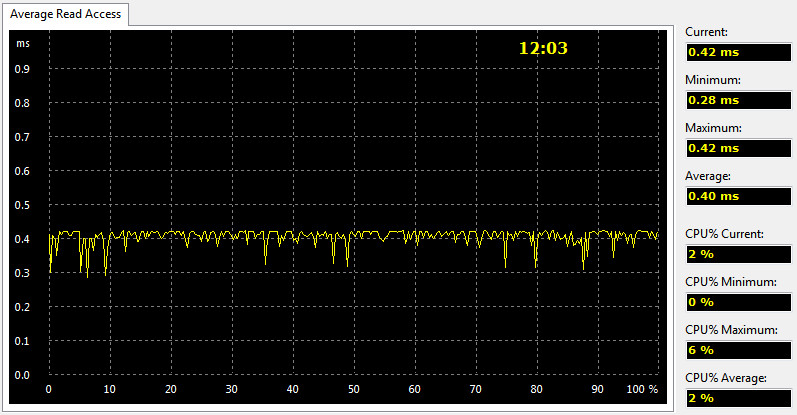
SSD via TB2
Single drive setup connected to an onboard Thunderbolt 2 controller.
Performance Analysis
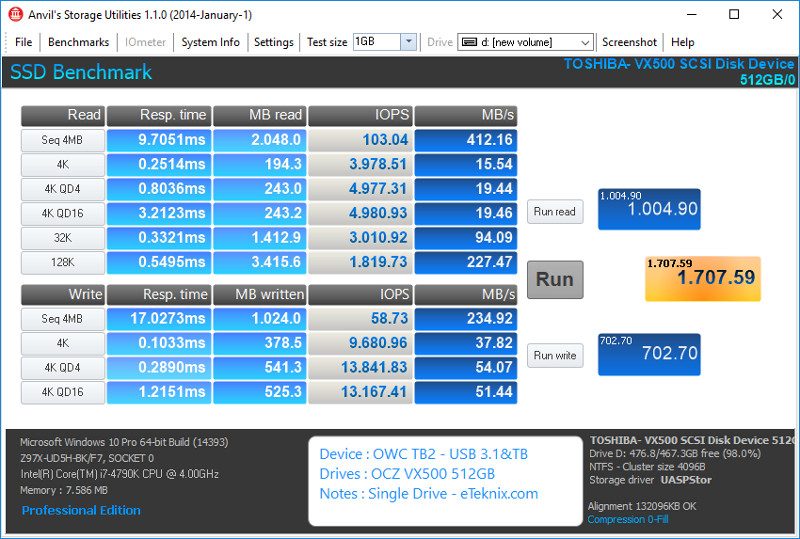
Anvil’s Storage Utilities.
Anvil’s Storage Utilities is a complete benchmark solution used to test any write-able storage drive. It has a variety of settings and options as well as a multitude of tests.
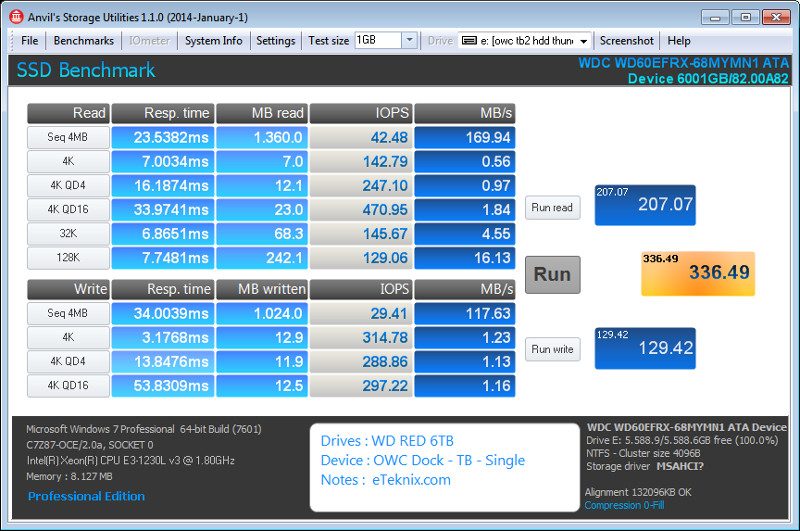
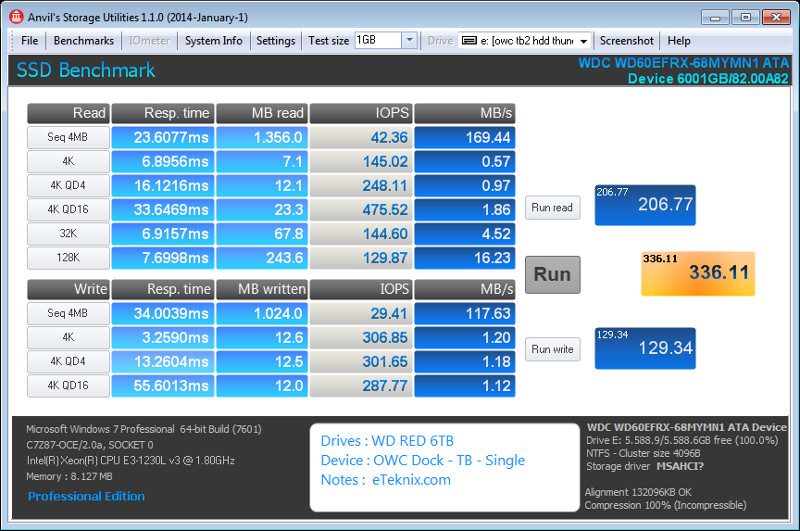
HDD via USB 3.1
Single drive setup connected to an Intel controlled motherboard port.


HDD via TB2
Single drive setup connected to an onboard Thunderbolt 2 controller.
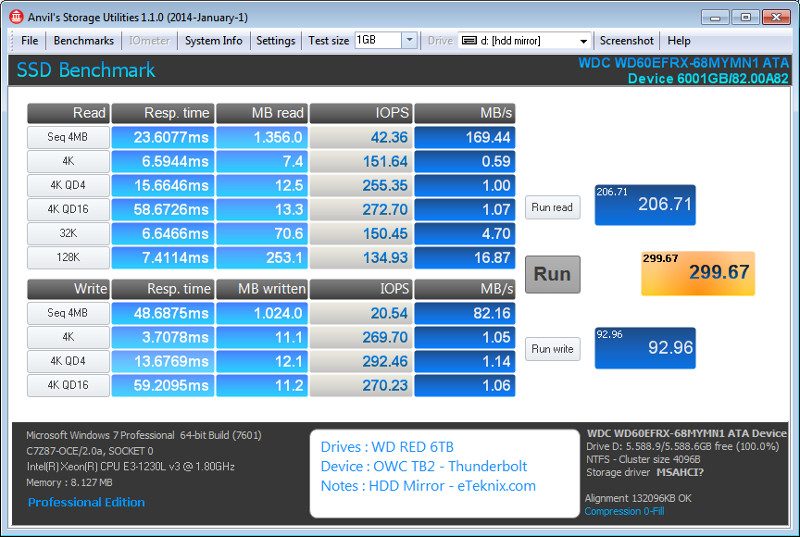
HDD Mirror (TB2)
Dual drive setup connected to an onboard Thunderbolt 2 controller and set up with software RAID.

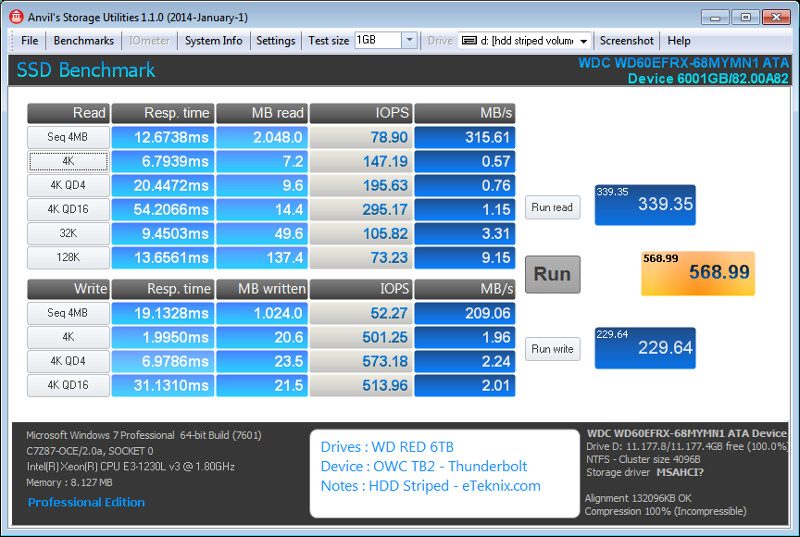
HDD Striped (TB2)
Dual drive setup connected to an onboard Thunderbolt 2 controller and set up with software RAID.

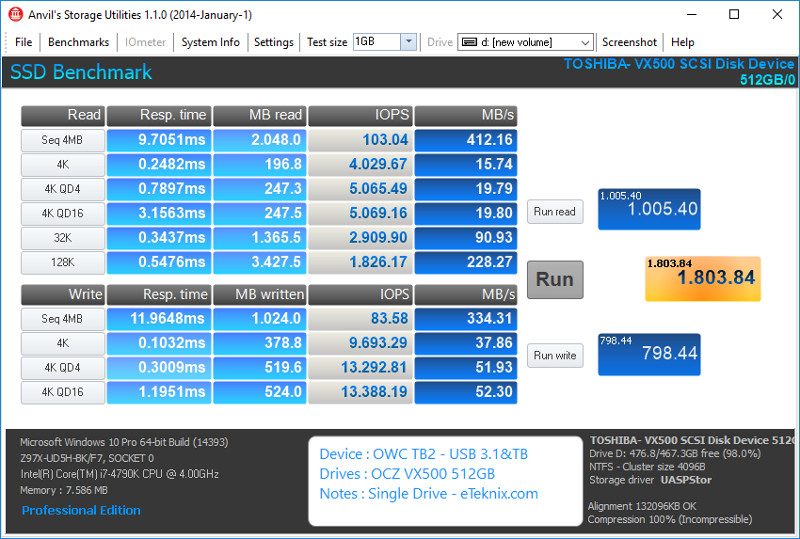
SSD via USB 3.1
Single drive setup connected to an Intel controlled motherboard port.
SSD via TB2
Single drive setup connected to an onboard Thunderbolt 2 controller.


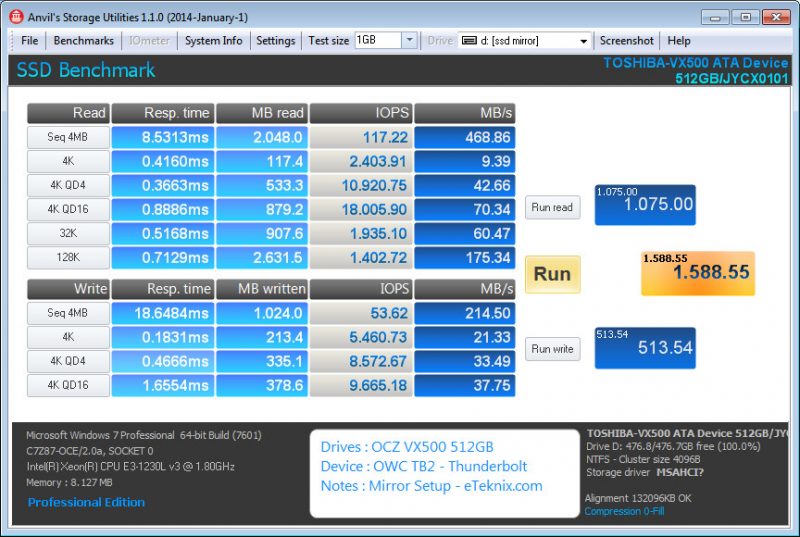
SSD Mirror (TB2)
Dual drive setup connected to an onboard Thunderbolt 2 controller and set up with software RAID.

SSD Striped (TB2)
Dual drive setup connected to an onboard Thunderbolt 2 controller and set up with software RAID.


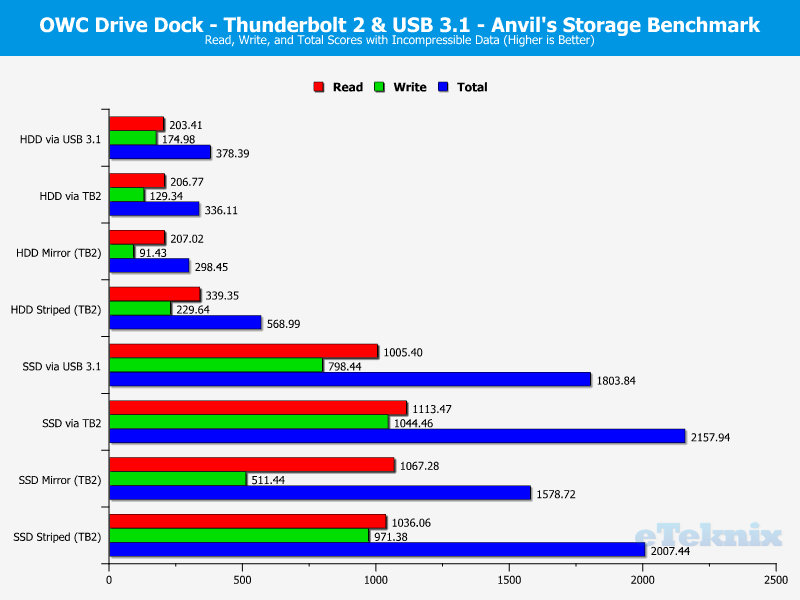
Performance Analysis

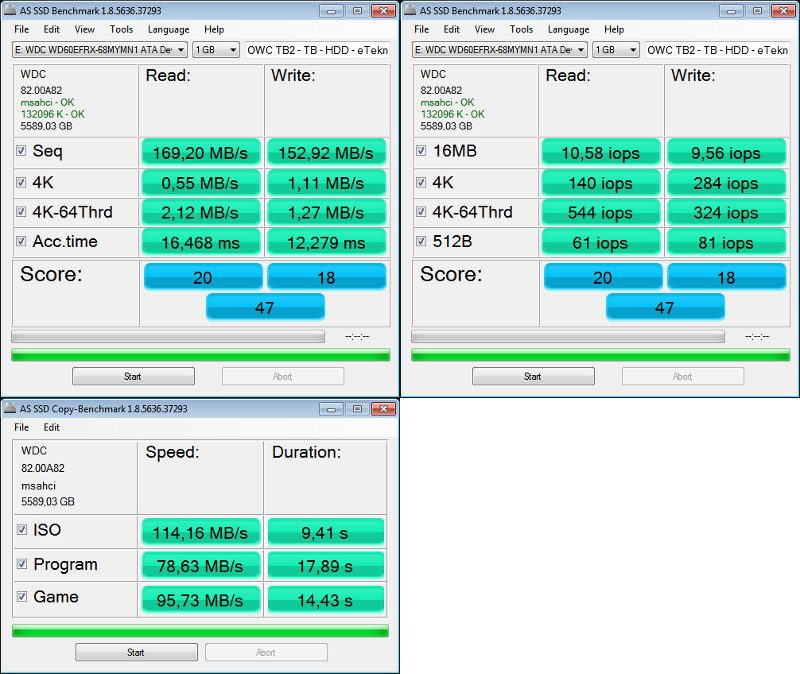
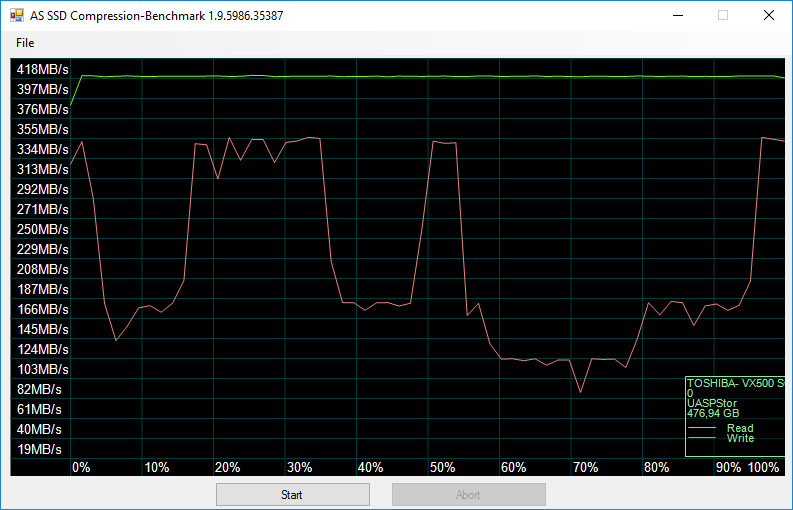
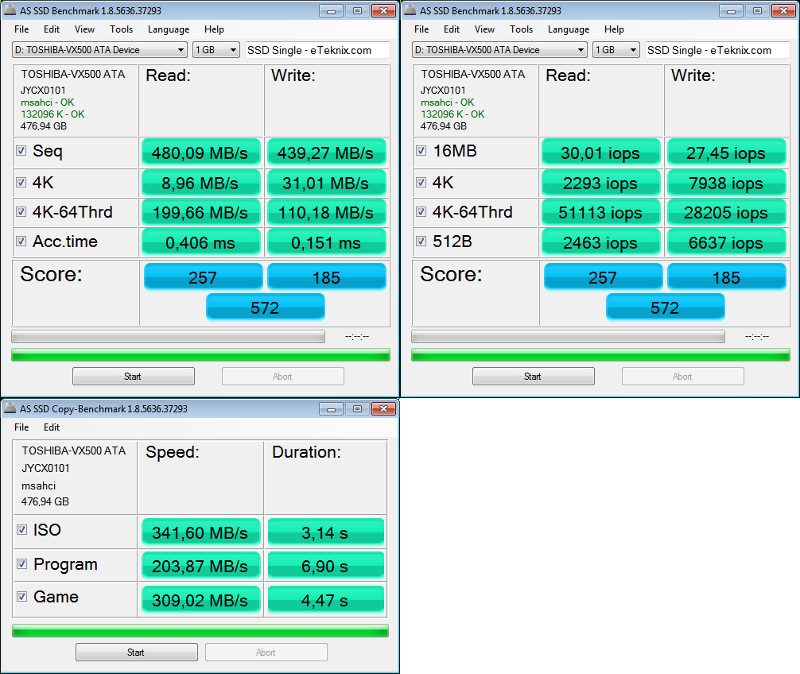
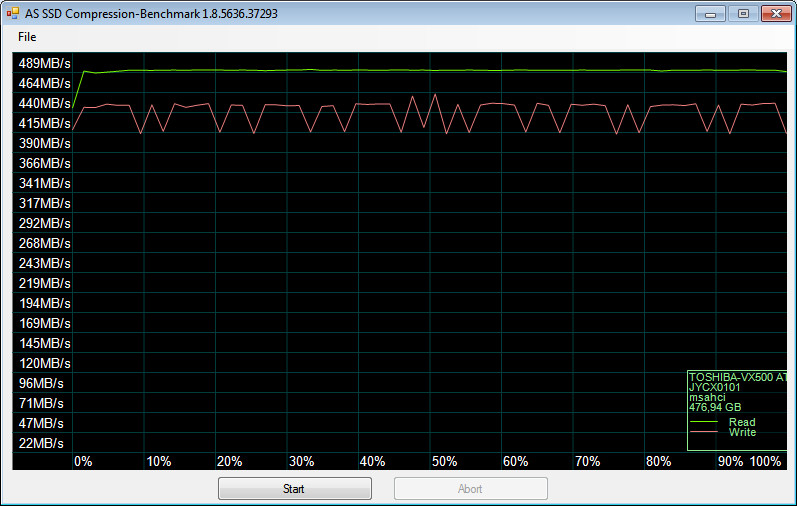
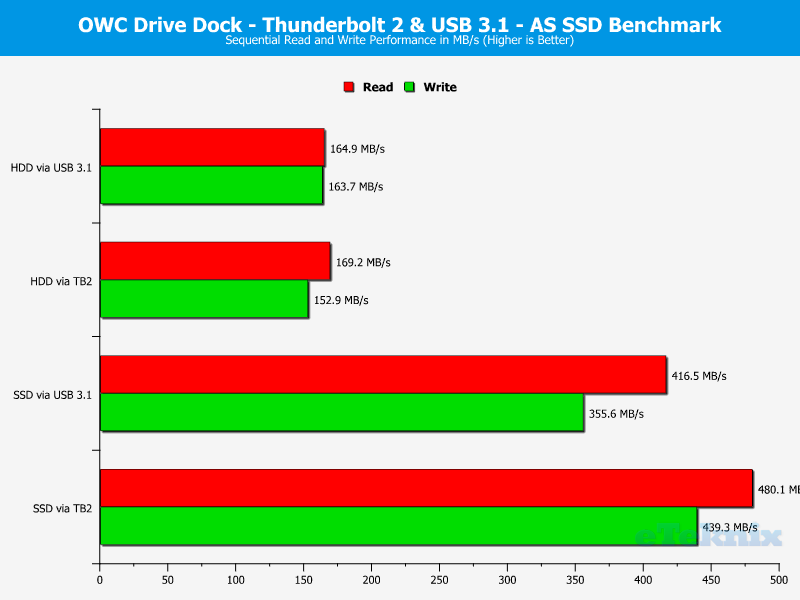
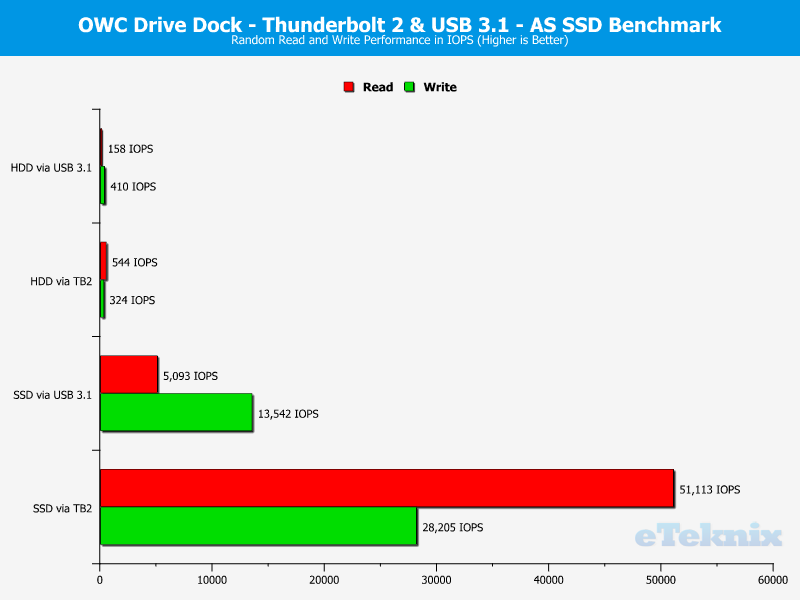
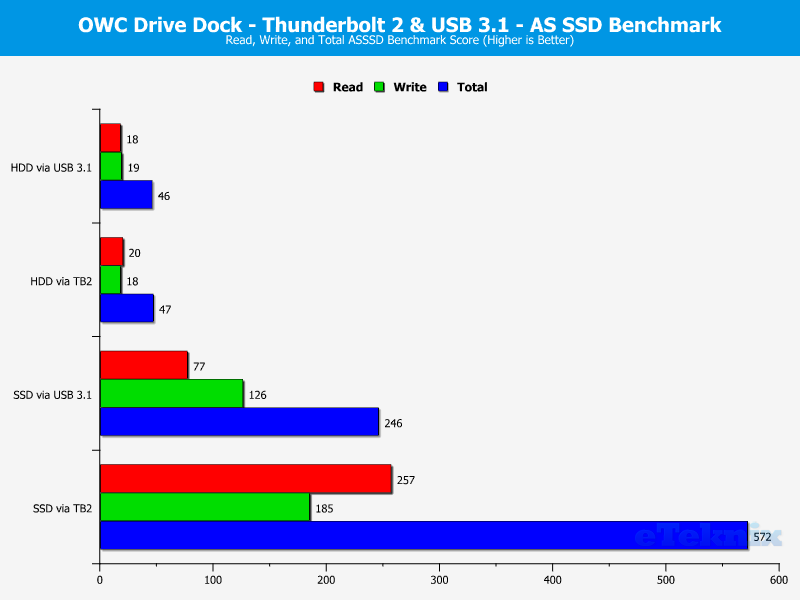
AS SSD Benchmark
The AS SSD software determines the performance of Solid State Drives (SSD). The tool contains five synthetic and three practice tests. The synthetic tests determine the sequential and random read and write performance of the SSD. These tests are performed without using the operating system caches. In Sequential tests, the program measures the time it takes to read and write a 1 GB file respectively.
HDD via USB 3.1
Single drive setup connected to an Intel controlled motherboard port.

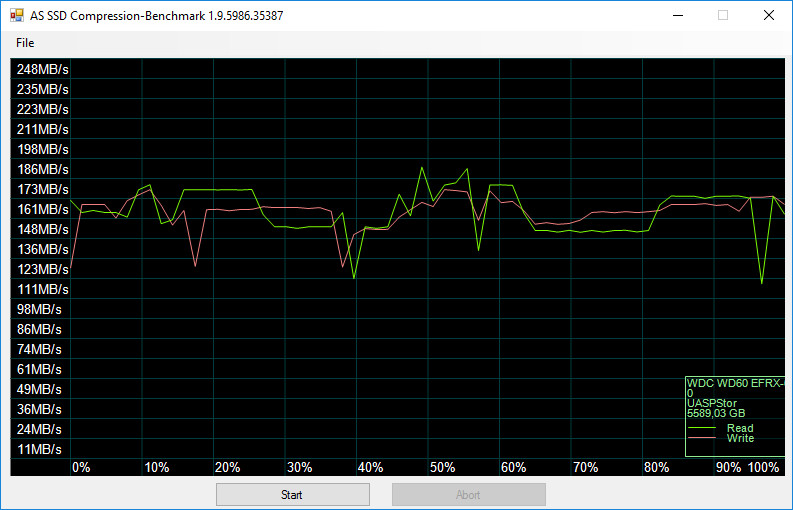
HDD via TB2
Single drive setup connected to an onboard Thunderbolt 2 controller.
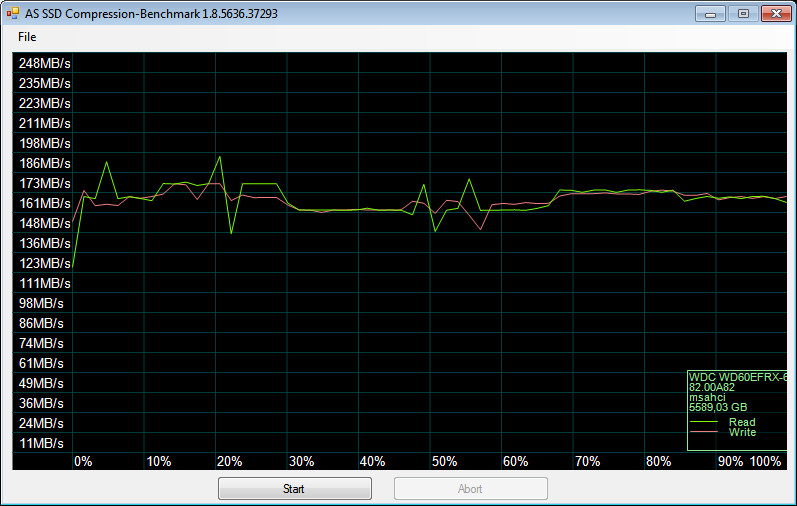
SSD via USB 3.1
Single drive setup connected to an Intel controlled motherboard port.
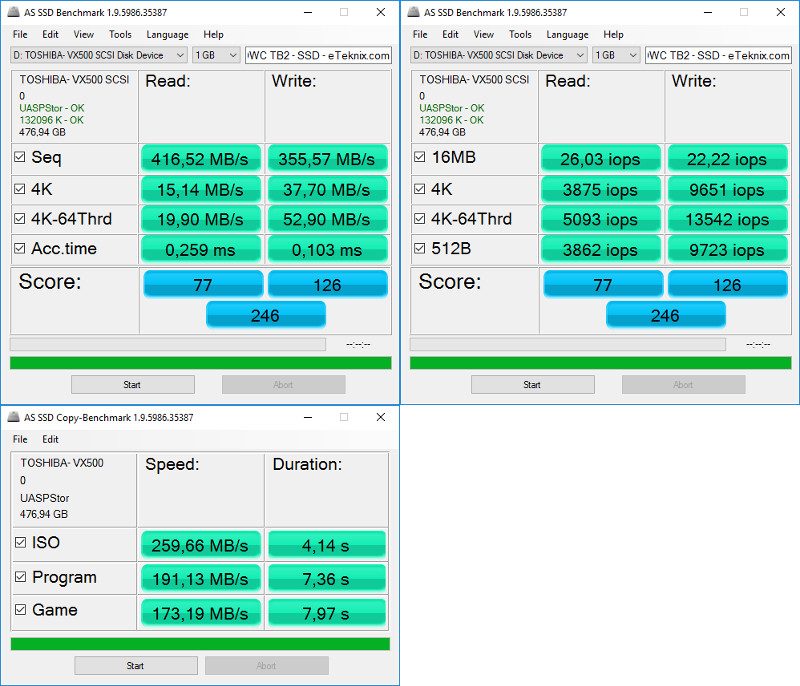
SSD via TB2
Single drive setup connected to an onboard Thunderbolt 2 controller.
Performance Analysis
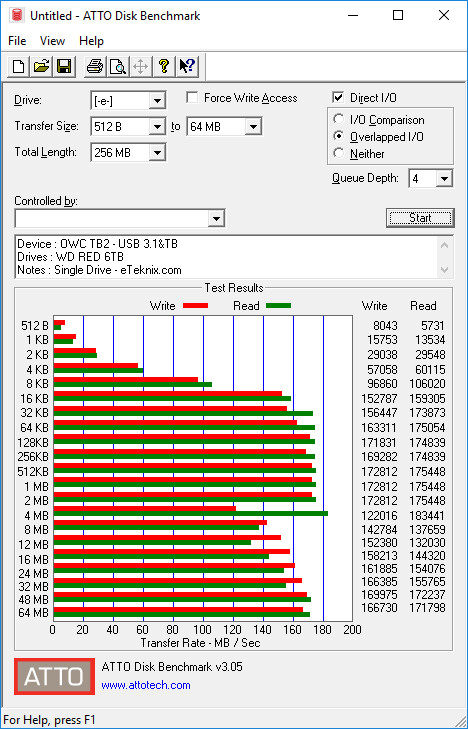
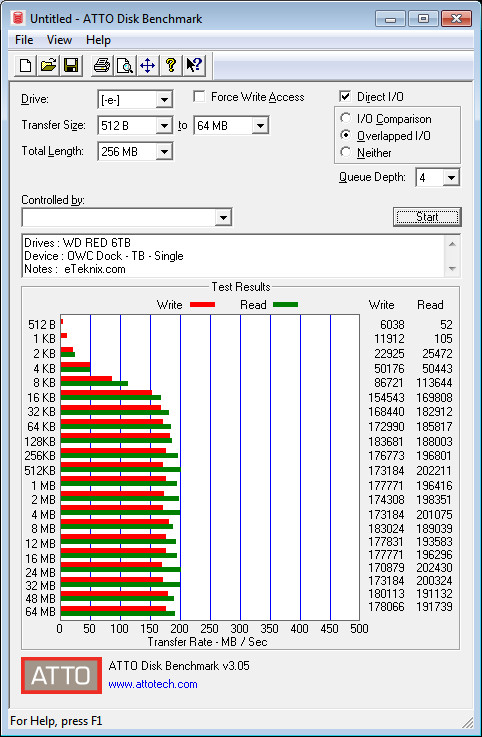
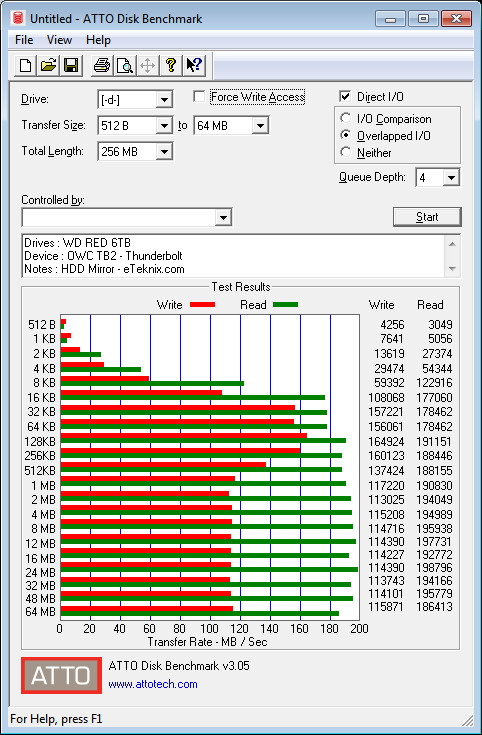
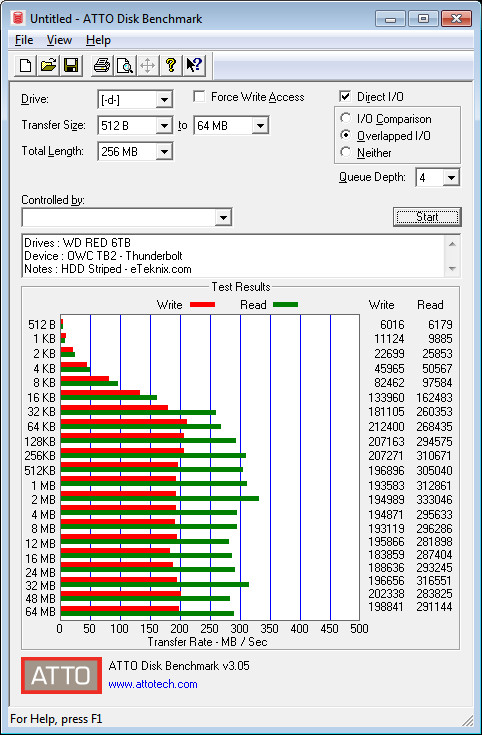
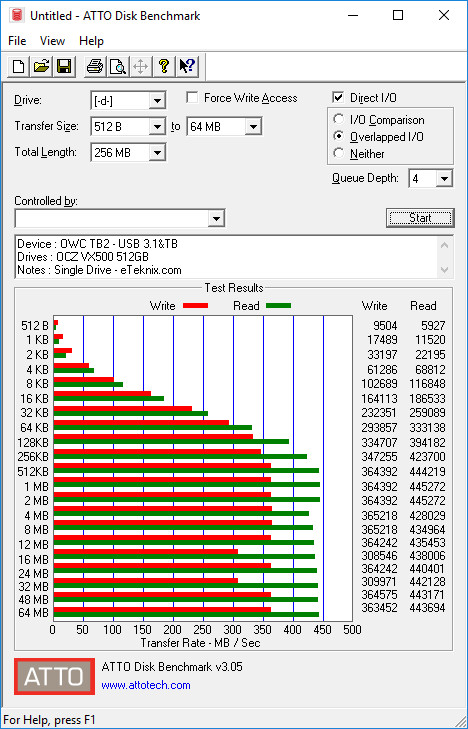
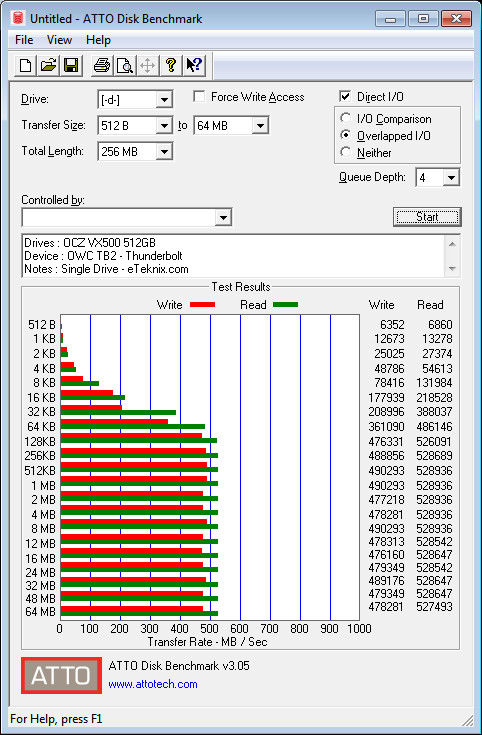
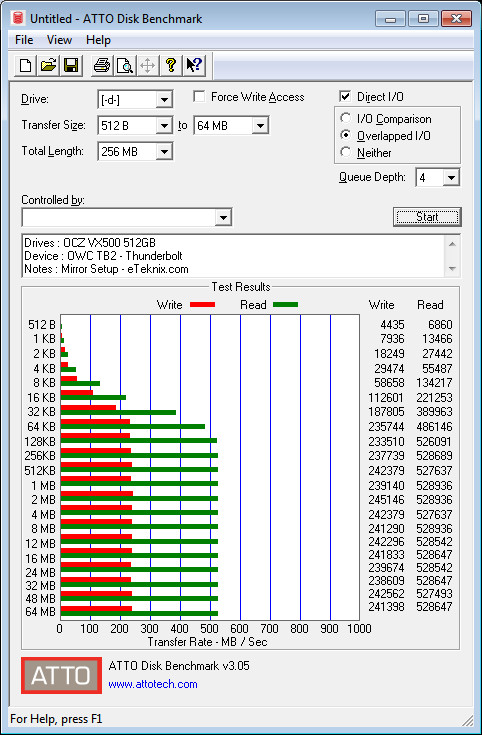
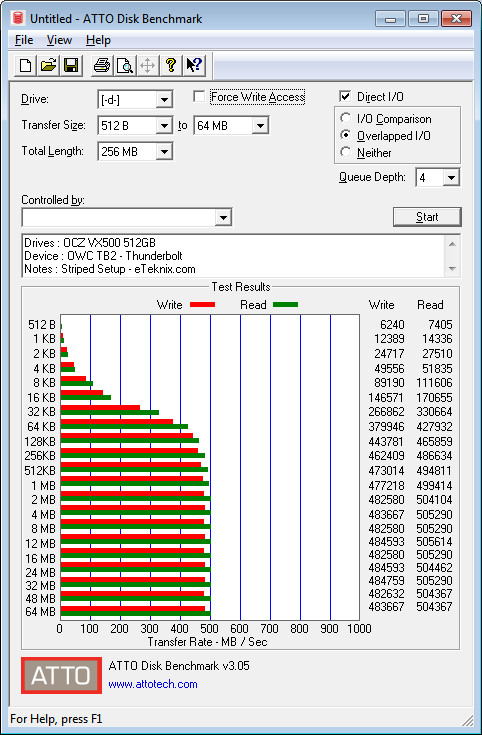
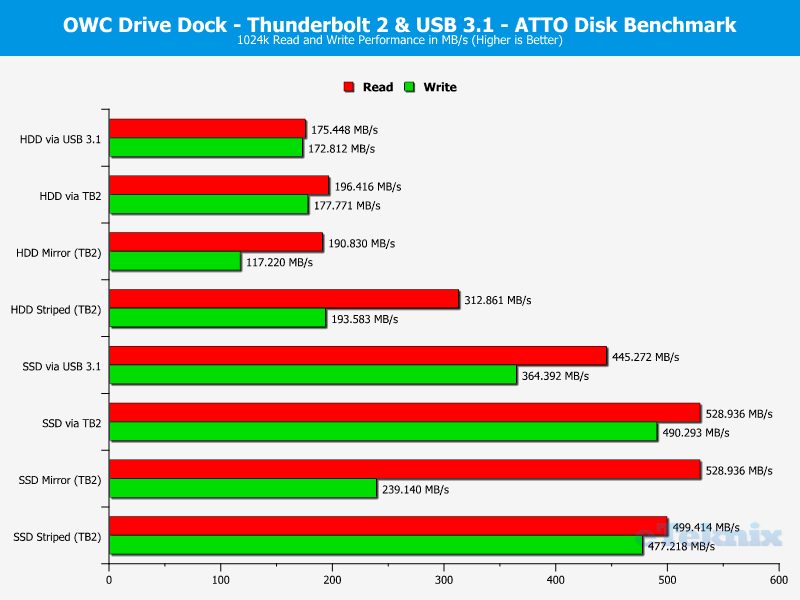
ATTO
The ATTO Disk Benchmark performance measurement tool allows to test your storage systems performance with various transfer sizes and test lengths for reads and writes. Several options are available to customise your performance measurement including queue depth, overlapped I/O and even a comparison mode with the option to run continuously.
HDD via USB 3.1
Single drive setup connected to an Intel controlled motherboard port.
HDD via TB2
Single drive setup connected to an onboard Thunderbolt 2 controller.
HDD Mirror (TB2)
Dual drive setup connected to an onboard Thunderbolt 2 controller and set up with software RAID.
HDD Striped (TB2)
Dual drive setup connected to an onboard Thunderbolt 2 controller and set up with software RAID.
SSD via USB 3.1
Single drive setup connected to an Intel controlled motherboard port.
SSD via TB2
Single drive setup connected to an onboard Thunderbolt 2 controller.
SSD Mirror (TB2)
Dual drive setup connected to an onboard Thunderbolt 2 controller and set up with software RAID.
SSD Striped (TB2)
Dual drive setup connected to an onboard Thunderbolt 2 controller and set up with software RAID.
Performance Analysis
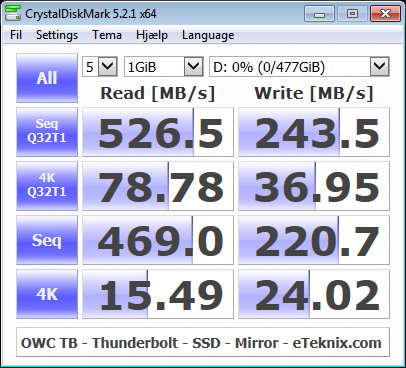
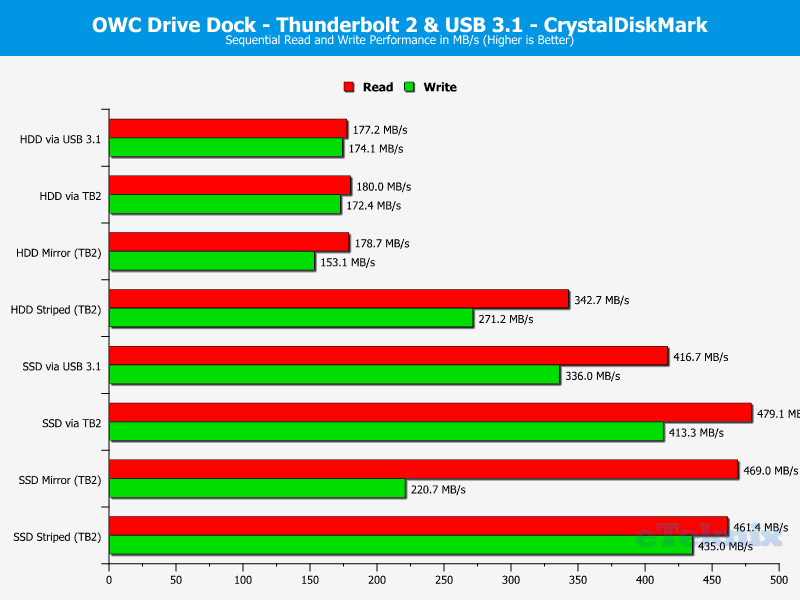
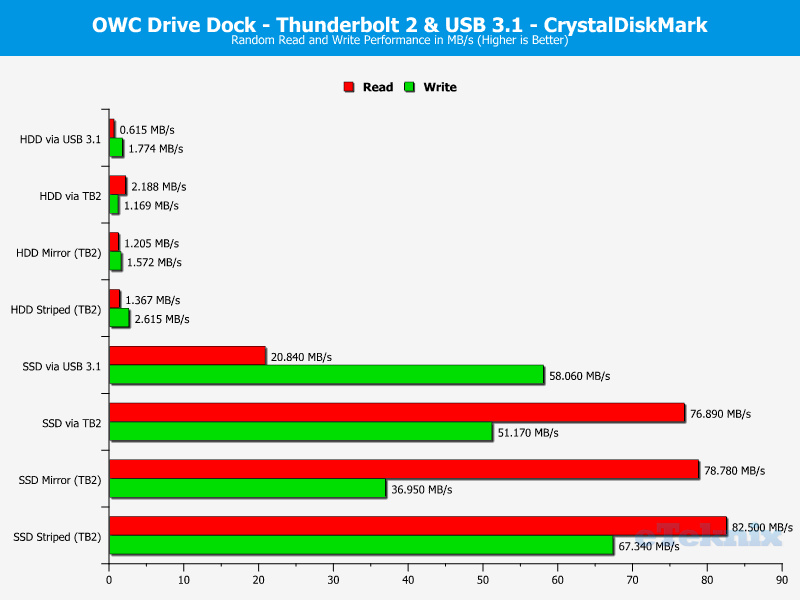
CrystalDiskMark
CrystalDiskMark is a small HDD and SSD benchmark utility that allows you to measure a drive’s sequential and random performance.
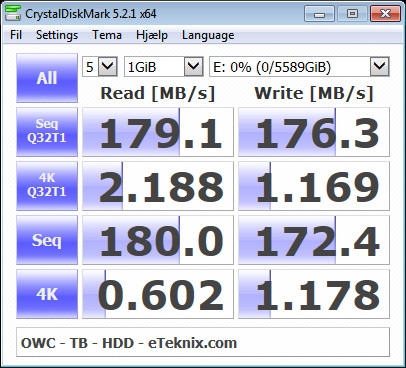
HDD via USB 3.1
Single drive setup connected to an Intel controlled motherboard port.
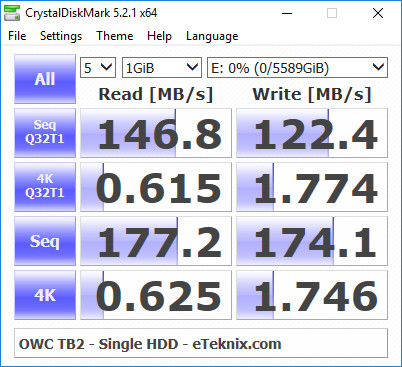
HDD via TB2
Single drive setup connected to an onboard Thunderbolt 2 controller.
HDD Mirror (TB2)
Dual drive setup connected to an onboard Thunderbolt 2 controller and set up with software RAID.

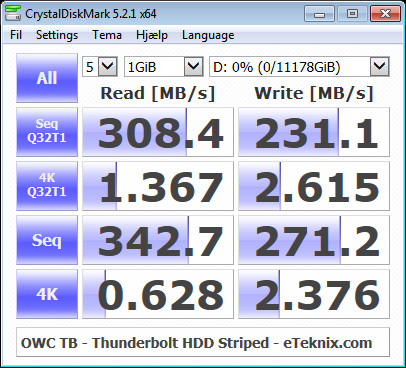
HDD Striped (TB2)
Dual drive setup connected to an onboard Thunderbolt 2 controller and set up with software RAID.
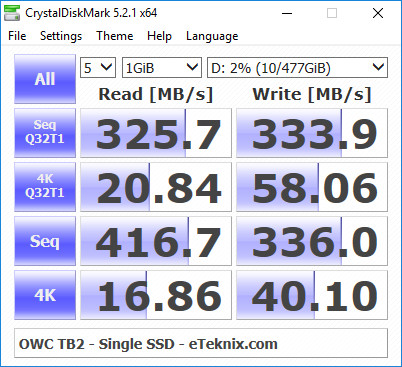
SSD via USB 3.1
Single drive setup connected to an Intel controlled motherboard port.
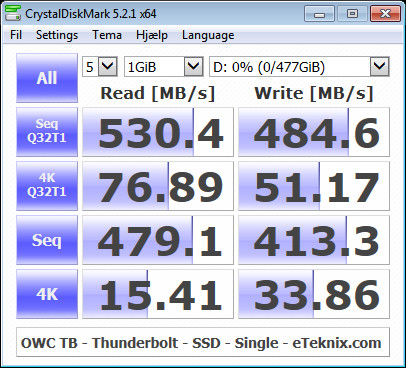
SSD via TB2
Single drive setup connected to an onboard Thunderbolt 2 controller.
SSD Mirror (TB2)
Dual drive setup connected to an onboard Thunderbolt 2 controller and set up with software RAID.
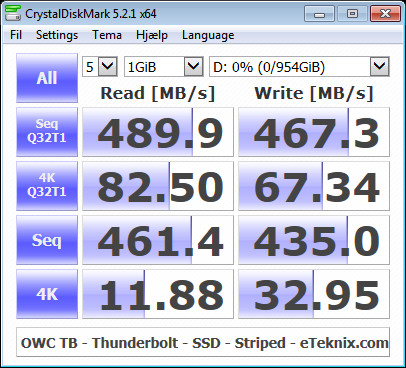
SSD Striped (TB2)
Dual drive setup connected to an onboard Thunderbolt 2 controller and set up with software RAID.
Performance Analysis
Final Thoughts
Pricing
I started the review by mentioning that this isn’t the cheapest docking station, so let’s get to the costs. At the time of writing, the OWC Drive Dock (OWCTB2U3DKR2) can be found on Amazon for $269.75 in the US and £246.02 in the UK.
Conclusion
The Drive Dock is the first OWC product that I had the pleasure to test and it was a great start. The Drive Dock looks good and features a premium finish. The unit itself is quite heavy which will give it a stable position on any surface. The weight is due to the built-in PSU which is something that I like. It offers you a cleaner desk setup with fewer power bricks and AC/DC adapters laying around.
While the unit has an overall great finish, there is one place that could use improvements. Don’t get me wrong, everything works as it should. But the two soft-power buttons on the top of the unit lack the same premium feel that the rest of the unit has. That said, they work as intended and every time. Perhaps a place to improve on the next version of the model, perhaps one with Thunderbolt 3.
The selling point in this unit, besides the dual-drive docking abilities, is the dual connection options. The Drive Dock features a classic USB connection for support with almost any system, but that’s not the highlight. The Thunderbolt 2 ports are. The two ports allow for daisy chaining of devices to a single host port, which is another thing that provides you with a very clean setup. Thunderbolt 2 also offers better performance when compared to USB. We’ve seen the clear differences in the performance results on the previous pages.
What’s left to say, well, the Drive Dock supports all types of drives: From large capacity 3.5-inch hard drives to speedy 2.5-inch solid state drives. RAID is partially supported, but only software RAID.
Pros
- Dual Thunderbolt 2 ports
- USB 3.1 connection
- Easy dual-drive docking
- Built-in PSU for clean setup
- 2.5-inch and 3.5-inch HDD and SSD supported
Cons
- Only software RAID where supported
“OWC’s Drive Dock with Thunderbolt 2 and USB 3.1 provides a good performance. It also looks good and allows for a clean setup.”
Thank you OWC for providing us with this sample.


