ASRock Z270 Extreme4 LGA1151 Motherboard Review
John Williamson / 7 years ago
Introduction
ASRock has been compiling some of the wackiest motherboard designs in recent memory such as the X99 Taichi which appears to be inspired by a beautifully constructed mechanical timepiece. As a horology enthusiast, the striking theme instantly captured my attention and I have to commend ASRock for concocting something rather special. Given the company’s lavish creations, I eagerly anticipated details of their upcoming Z270 range and was provided with a really interesting motherboard for today’s launch. The ASRock Z270 Extreme4 opts for an unusual cross pattern which swoops over the PCB and reliable 12-phase power delivery. Not only that, the motherboard incorporates the Purity Sound 4 audio solution which is based on the Realtek ALC1220 chipset.
Rather impressively, the product has an Intel i219V Gigabit LAN, reinforced PCI-E slots, Aura RGB lighting system and even a LED header to add a more ostentatious touch. On another note, the motherboard supports the USB 3.1 Type-A and Type-C protocols as well M.2. However, the lack of SATA Express, U.2 and Thunderbolt 3 functionality is surprising and might be reserved for higher-end models. Nevertheless, the ASRock Z270 Extreme4 looks very promising and I’m expecting it to be a fine choice alongside the new i7-7700K.
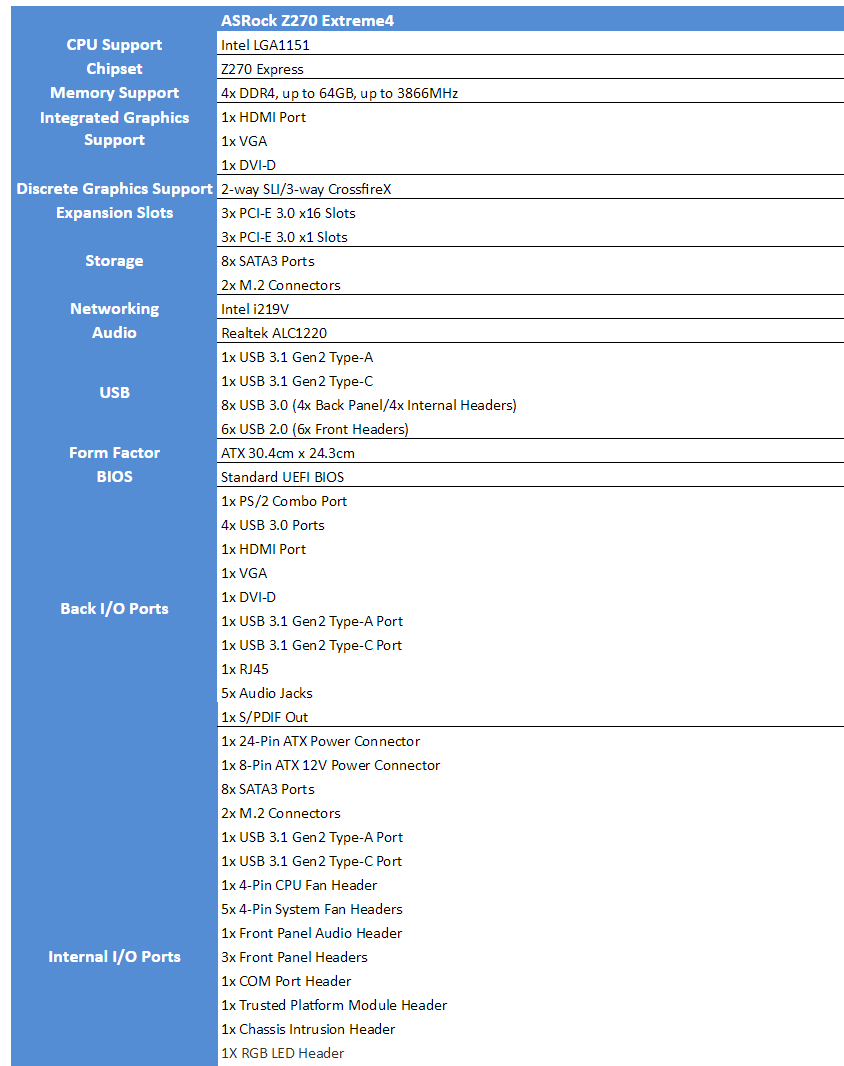
Specifications
Packaging and Accessories
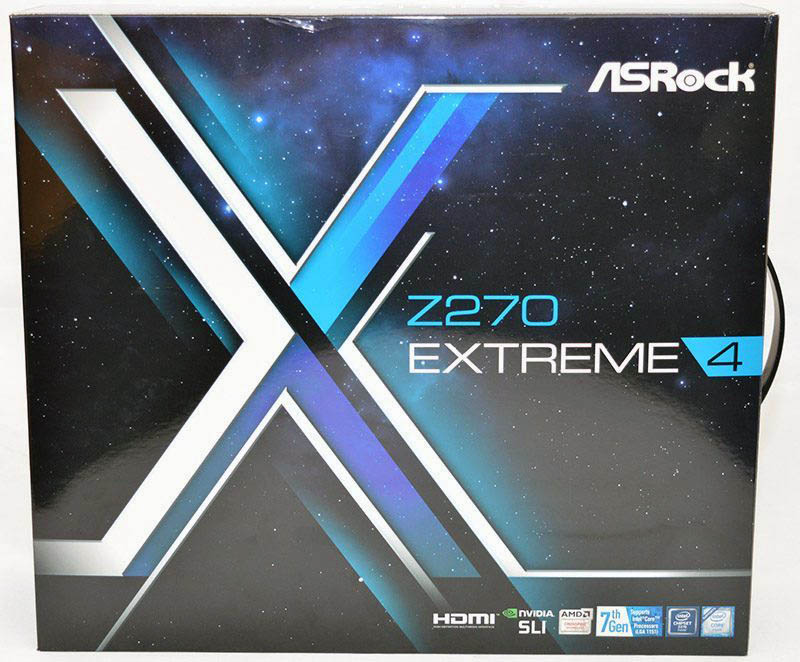
The packaging has a constellation backdrop and imposing cross which outlines the motherboard’s tasteful aesthetic. Personally, it’s probably one of my favourite box designs thus far and the colours infuse together in an attractive manner.
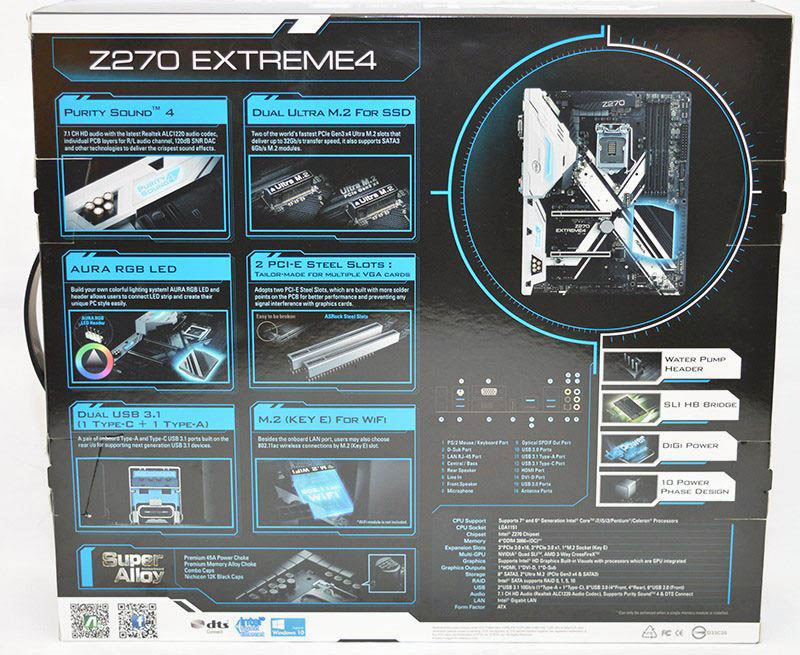
On the rear portion, the end-user is provided with an overview of the audio chipset, storage options, RGB lighting system and other standout features. The information is presented in a stylish manner and the turquoise colour really stands out. As a result, you almost feel inclined to inspect the box and read more about the motherboard in the manufacturer’s own words.
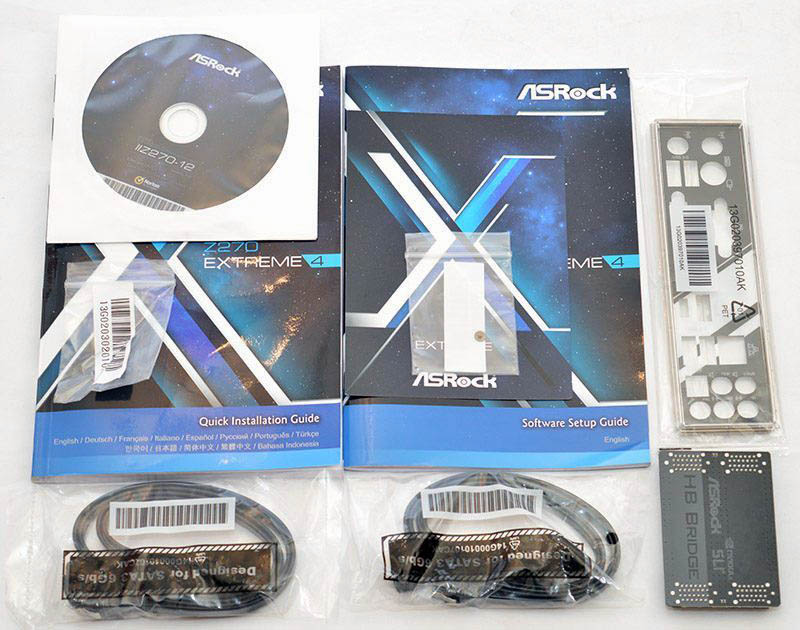
Here we can see the motherboard is bundled with a drivers/utilities disk. M.2 screws, quick installation guide, software setup guide, I/O shield, SATA cables and an HB SLI bridge. One small touch I quite like is I/O shield’s finish which has the same cross detailing as the PCB.
A Closer Look
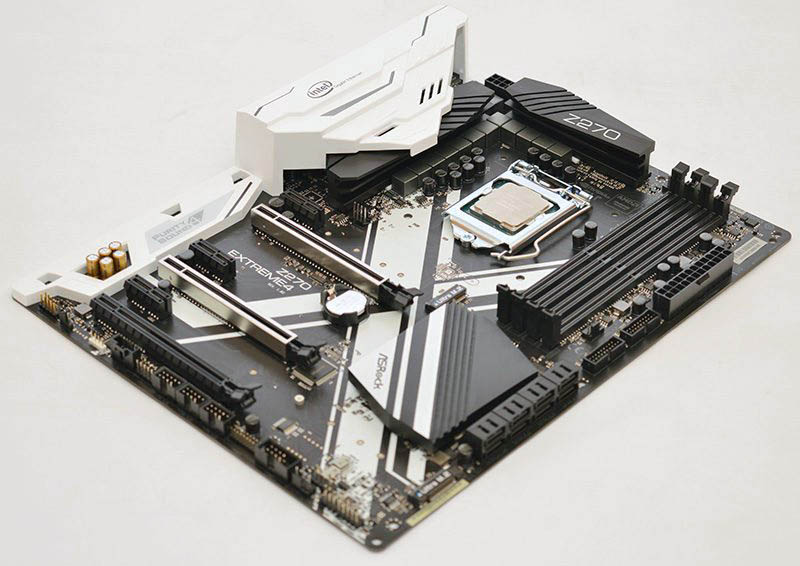
The ASRock Z270 Extreme4 opts for a sophisticated black and white colour scheme while adding a more distinctive appearance through the cross pattern which travels from the DIMM slots to the PCB edge. The striking accent hovers around the CPU socket and flows under the PCH. While taste is subjective, I absolutely adore the design and think it’s a masterstroke. Furthermore, the extremely large I/O cover which glides over the power delivery heatsink is an eye-opener and upholds a lovely synergy with the white cross section. On the other hand, the Intel logo’s positioning seems a little sloppy and I’m not entirely sure why it’s been incorporated onto the motherboard. Granted, the product requires an LGA1151 processor but other manufacturers don’t feel the need to add any Intel branding.
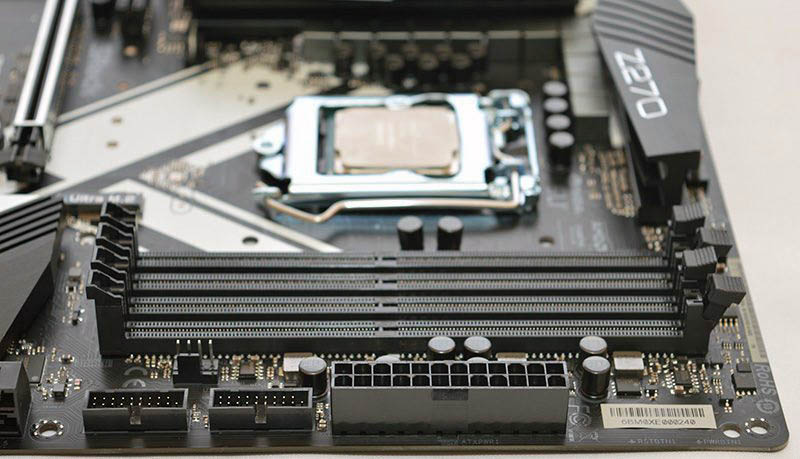
On another note, the motherboard has a hi-density ATX power connector and dedicated water pump header supporting up to 1.5A. This should be ample for most water pumps and allow you to control the RPM values more effectively. In total, the motherboard has five 4-pin PWM fan headers with Smart Fan Speed Control functionality. Interestingly, the PCB is constructed from high-density glass fabric which enhances the rigidity to prevent flexing. As you might expect, there’s also comprehensive EMI protection on the PCB, rear connectors and other sensitive areas which could be shorted.
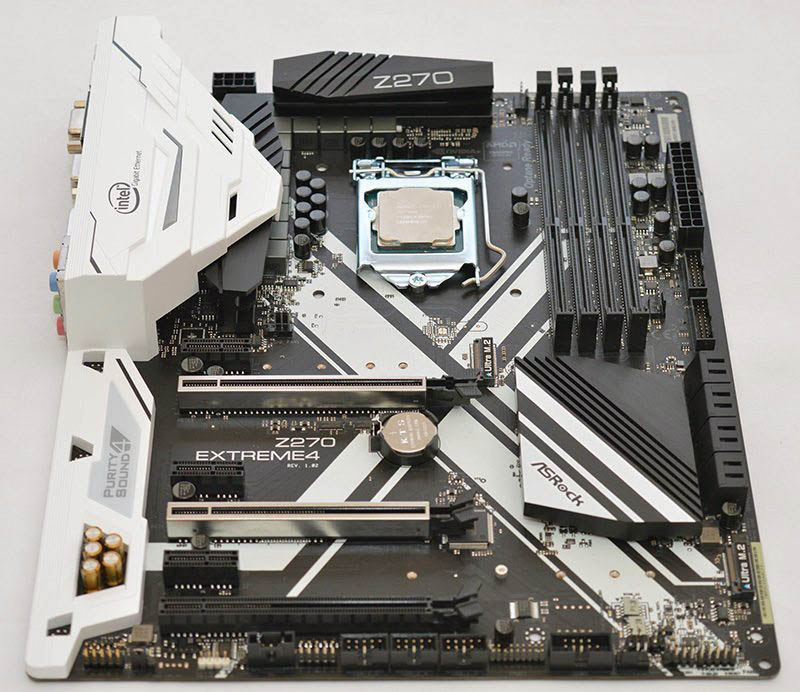
ASRock decided to use a 12-phase power delivery, premium 45A power choke and Nichicon 12K-rated black caps with 100% conductive polymer capacitors. Rather impressively, the memory alloy choke has a 70% reduction in core loss compared to iron powder chokes. Additionally, the XXL aluminium alloy heatsinks ensure the power circuitry operates within a low thermal range and should greatly improve the product’s longevity.

The ASRock Z270 Extreme 4 can accommodate up to 64GB DDR4 memory via a dual-channel configuration. Of course, the memory isn’t limited to Kaby Lake’s official 2400MHz figure, and it’s possible to utilise speeds of 3866MHz and beyond providing the memory controller can maintain the higher frequency. Unlike some of their competitors, ASRock didn’t house any LED lights between the DIMM slots or metal shielding for EMI purposes. To be fair, it’s not a massive issue and traditional DIMM slots have been perfectly fine on previous models and the 15u gold contacts should help matters. As you can see, the motherboard has the 24-pin connector in its traditional position and two USB 3.0 headers. Sadly, there’s no onboard power button, reset switch or diagnostic post LED. This makes overclocking a little bit more laborious and you cannot test the motherboard outside of the chassis as easily.
When it comes to the audio segment, ASRock engineered the Purity Sound 4 solution which revolves around the Realtek ALC1220 codec. More specifically, the audio has PCB isolation shielding which reduces EMI and leads to a higher level of audio fidelity. Also, there’s individual channels for the left and right audio as well as impedance sensing on the Front Out Port. The audio chipset has a 120dB signal-to-noise ratio DAC with differential amplifier and a TI® NE5532 premium headset amplifier which can contend with devices up to 800 Ohms. As per usual, high-end Nichicon gold series capacitors are used to provide a clean, reliable sound.
The motherboard’s PCI-E layout allows you do install multiple graphics card from both AMD and NVIDIA via x16, x8/x8 or x8/x4/x4. The primary and secondary PCI-E x16 slots are protected by stainless shield supports which are constructed with more solder points on the PCB to eliminate signal interference. Of course, they reduce the effect of GPU sag and withstand a greater force from heavier graphics cards. The three PCI-E x1 slots might not be useful for most people but they can be handy for installing sound cards and similar kinds of expansion devices.
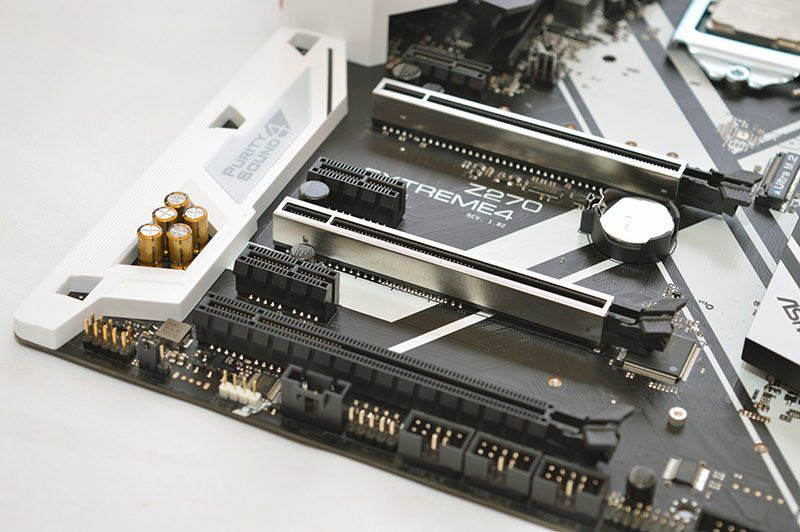
Here we can see the PCH has a gorgeous design which complements the PCB styling in a magnificent way. Also, the small grooves greatly enhance the motherboard’s aesthetic appeal and showcase the attention to detail throughout.

Connectivity-wise, the motherboard has six SATA3 ports directly from the chipset and another two ports powered by the ASMedia ASM1061. Furthermore, the motherboard incorporates two M.2 slots, one supporting type 2230/2242/2260/2280 and the other with type 2230/2242/2260/2280/22110 support. As previously mentioned, there’s no U.2, Thunderbolt 3 or SATA Express at your disposal.
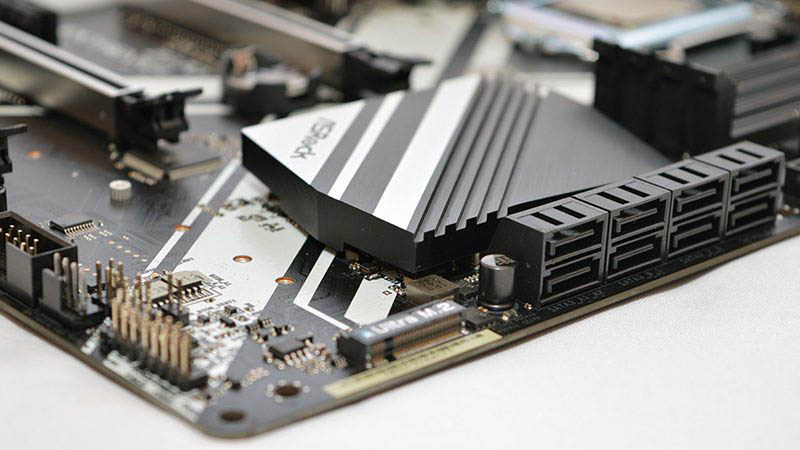
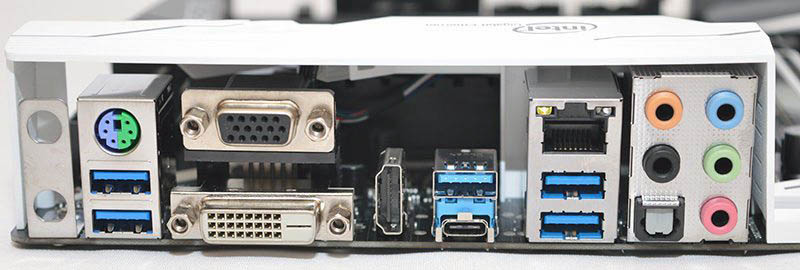
On the rear I/O, the ASRock Z270 Extreme 4 contains two holes for the optional M.2 WiFi antennas, PS/2 combo port, four USB 3.0 ports, D-Sub, dual-link DVI-D, HDMI, USB 3.1 Type-A, USB 3.1 Type-C, Intel i219V Gigabit LAN, five audio jacks and S/PDIF.
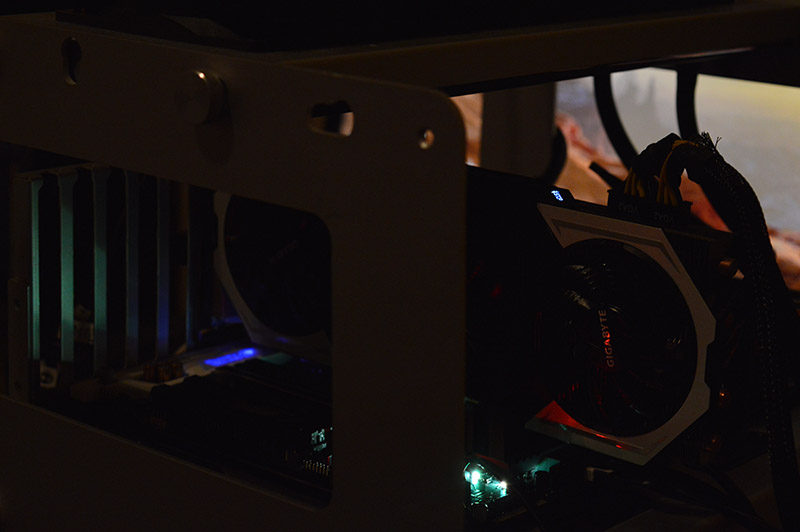
Unfortunately, the RGB lighting is quite subdued and I found it difficult to capture the colours on camera. Honestly, the lighting isn’t particularly bright and pales in comparison to the MSI’s Mystic Light. Despite this, it’s still a nice feature and some users may prefer a lower brightness. The lighting is embedded into the I/O cover, audio chipset cover and PCH. The motherboard’s RGB header is a great addition to power a lighting strip and controls its characteristics.
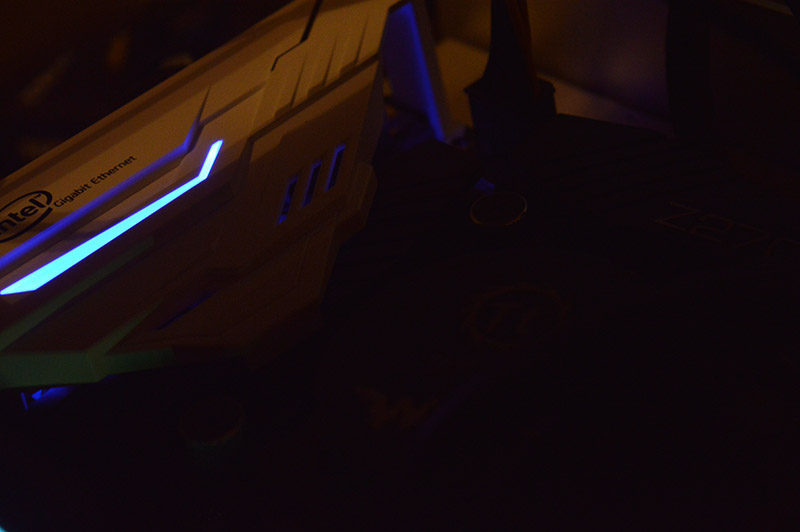
Once again, it’s clear that the RGB illumination doesn’t have a wow factor and struggles to light up key areas in a dark environment.
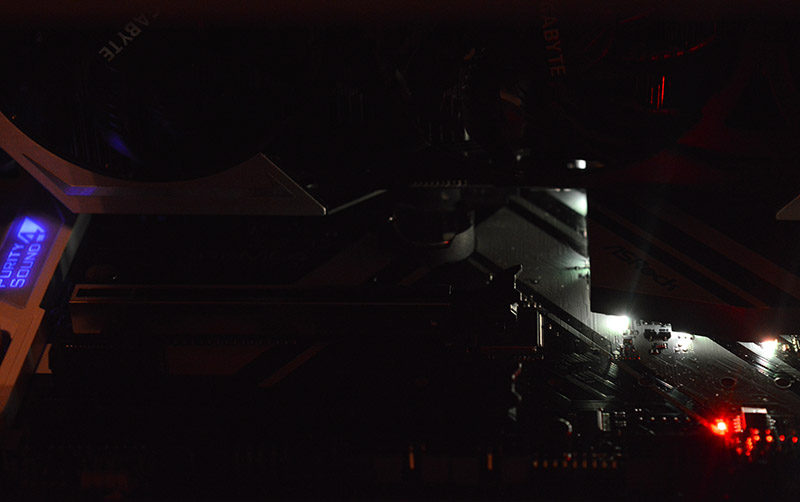
When looking at the entire test bench, the lighting is clearly visible but it’s not as impressive as I initially hoped.
Testing & Methodology
Here is the test bench used for all Z270 motherboard reviews:
Hardware
- Motherboard varies by review
- CPU: Intel Core i7-7700K
- GPU: Gigabyte G1 Gaming GTX 980Ti 6GB GDDR5
- RAM: Crucial Elite 16GB (2x8GB) 2666MHz
- Cooling: Thermaltake Water 3.0 AIO with Gelid GC-Extreme
- Case: Lian Li T80 Test Bench
- Storage Drives: Main storage: Toshiba OCZ VX500 500GB SATA, Test Devices: Toshiba OCZ VX500 500GB SATA , Toshiba OCZ RD400 512GB NVMe M.2 and Patriot SuperSonic Magnum 256GB USB 3.0 Flash Drive
- PSU: Be Quiet! Dark Power Pro 11 850W
- Operating System: Windows 10 64-bit
- Networking: ASUS RT-AC68U router
Software
- SiSoft Sandra Engineer – available here
- WPrime – available here
- Cinebench – available here
- 3DMark – available here
- AIDA 64 Engineer – available here
- Latencymon – available here
- Rightmark Audio Analyser – available here
- Passmark – available here
Memory
For our memory tests, we use the built-in memory benchmarks in AIDA64 Engineer and SiSoft Sandra. For more details on each of the benchmarks please see here and here respectively.
Storage
To test the storage performance in our motherboard reviews we use AIDA’s Disk Benchmark utility built into their AIDA64 Engineer Edition software package and run linear read and write tests. We run each of the benchmark tests on a SATA III, USB 3.0 and M.2 device. For SATA III testing we use a SanDisk Extreme Pro 240GB, for USB 3.0 testing we use the Supersonic Magnum 256 GB USB 3.0 flash drive and for M.2 testing we use Plextor’s 256GB M.2 M6e SSD. The drives are always formatted before use.
Networking
For our networking tests we connect the test system up to our Intel Gigabit-enabled ASUS Rampage IV Extreme X79 motherboard test system through the ASUS RT-AC68U router and run our tests. We opted for this over a direct point-to-point connection because we wanted to simulate real-world performance. For our WiFi tests we do the same except we connect the test system to the ASUS RT-AC68U router via WiFi at a distance of 2 metres from the router. The testing is conducted using PassMark’s Advanced Network Test detailed below.
PassMark
The PassMark Advanced Network Test (which is part of PerformanceTest) is designed to test the data transfer rate between two computers both of which must be running PerformanceTest. One of the computers must act as the server and will sit waiting for a connection. The other computer acts as a client. It connects to the server machine and sends data to it for the duration of the test. You can download a trial version of PerformanceTest from here.
Power Usage
To measure power consumption we, use a “killawatt” meter and measure the total system power draw at the wall. We run three different use-case scenarios for 5 minutes and take the average reading.
RightMark Audio Analyser (RMAA)
RMAA suite is designed for testing quality of analog and digital paths of any audio device. The results are obtained by playing and recording test signals passed through the tested audio path by means of frequency analysis algorithms. A more common mark is also provided for those unfamiliar with measured technical parameters. Available here. We run the RMAA test using a 3.5mm to 3.5mm cable connecting the line out to the line in to test the quality of the motherboard audio codec, not any external audio devices. We run the complete playback and recording test at default settings and then get RMAA to interpret the results giving the below outputs. We sync the playback and recording audio devices to the same setting as the test for accurate results.
DPC
DPC is a Windows tool that analyses the capabilities of a computer system to handle real-time data streams properly. It may help to find the cause for interruptions in real-time audio and video streams, also known as drop-outs. This software is available for download free here.
wPrime
wPrime is a leading multithreaded benchmark for x86 processors that tests your processor performance by calculating square roots with a recursive call of Newton’s method for estimating functions. wPrime is a free utility that is available for download here.
Cinebench R15
Cinebench is a widely respected benchmark for testing the performance of x86 CPUs. The program allows you to test single and multi-threaded performance as well as GPU performance by rendering with Open GL. Download here.
3D Mark
The new 3DMark includes everything you need to benchmark your hardware. With three all new tests you can bench everything from smartphones and tablets to notebooks and home PCs, to the latest high-end, multi-GPU gaming desktops. Download here.
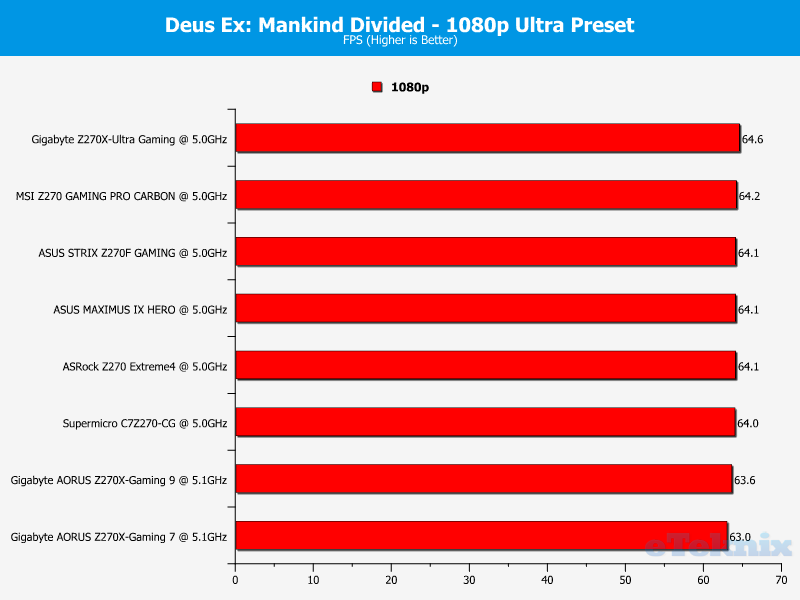
Deus Ex: Mankind Divided
Deus Ex: Mankind Divided is an action role-playing stealth video game developed by Eidos Montreal and published by Square Enix. Set in a cyberpunk-themed dystopian world in 2029, two years after the events of Human Revolution, Mankind Divided features the return of Adam Jensen from the previous game, Deus Ex: Human Revolution, with new technology and body augmentations.
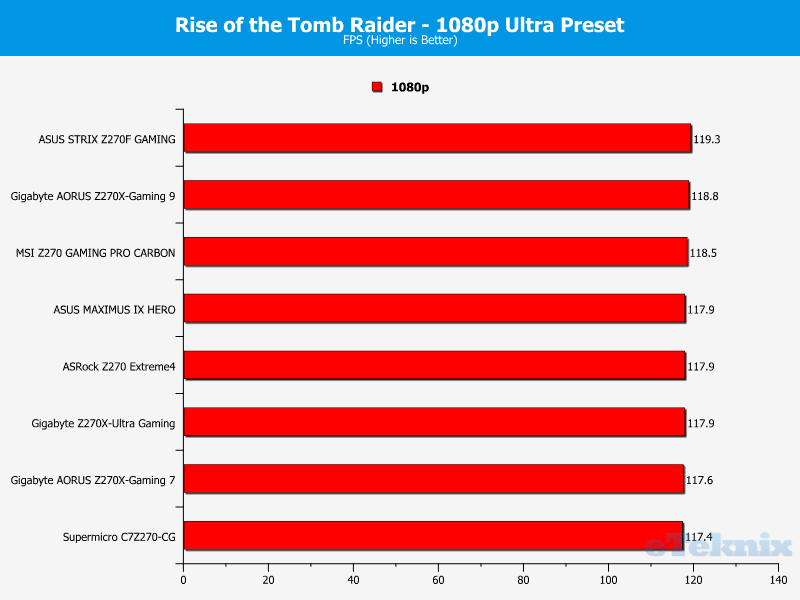
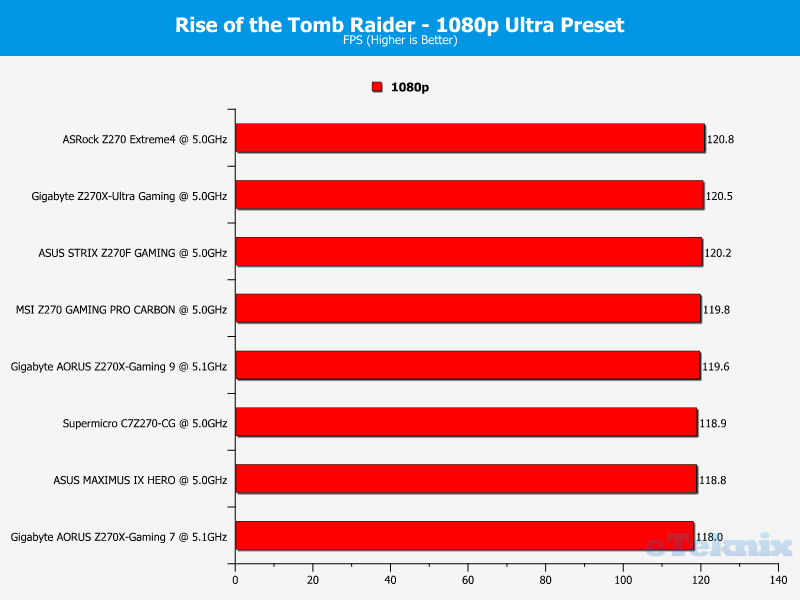
Rise of the Tomb Raider
Rise of the Tomb Raider is a third-person action-adventure game that features similar gameplay found in 2013’s Tomb Raider. Players control Lara Croft through various environments, battling enemies, and completing puzzle-platforming sections while using improvised weapons and gadgets in order to progress through the story. The game is run on the Very High preset with FXAA enabled. Please note, the DirectX 12 API has been selected and an average from 3 benchmark runs is taken for the final result.
BIOS and Overclocking
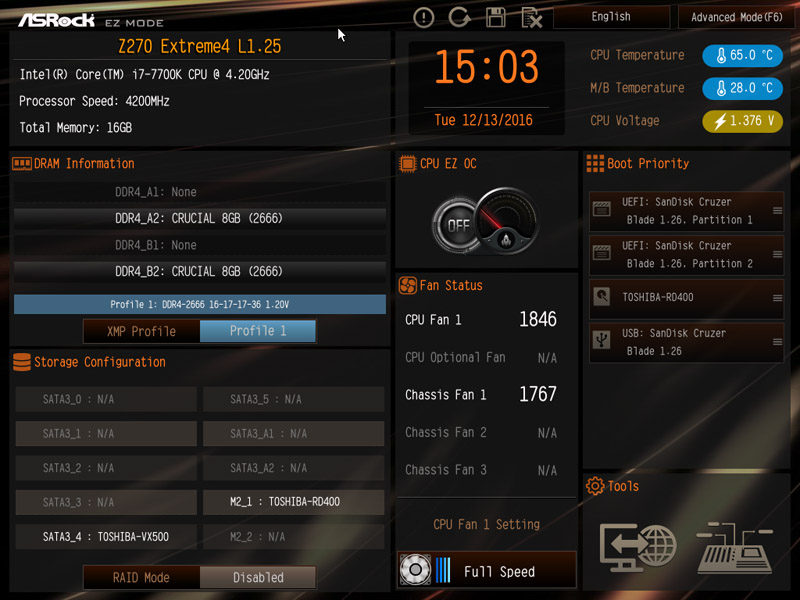
ASRock’s BIOS doesn’t employ the most user-friendly layout I’ve seen but it’s perfectly functional and doesn’t take long to become familiar with. For those who feel overly intimidated by the BIOS’ full gamut of options, it’s recommended to stick with the basic page which lists key system parameters and allows you to modify the XMP profile, boot priority and access key tools. Not only that, the EZ Mode has a dial which makes a quick overclock remarkably simple, although I’d always recommend finding your chip’s potential manually. Whatever the case, I really like the EZ Mode and think it’s a superb option for those who want to make a few minor alterations.
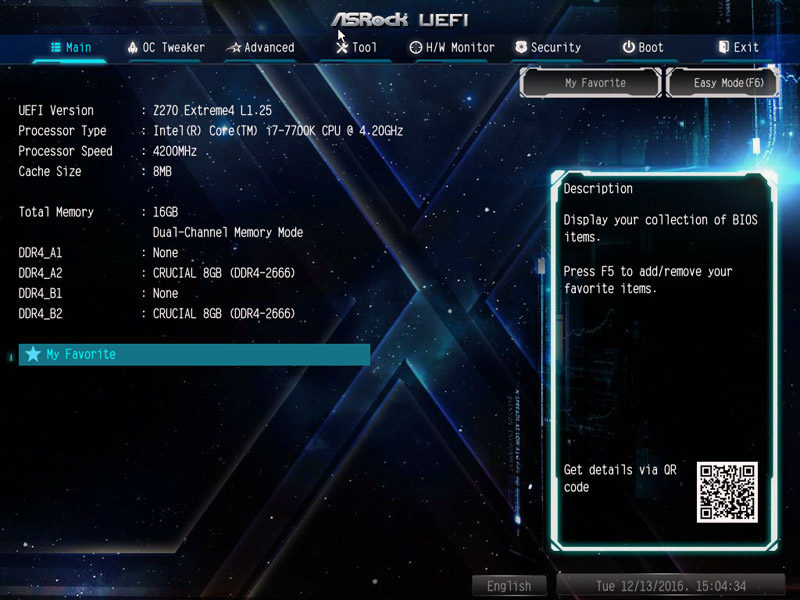
Once you’ve switched to the advanced section, the background changes to the space snapshot seen on the motherboard’s packaging. I’m not entirely sure why this isn’t used for the EZ Mode but it might be something to do with the legibility of various icons. On the main page, you can inspect the UEFI version, processor speed, memory capacity and access favourites. The tooltips provide a good explanation of each setting and make you feel more confident when enacting key changes.
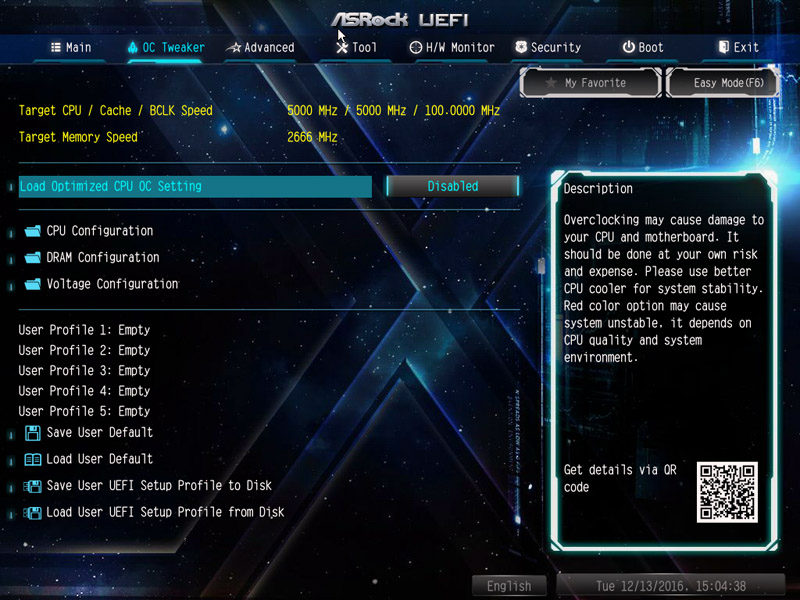
Here we can see the OC Tweaker’s front page which divides overclocking settings into sub-menus and lists various user profiles you might have saved. The motherboard outlines the target speeds of a particular overclock which act as a guide to consider if the tweaks are realistic.
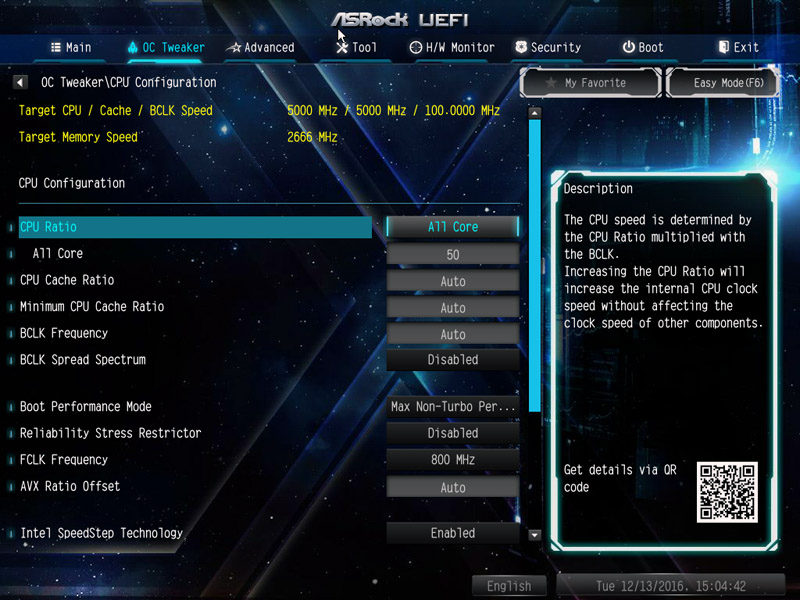
In the CPU configuration menu, it’s possible to overclock all cores or per core and manually set the multiplier. Not only that, the end-user has the ability to change the BCLK frequency, BCLK speed spectrum, AVX ratio offset and more. This is a wonderful array of options which ensures you can customise the overclock to post the best possible result.
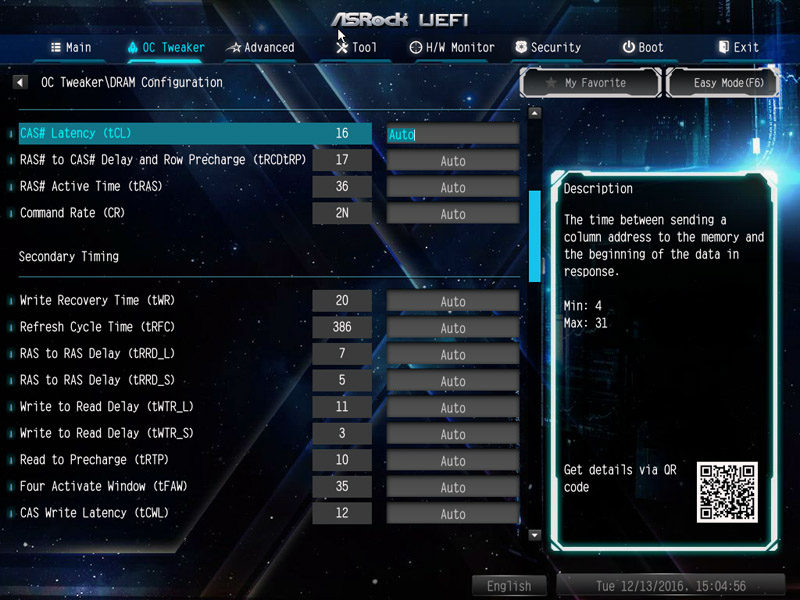
Next up is the DRAM tab which houses options to modify the frequency, cycle between XMP profiles and use the DRAM Tweaker utility.

Further down the menu, the individual timings are listed and you can loosen or tighten the timings depending on the memory overclock’s stability. This shouldn’t be a concern for the majority of users as they’ll probably just dial in the XMP profile. Nevertheless, there’s a massive selection of options from the tWR to tRTP.
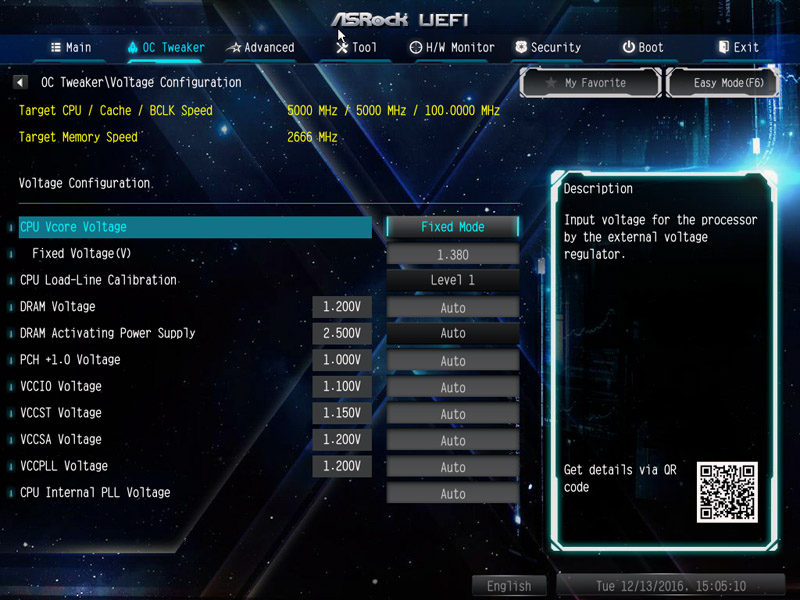
When overclocking the CPU, you’re able to select between a fixed mode and offset. I usually prefer the fixed mode but this just a personal preference. After selecting a particular mode, simply enter the voltage in the box below. Users with a high level of technical expertise might want to alter the load-line calibration, VCCIO and PLL.
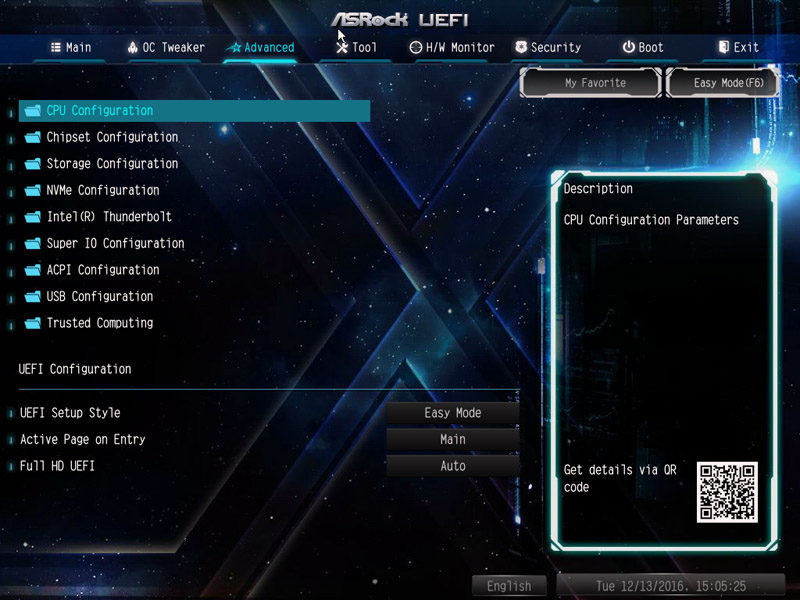
The Advanced page lists an assortment of useful menus which can be accessed to adjust the CPU configuration and other important system attributes.
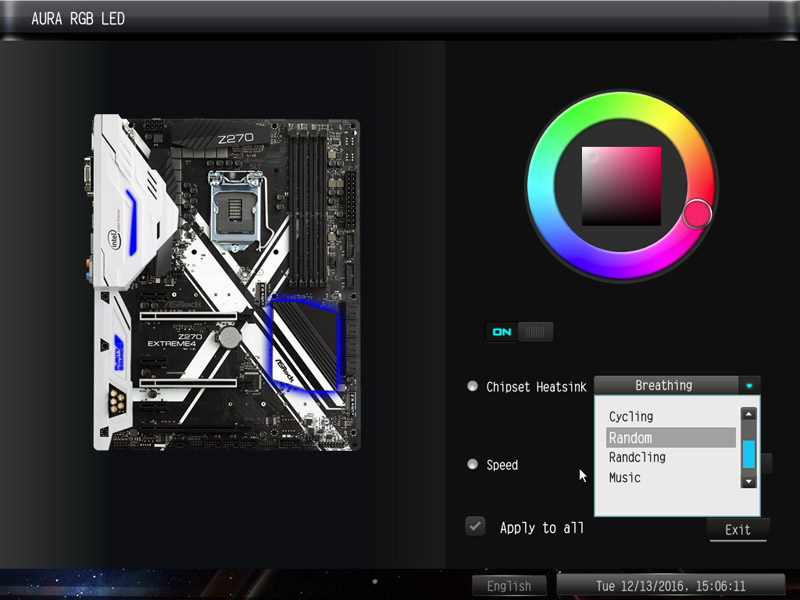
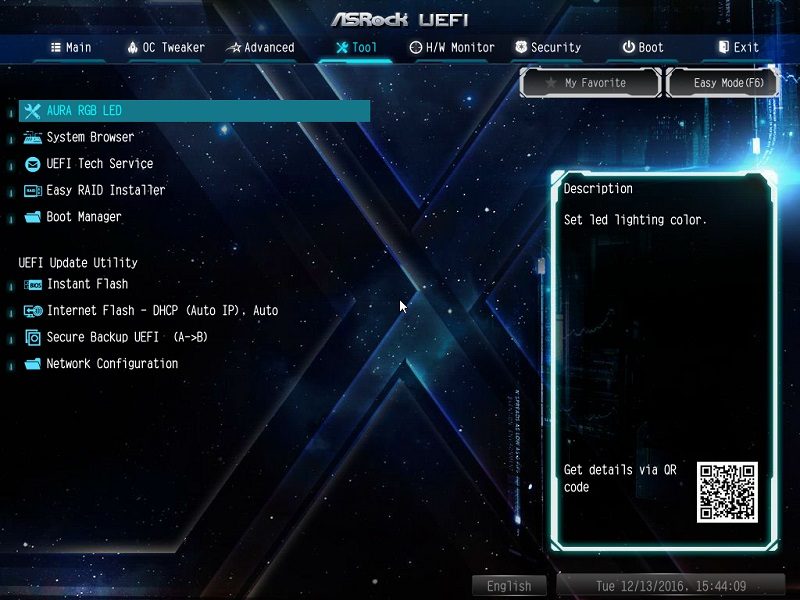
In a disappointing turn of events, it seems the motherboard’s RGB lighting customisation is fairly limited and can only be modified from the BIOS. However, this could be easily changed for the launch and I’d expect some software to be devised which offers similar functionality. The Aura RGB LED utility allows you to switch the lighting on/off and cycle between a whole host of transitional effects.
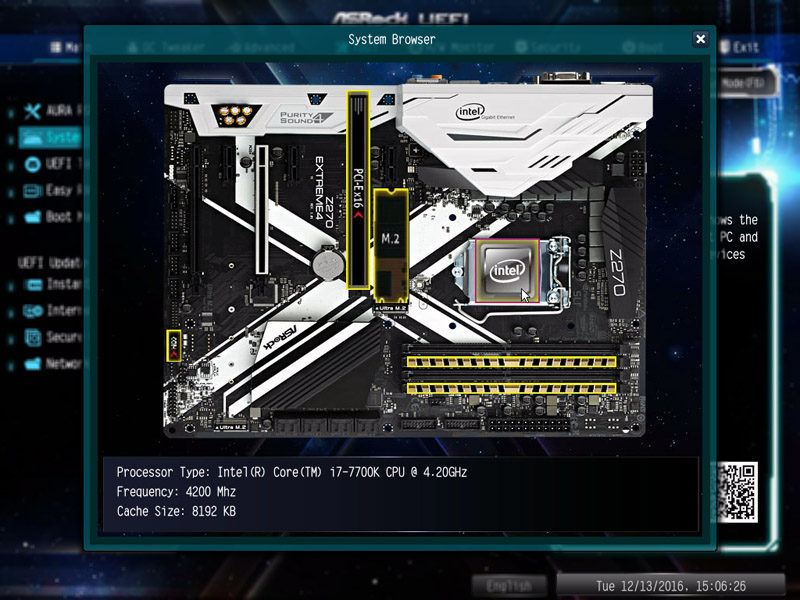
Here we can see the system browser which identifies installed components and provides details on their running speed. This is a really useful tool if you want to learn more about the motherboard’s layout and unsure about certain technical specifications.
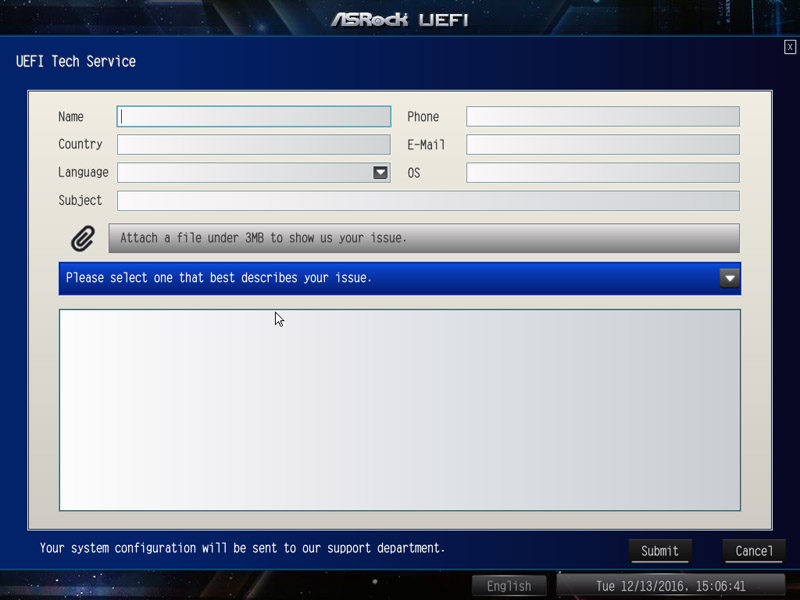
ASRock’s UEFI Tech Service is a rather unusual addition which allows you contact a support line and document any problems. Unlike the usual e-mail correspondence, ASRock has the ability to read your system information and perform remote diagnostics in a more effective manner.
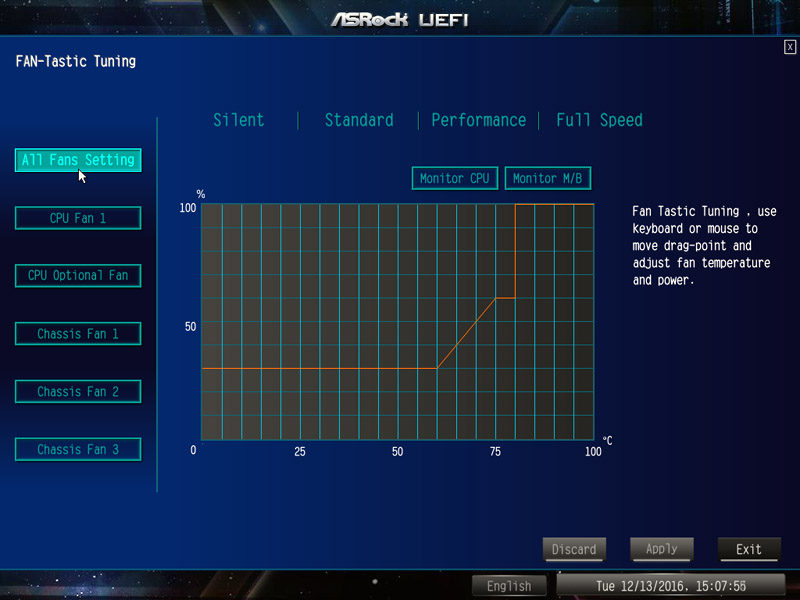
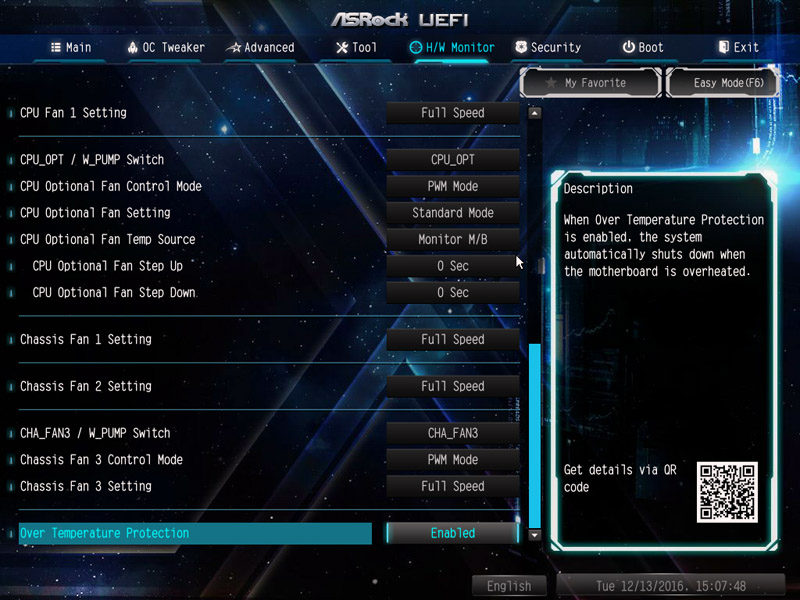
The humorously-named, Fan-Tastic tuning software automatically detects your cooling hardware and thermal loads to find a suitable configuration. Not only that, you can choose between Silent, Standard, Performance and Full Speed profiles. If none of these is suitable, simply drag the fan curve to create a custom power to temperature ratio. This is really easy to do thanks to the clear visual aid.
On the Tool page, you can take advantage of numerous utilities including the Easy RAID Installer, Internet Flash and Secure Backup.
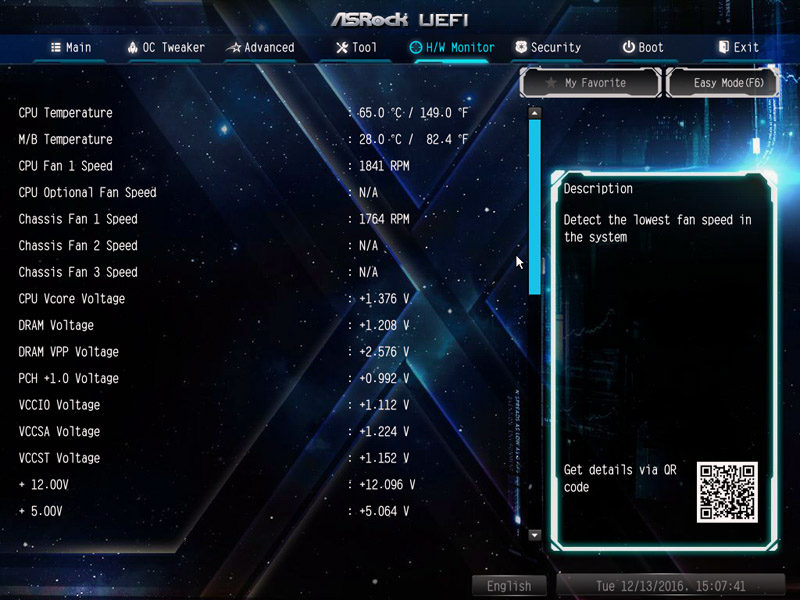
The H/W Monitor detects an unbelievable amount of system values from the CPU temperature to the VCCSA Voltage. As a result, it’s not too difficult to find out kind problem areas and if a particular fan is malfunctioning.
In addition to the Fan-Tastic tool, you can change the characteristics of each fun and choose between the aforementioned profiles.
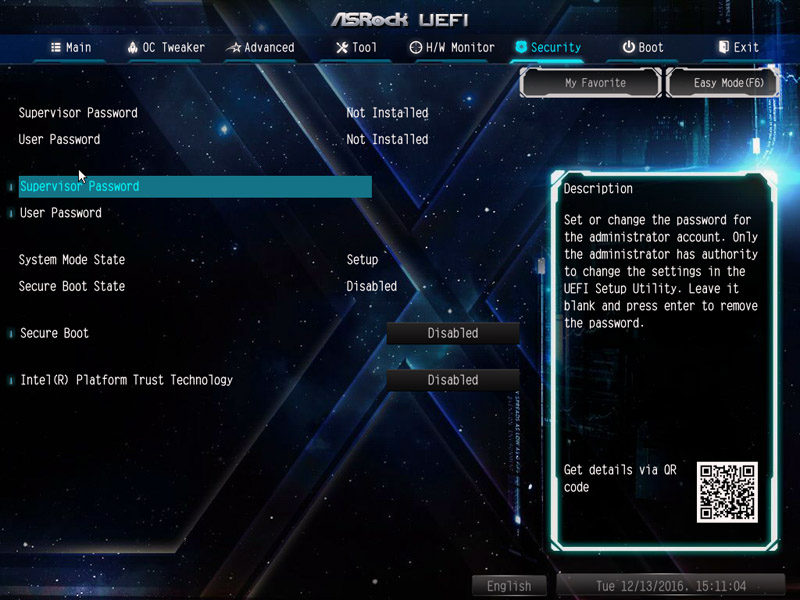
The Security tab is handy to set a supervisor password and prevent other users from messing up the BIOS settings.
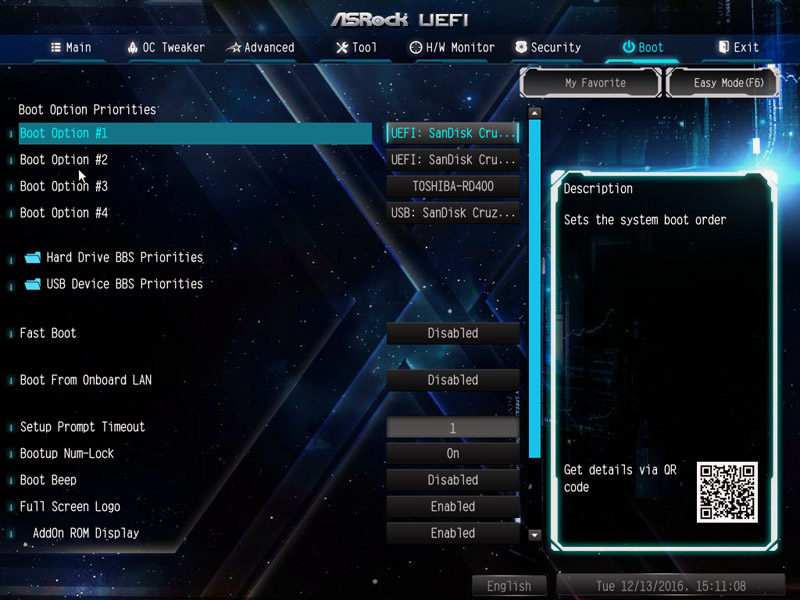
On the boot tab, it’s possible to change the default order and make other adjustments.
The Exit page is pretty self-explanatory and required to save any changes, load the UEFI defaults and discard tweaks in the current session.

Overclocking
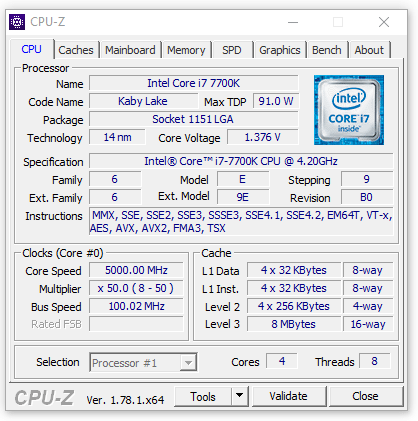
Despite the 12-phase power delivery and impeccable circuitry, I wasn’t able to reach 5.1GHz even with a hefty 1.475V. Therefore, I settled on 5.0GHz and scaled back the voltage to the lowest stable point. Eventually, it seems 5.0GHz was possible using 1.385V which deviates slightly with level 1 load-line calibration enabled. In hindsight, I don’t think the 5.0GHz is a disappointing result and the motherboard is a suitable choice for those who intend on applying a large overclock. Saying that, it does fall behind two Gigabyte offerings.
Software Overview
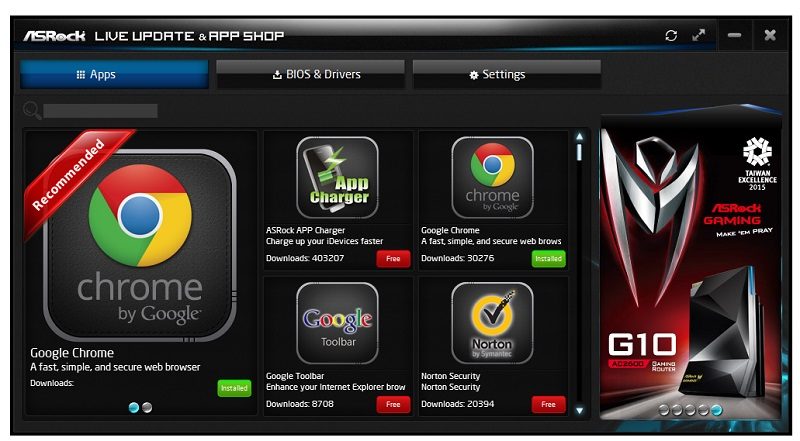
The company’s software package is really basic and devoid of many useful applications. As you can see, the main window lists Google Chome as a key asset and Norton Anti-Virus. Without trying to sound overly dramatic, Norton is an irritating piece of software which has consistent pop-ups whenever you launch a game or download files. During system reviews, it tends to interrupt benchmarks and cause inaccurate results. The App shop has an advert for an ASRock product but it’s too intrusive. Please note, the software suite might be better on release and include more tools, but I could only use what was provided on the motherboard disk.
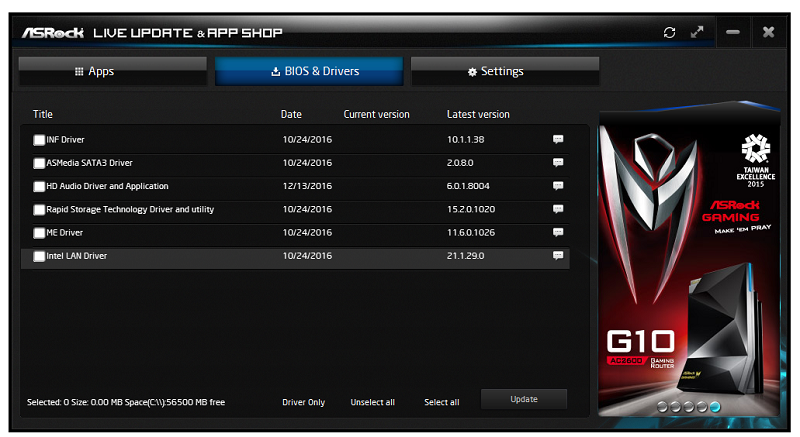
On a more positive note, the BIOS and Driver tabs are extremely useful to quickly install the latest updates without having to search for each driver individually. This should save you a lot of time and ensure it’s really simple to keep a system up to date.
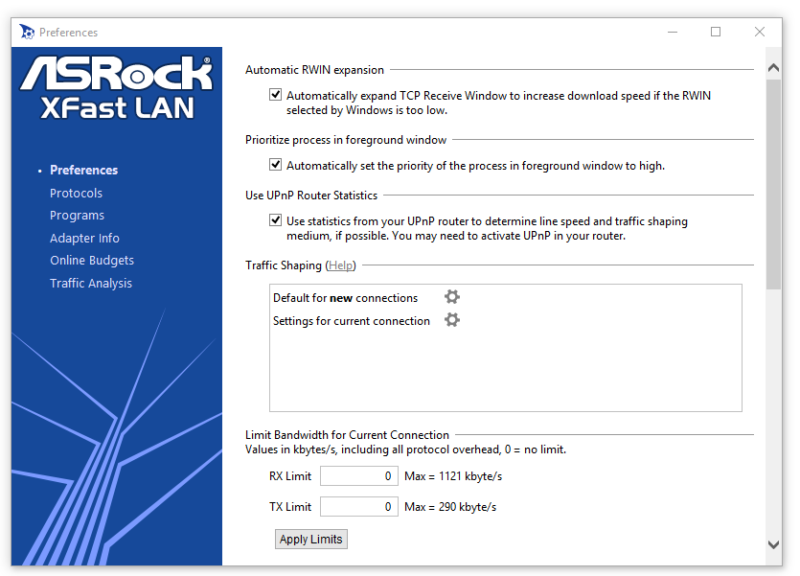
ASRock has included the XFast LAN program which is a traffic shaping solution and allows you to manage priorities of different applications. The traffic prioritisation could reduce latencies in games and provide essential information to monitor networking behaviour. Honestly, it’s probably the most useful tool bundled in the motherboard’s software package.
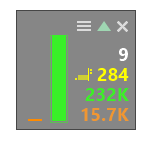
Interestingly, a traffic monitoring GUI is positioned in the system tray and lists key data.
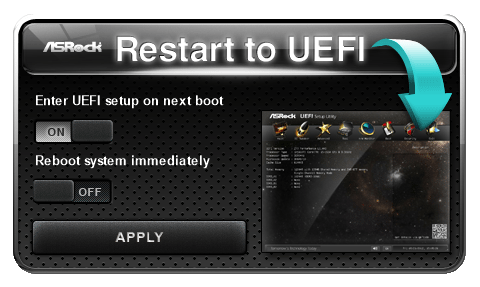
The Restart to UEFI utility can be useful to directly reboot into the BIOS without relying on the BIOS key. If you have an ultra-fast NVMe boot SSD, it’s often difficult to press the BIOS function key in time which leads to a frustrating experience. Thankfully, the Restart to UEFI application solves this problem!
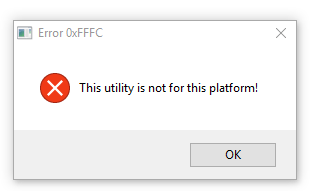
Unfortunately, the ASRock A-Tuning utility wouldn’t work on the motherboard despite trying both the X64 and X86 installers. This is a shame because it’s an application for altering the fan speeds, overclock frequencies and much more. Hopefully, the installer bug will be fixed for the launch and you’ll be able to use its full potential.
CPU & GPU Performance
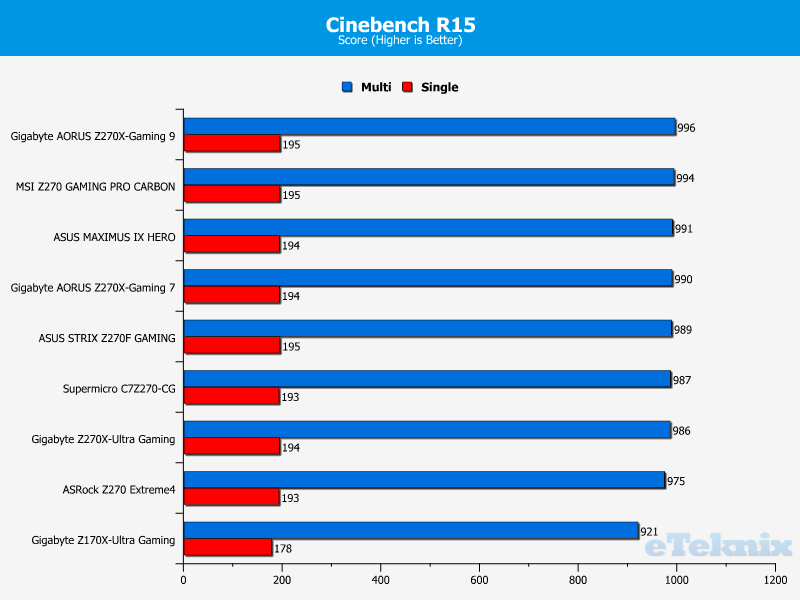
Cinebench
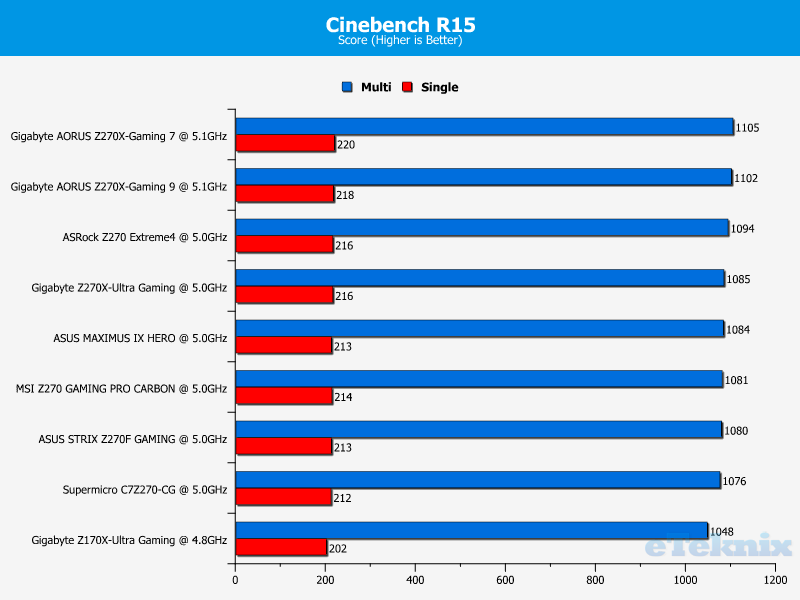
In Cinebench R15, the motherboard lingers behind other Z270 alternatives while running the i7-7700K at its stock configuration. Once overclocked, the performance is much more competitive and best result from any motherboard unable to drive a 5.1GHz frequency boost.
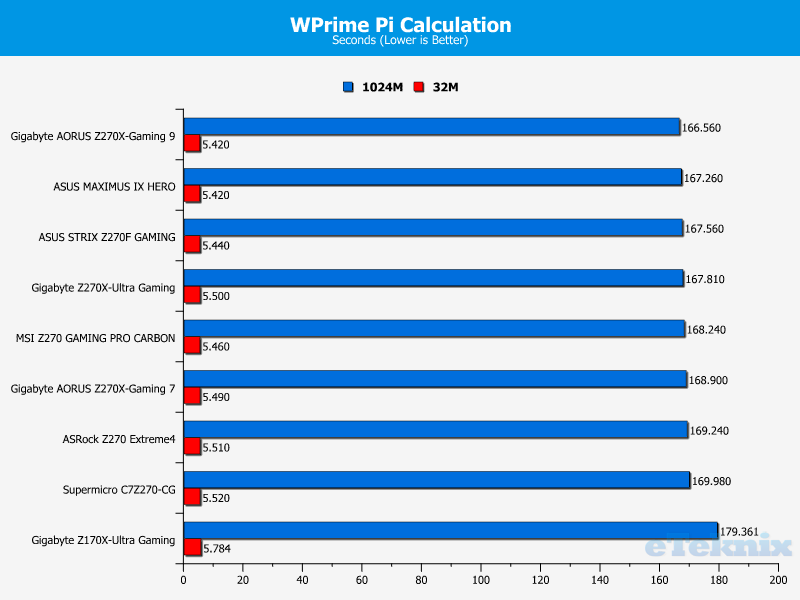
WPrime
Here can see the motherboard outperforms the Supermicro C7Z270-CG by the smallest of margins and isn’t too far away from rising well up the field. After being overclocked to 5.0GHz, the calculation time almost drops under the 150 seconds mark.

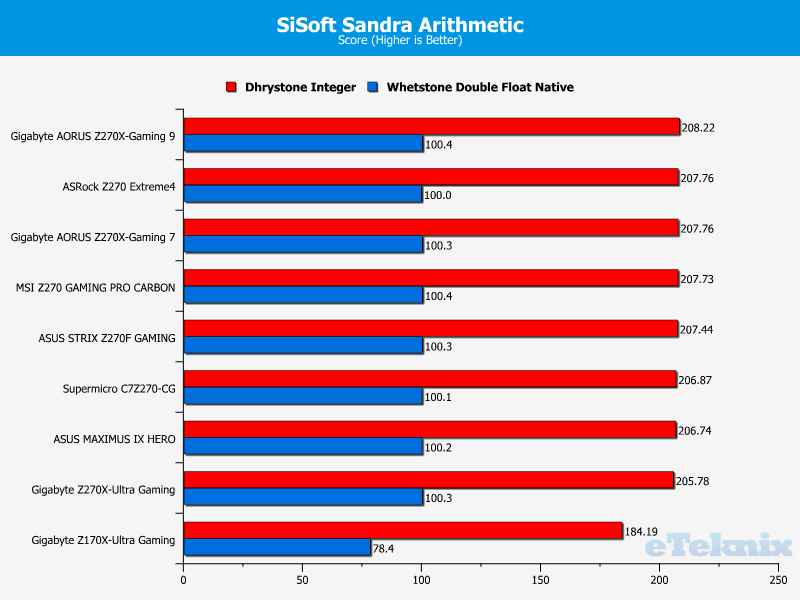
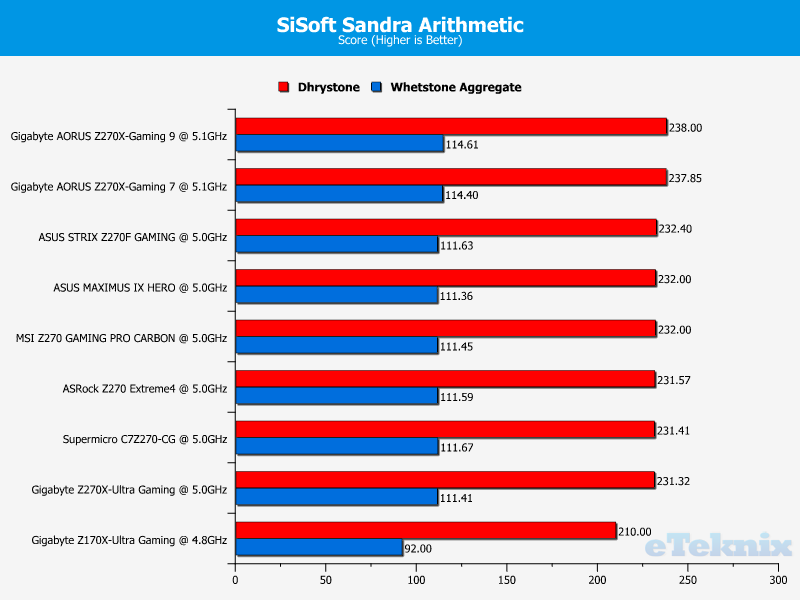
SiSoft Sandra
The ASRock Z270 Extreme4 performs brilliantly during the SiSoft Sandra Arithmetic benchmark and is remarkably close to surpassing every other motherboard sent for review. The motherboard doesn’t quite fare as well in the overclocked face-off, but it’s still a commendable result.
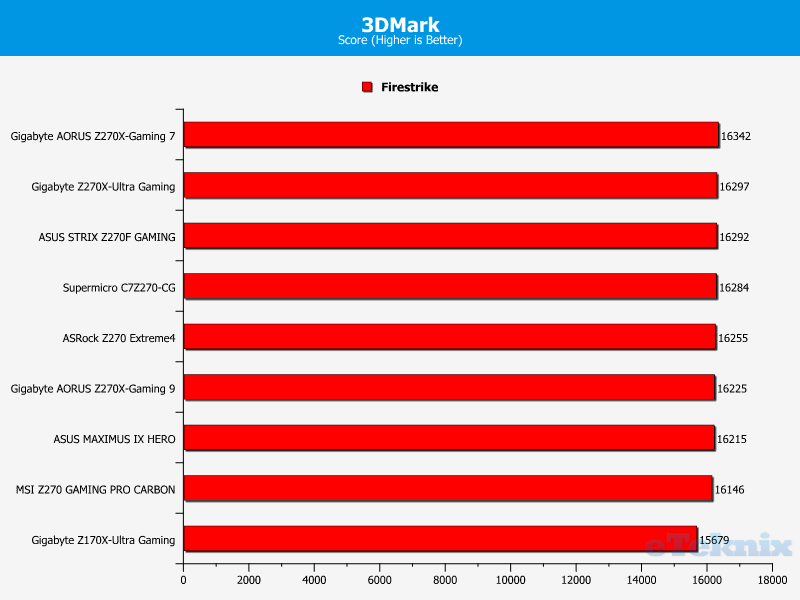
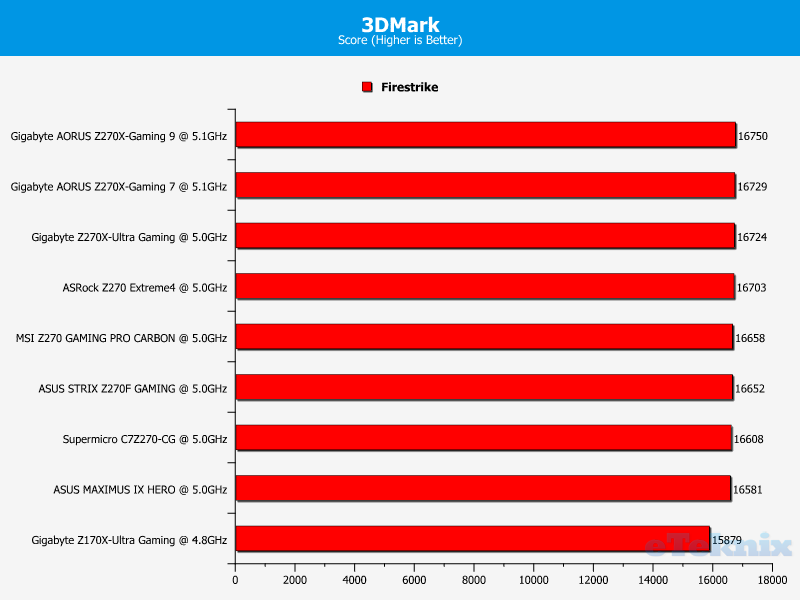
3DMark
As expected, there’s very little to choose between various Z270 motherboards when running a 3D-intensive benchmark. Despite this, the ASRock Z270 Extreme4 demonstrates its suitability alongside a high-end graphics card.
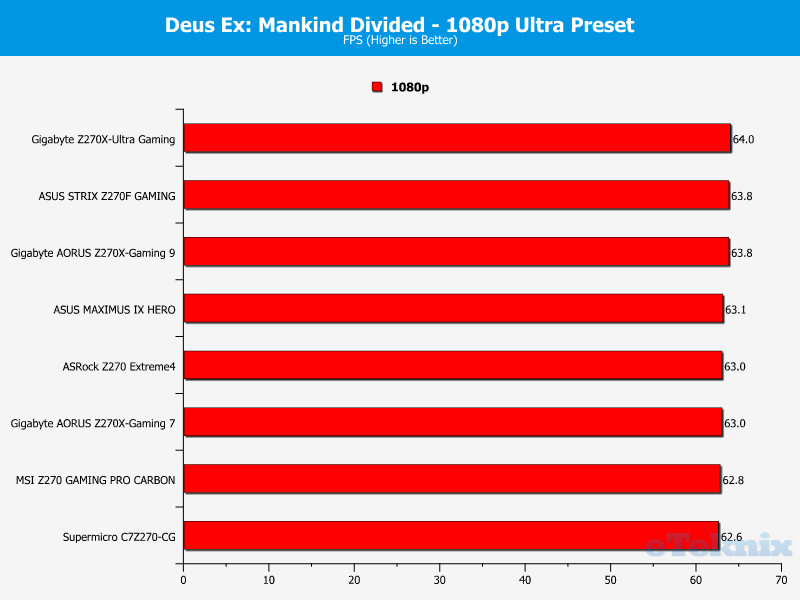
Deus Ex: Mankind Divided
In Deus Ex: Mankind Divided, the motherboard obtains a mid-table position and offers an identical experience to rival products.
Rise of the Tomb Raider
Once again, the motherboard does really well in gaming benchmarks, especially when overclocked. While it might seem a little bizarre that the lower frequency resulted in a higher frame-rate, it’s within a margin of error and the game’s performance mainly depends on the GPU.
Memory Performance
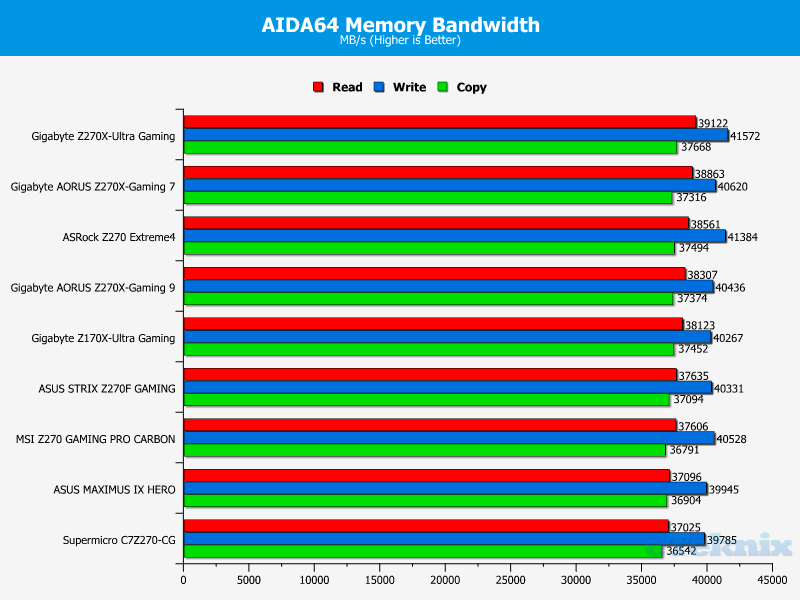
AIDA64 Engineer
Here we can see the motherboard’s memory bandwidth is excellent and outputs really fast read, write and copy speeds. The write speed, in particular, is very good and exceeds the 41,000 barrier.
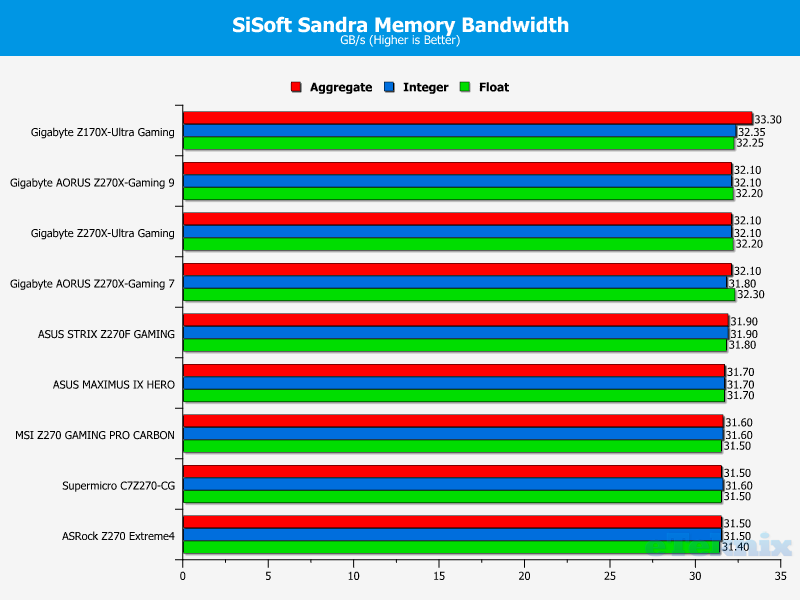
SiSoft Sandra
On the other hand, the memory bandwidth during the SiSoft Sandra benchmark wasn’t particularly impressive and the lowest score set thus far. Of course, it’s not a huge problem because you’ll find it difficult to notice the difference outside of synthetic testing.
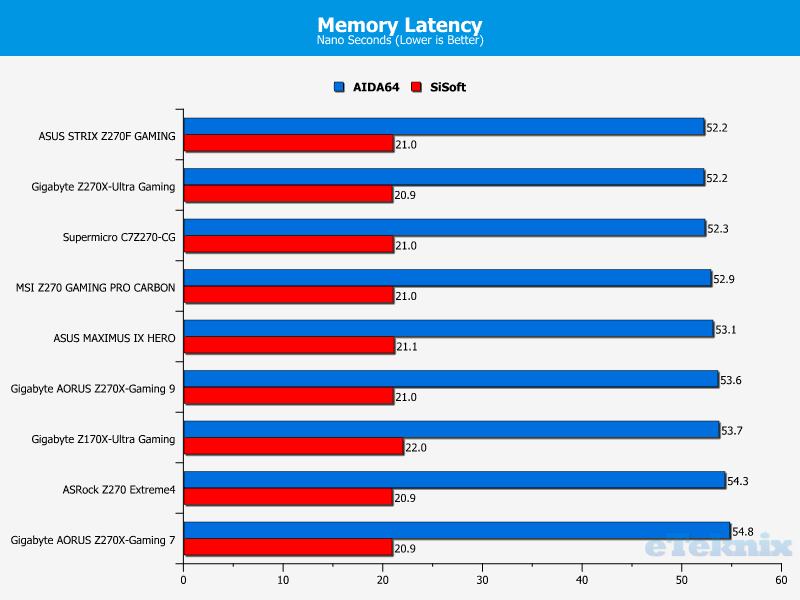
Combined Latency Test
The ASRock Z270 Extreme 4’s latency remained quite low in SiSoft Sandra but the AIDA64 result has some room for improvement.
Storage Performance
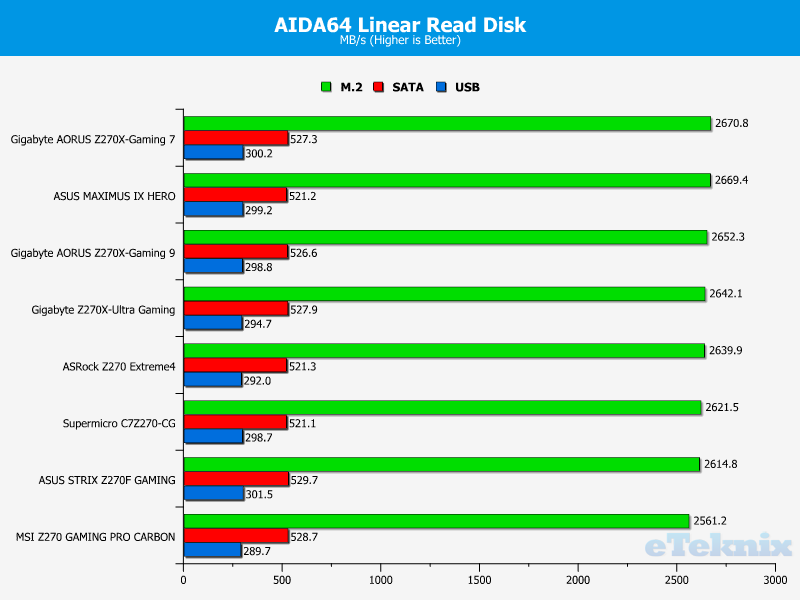
Linear Read
The motherboard’s M.2 linear read rate was consistent and didn’t drop in an abrupt way. On another note, the SATA read speeds were within the range I expect while the USB performance was a little disappointing.
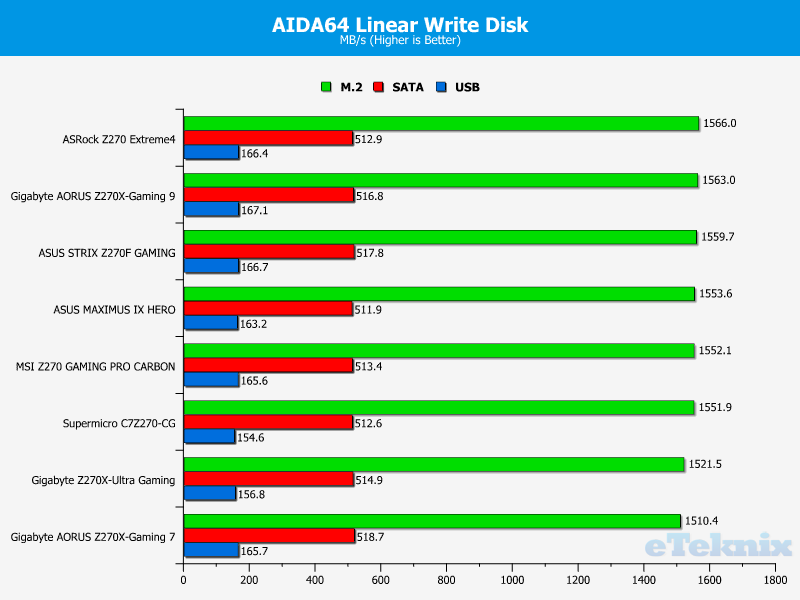
Linear Write
This time, the motherboard recorded the fastest M.2 write speed and wasn’t far off being the first entry above 1570MB/s. Additionally, the SATA speed was solid and the USB 3.0 write rate deserves praise.
Networking Performance
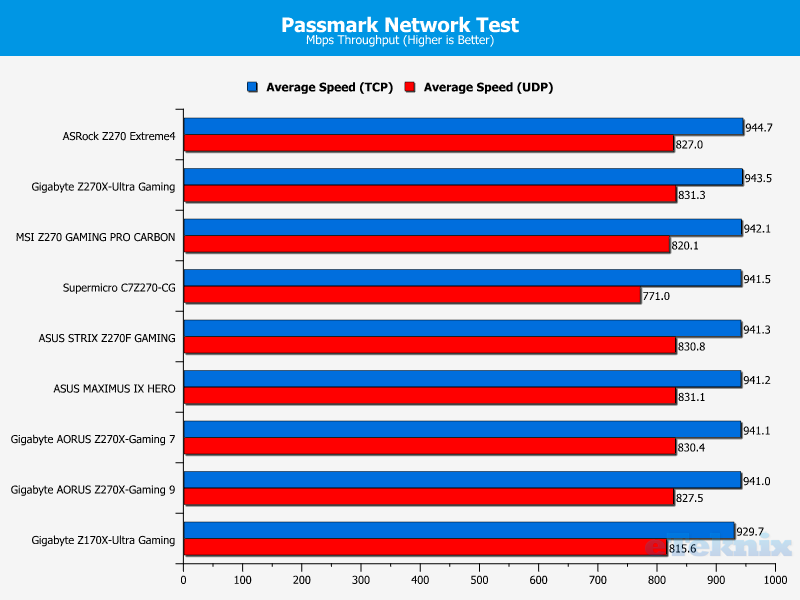
Passmark Performance Test 8 – Ethernet
The motherboard’s Intel i219V networking solution offers wonderful TCP speeds and just defeated the Gigabyte Z270X-Ultra Gaming to the top spot. Furthermore, the UDP performance was good and didn’t exhibit too many large bandwidth dips.
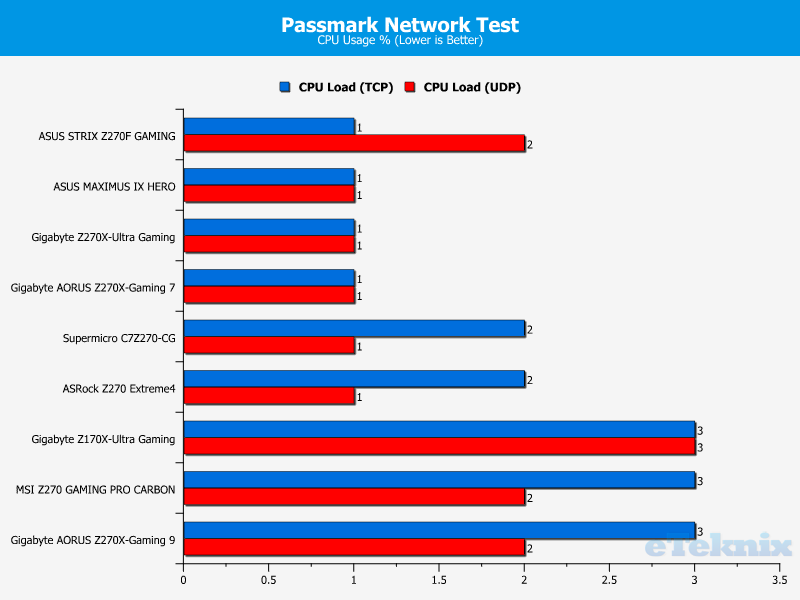
Passmark Performance Test 8 – CPU Work Load
As per usual for Intel networking chips, the CPU utilisation is extremely low.
Audio Performance
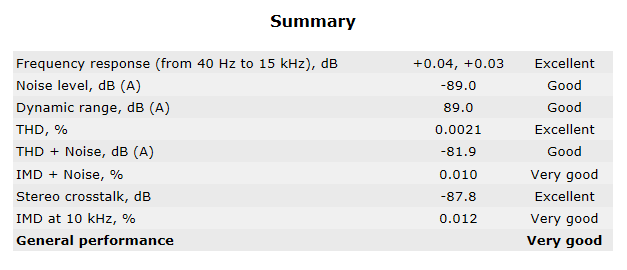
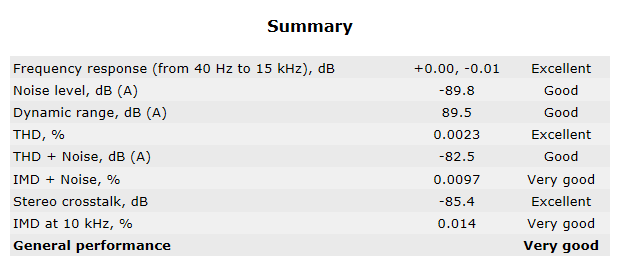
The ASRock Z270 Extreme 4’s audio circuitry is able to deliver a fantastic frequency response at various bit-rates. Furthermore, the stereo crosstalk, dB and THD, % performance is superb. Evidently, the dynamic range could be better and the noise levels appear to fare better at higher bit-rates. On the whole, the audio is great and more than ample for most people’s usage scenarios.
16 Bit, 44KHz (DVD Quality)
16 Bit, 96KHz (Studio Quality)
24 Bit, 96KHz (Studio Quality)
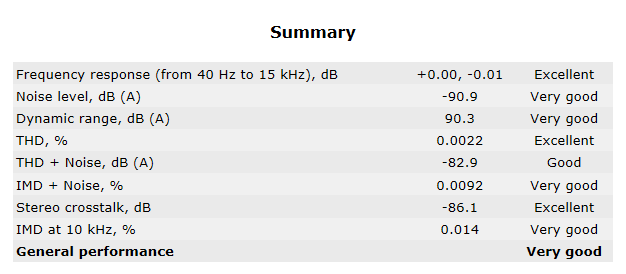
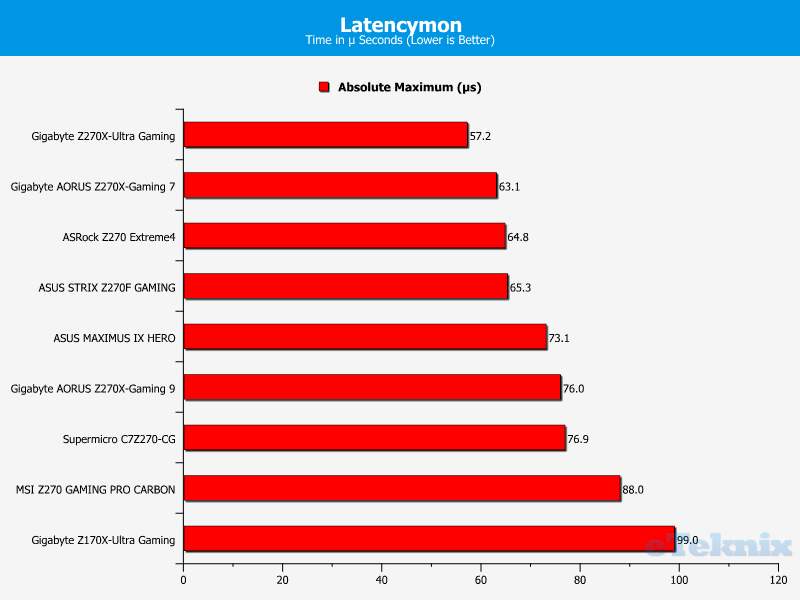
DPC Audio Latency Analyser
The motherboard’s audio latency is really low and outperforms many premium Z270 offerings.
Power Consumption
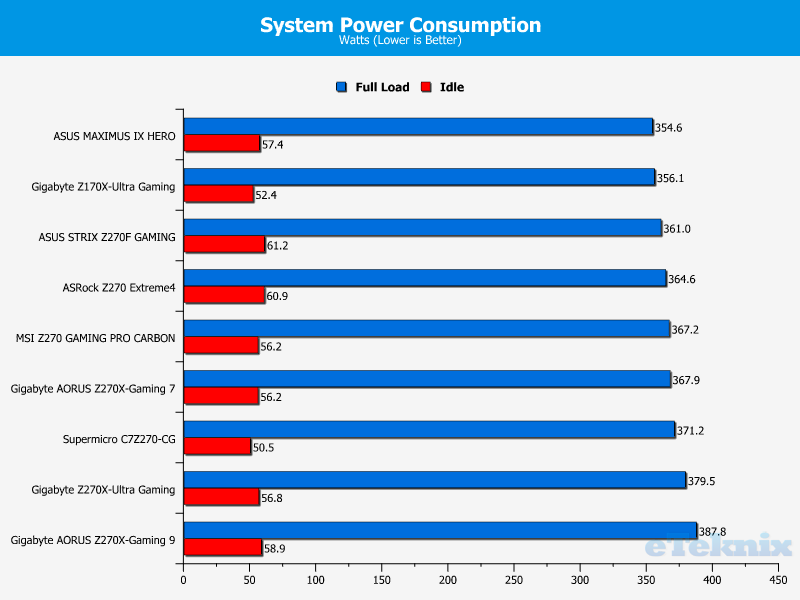
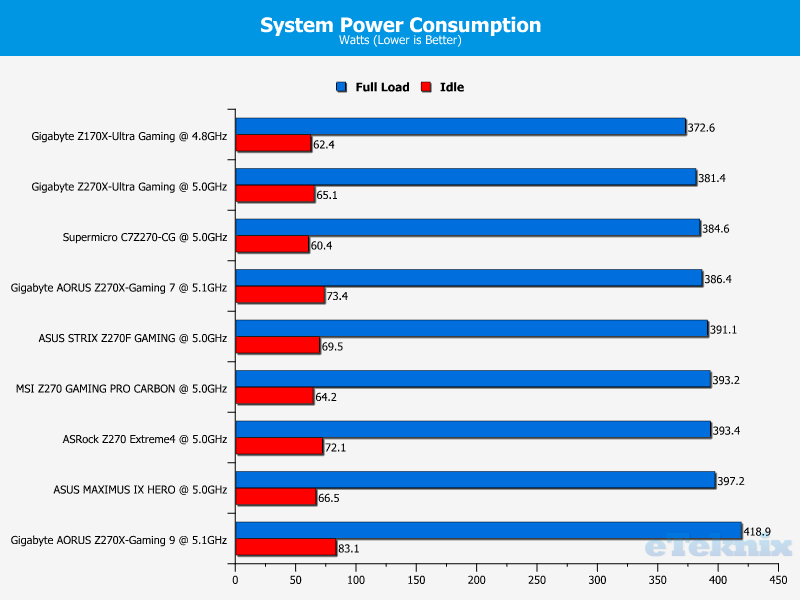
At stock values, the system power draw with the motherboard installed is a very respectable 364.6-watts. Once overclocked, the power consumption nearly goes past a 400-watt figure, which is higher than I’d like.
Final Thoughts
Pricing
Unfortunately, there’s been a complete lack of information regarding the Z270 motherboards and their retail prices. As a result, it’s impossible to conduct a fair comparison between numerous products and assess the value proposition. Rest assured, once the full Z270 range is available to purchase, I’ll be adding the appropriate links and revisiting the pricing analysis. According to my sources, it’s likely vendors will add approximately £10-£30 compared to the previous generation. However, this doesn’t help matters when a company unveils something completely new and the predecessor can’t be researched to gauge a pricing estimate. Honestly, I’d expect more details to emerge during CES when PR contacts return from the holiday break.
Overview
The ASRock Z270 Extreme4 is based on a stylish colour scheme and imposing PCB print. In particular, the cross pattern adds a more spectacular touch to the motherboard’s design and helps it to stand out from the crowd. Personally, I love how the cross detailing surrounds the CPU socket and blends into the PCH. This is a really neat effect and coincides with the motherboard’s jet black elements rather well. Even though the hefty I/O cover has a certain appeal, the Intel logo is an odd choice and detracts from the product’s individualism. Sadly, the Intel branding inhibits the sleek, uniform appearance and seems out of place.
On a more positive note, the motherboard supports RGB illumination through the PCH, audio isolation cover and I/O cover. The full gamut of colours allows you to modify the motherboard’s appearance and select from a decent number of transitional effects. Rather irritatingly, the customisation can only be done directly in the BIOS and there wasn’t any software included which performs a similar function in Windows. Thankfully, this is easily fixed and I wouldn’t be surprised if an RGB application emerges soon. It’s an important topic because the motherboard has an RGB header which allows you to control the strip’s illumination. The lighting itself is quite nice to look at but it’s a more subdued than Gigabyte and MSI’s systems. Of course, this isn’t necessarily a negative point because extremely vivid lighting might seem overpowering.
The motherboard opts for a 12-phase power delivery, powerful 45A power choke and premium Nichicon 12K black capacitors. Not only that, the ASRock Z270 Extreme4 utilises a glass fabric PCB which contends with heat variation more effectively. The XXL aluminium heatsinks ensure the power circuitry runs as intended and has excellent reliability. Also, the DIMM slots have 15u gold contacts to protect against EMI. ASRock included a dedicated water pump header supporting up to 1.5A and another four PWM headers offering full fan control. As you might expect for a Z270 product, the motherboard’s audio hardware is based on the Realtek ALC1220 codec and has a 120dB signal-to-noise ratio. Furthermore, the TI® NE5532 amplifier can power headphones with a rating up to 800 Ohms. During the testing phase, the audio performance was excellent, albeit with a slight room for improvement in some areas.
Other notable features include fortifying metal shielding for the top two PCI-E slots, dual M.2 connectivity and eight SATA ports. The motherboard has a slot to install an M.2 WiFi module and supports both forms of USB 3.1. One slight annoyance is the lack of a power button and diagnostic post LED. This means it’s difficult to ascertain the root cause of system instability.
ASRock’s BIOS is relatively easy to use and packed full of useful features. Granted, the interface isn’t as slick as ASUS’ world-renowned BIOS layout, but it’s perfectly functional and caters to users with contrasting technical experience. The clear text, thematic categories and handy thermal readings all contribute to making the BIOS a great asset. The System Browser helps you to identify different sections of the motherboard and determine a connected device’s running speed. While the fan software is a little basic, it’s decent to control PWM values and create a good balance between thermal dissipation and noise levels.
In terms of performance, the motherboard is fantastic and excels during networking tests. Additionally, the M.2 write rate was remarkable and defeated all the other Z270 launch offerings. Outside of these fields, the performance is solid and the motherboard selection doesn’t make a substantial difference. Nevertheless, the ASRock Extreme4 upholds great performance numbers and the only major downfall occurred during stock Cinebench R15 testing. Of course, the disappointing multi-threaded score could be the result of an outside application, early BIOS or other factors. Whatever the case, the motherboard works alongside the new i7-7700K rather well.
Pros
- Dual M.2 offers exceptional read/write rates
- Eye-catching aesthetic design
- Great audio performance
- Impressive 12-phase power delivery
- Innovative PCB pattern
- Marvellous networking
- Nichicon 12K black capacitors
- Primary and secondary PCI-E slots have EMI shielding
- Supports USB 3.1 Type-A and Type-C
- Wonderful M.2 read speeds
Cons
- No onboard buttons or diagnostic tools
- RGB lighting can only be customised in the BIOS
- Software suite is very basic
“The ASRock Z270 Extreme4 has a gorgeous PCB design, impressive power circuitry and supports dual M.2 connectivity. Not only that, it’s able to maintain exceptionally high networking speeds and comes with a great audio solution.”

ASRock Z270 Extreme4 LGA1151 Motherboard Review
Thank you ASRock for providing us with this sample.


