ASUS Maximus IX Hero LGA1151 Motherboard Review
John Williamson / 7 years ago
Introduction
The ASUS Maximus VIII Hero is widely regarded as one of the most luxurious Z170 products on the market which beautifully caters to the core gaming demographic. In particular, the motherboard’s impeccable SupremeFX audio, reliable Extreme Engine Digi+ and comprehensive software package offer the perfect solution for enthusiasts requiring a no-compromise approach. Of course, today marks the release of Intel’s Z270 Express chipset and 7th generation processors. To tie-in with this launch, ASUS has developed the successor to the Maximus VIII Hero which introduces new features and a slightly refined aesthetic design.
Rather impressively, the ASUS Maximus IX Hero has a revamped audio solution in the form of the SupremeFX S1220 codec. Not only that, the motherboard contains a 3D-printing mount to add your own personal touch. Additionally, there’s two M.2 slots which allow to you configure an extremely fast NVMe RAID0 array. The motherboard houses USB 3.1 Type-A and Type-C ports through an ASMedia controller and the PCB even has a USB 3.1 front connector. In total, there are eight fan headers equipped with automatic PWM/DC detection. Evidently, the Aura lighting system is another important aspect and you can attach two 5050RGB strips and control their hue in ASUS’ software suite. Judging by the specification, I’m expecting the ASUS Maximus IX Hero to build upon its predecessor’s success and take the brand’s legacy to new heights.
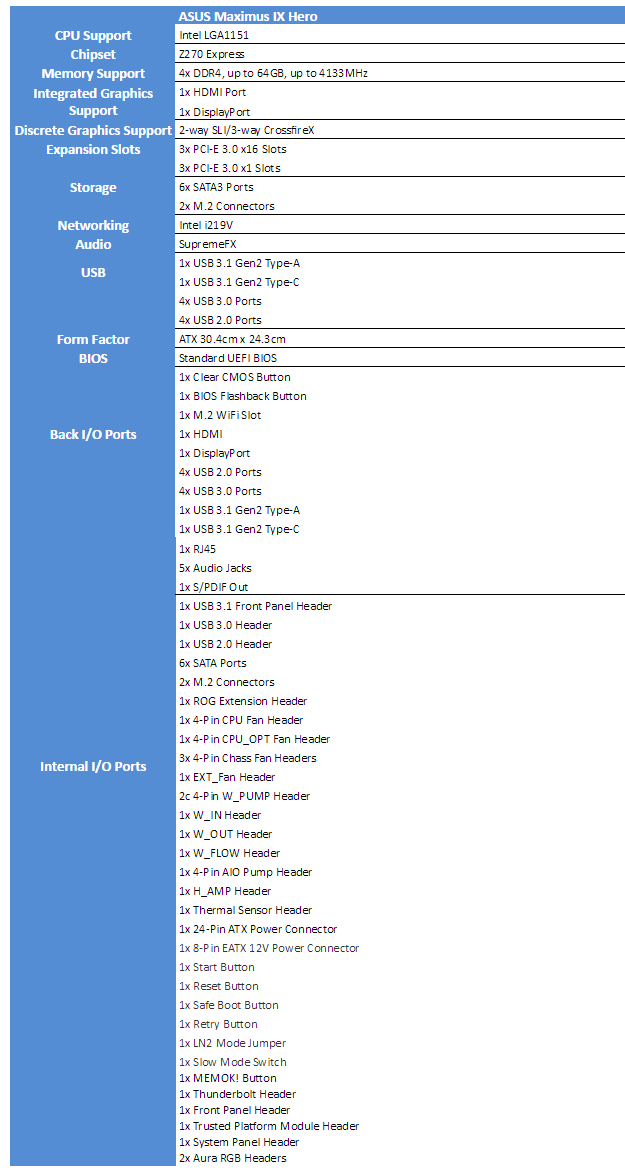
Specifications
Packaging and Accessories
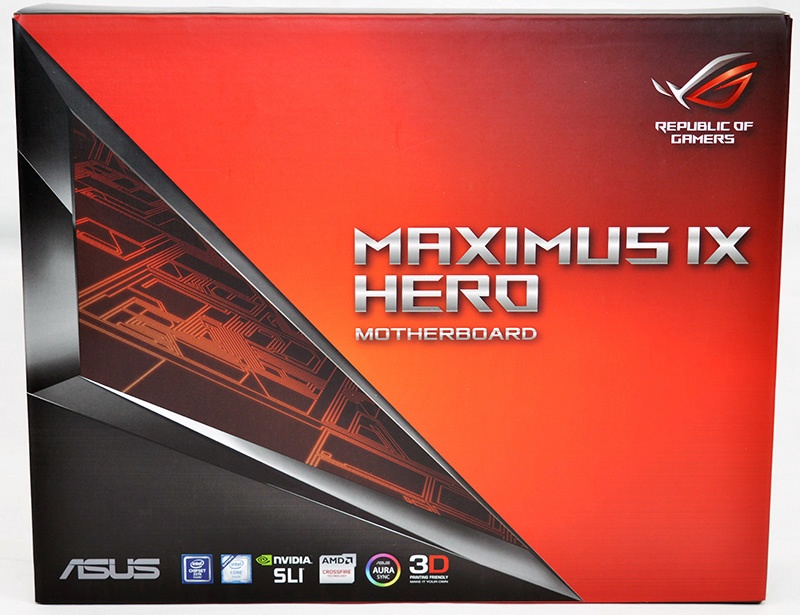
The ASUS Maximus IX Hero comes in a really stylish box which is based on the classic red and black gaming colour scheme. Furthermore, the gorgeous PCB circuitry image captures your attention and contrasts with the two-tone colour combination rather nicely. Towards the bottom, icons are displayed outlining the motherboard’s Aura lighting system, SLI support and 3D-printing friendly design.
On the rear section, the end-user is presented with a motherboard overview and brief discussion of the key features. Interestingly, ASUS tries to keep things simple and doesn’t plaster the box with a huge wall of text to explain various technical aspects. This tactic works quite well and I prefer the cleaner arrangement.

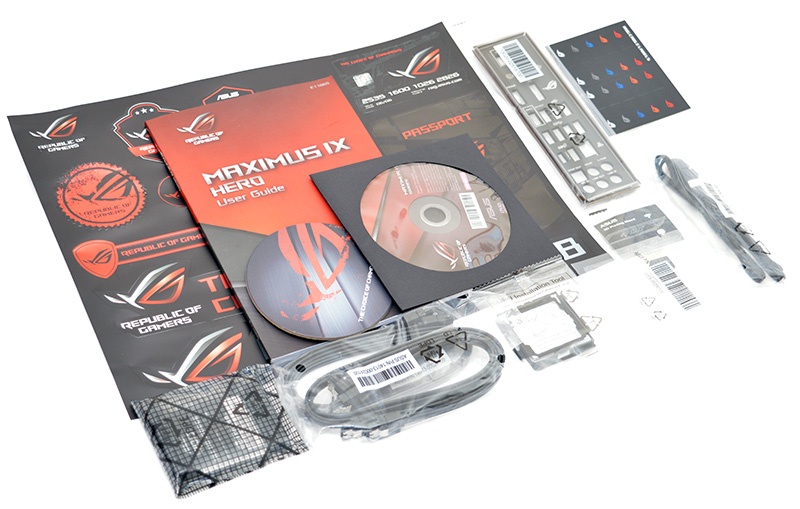
Here we can see the motherboard comes with a huge ROG sticker set, SLI HB bridge, user’s guide, ROG coaster, four SATA cables, drivers/utilities disk, M.2 screws, CPU installation tool, I/O shield, 3D Printing Mount, Q-Connector, ROG cable labels and an 80cm extension cable for RGB strips.
A Closer Look
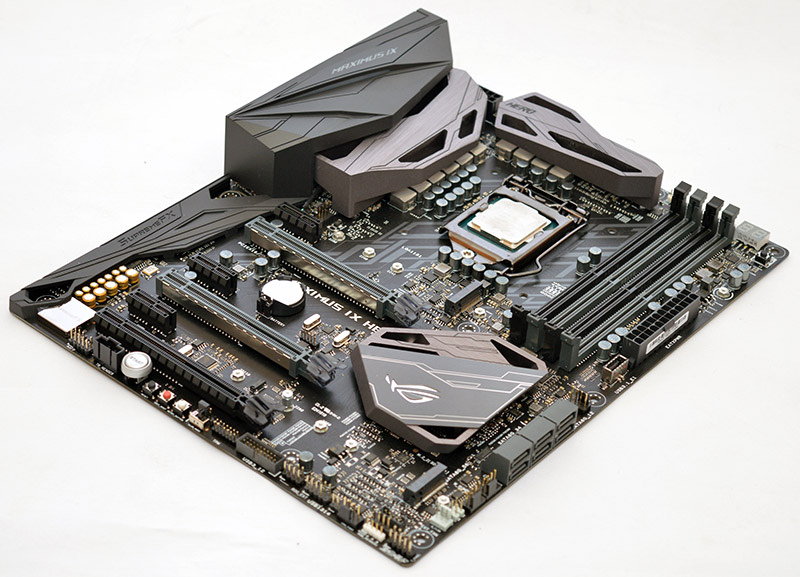
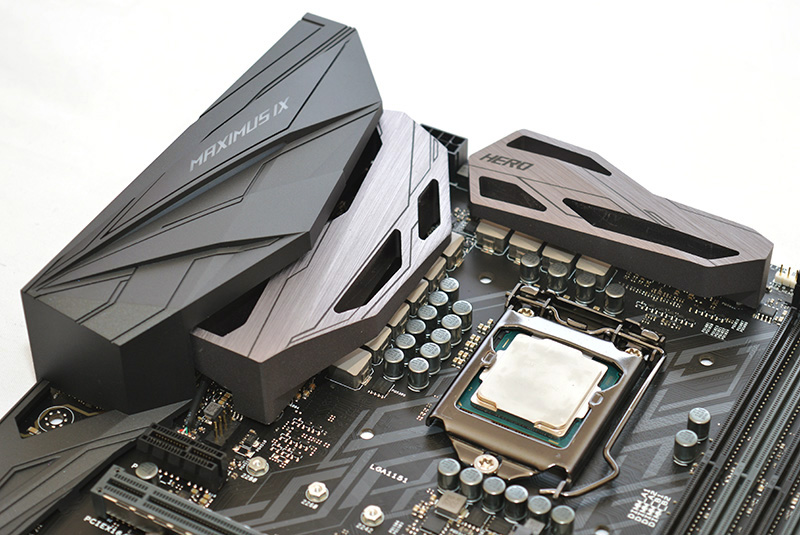
The ASUS Maximus IX Hero employs a neutral jet black and silver colour scheme which complements a huge range of components sporting contrasting designs. This understated, sophisticated theme dismisses the ROG aesthetic from a few generations ago which fixated on a red shade. Instead, the motherboard injects a hint of colour through RGB technology which means you can customise the appearance based on your own individual taste. For example, it’s possible to select your favourite hue, enable a vibrant transitional effect or turn off the illumination. Personally, I think the reliance on RGB to add colour is a wise move and prevents products from having a limited appeal.
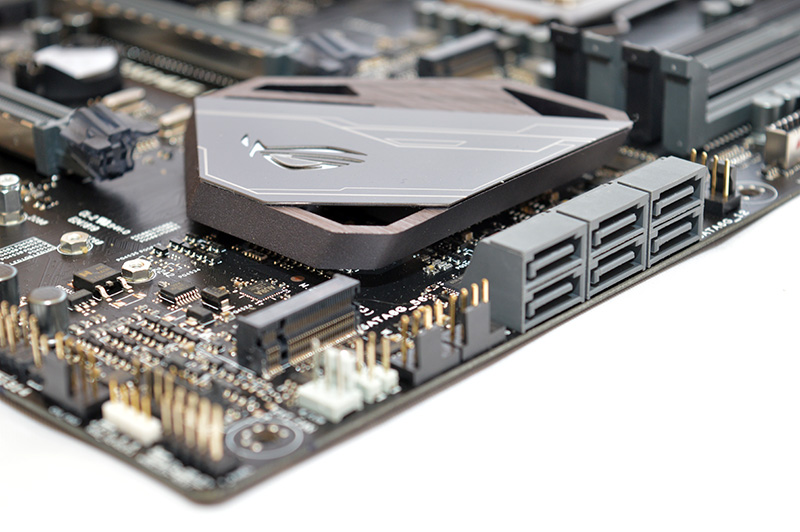
Even though I describe the motherboard’s style as understated, the imposing heatsinks and I/O cover are beautifully designed which create a unique feel. More specifically, the brushed silver finish around the power delivery heatsinks is absolutely stunning and I love the small cut-outs which take the aesthetic beauty to another dimension. Furthermore, the PCH heatsink is really unusual and the pattern swooping across looks rather special. This detailing continues on the I/O cover which upholds a superb level of synergy.
In total, the motherboard has eight fan headers including five chassis headers, two pump headers and a high amp header. Interestingly, ASUS has engineered a new fan control IC capable of over temperature protection and over current protection. This protects the fan IC from becoming damaged due to a power surge and sudden thermal stress. Not only that, all of the onboard headers have PWM/DC detection which can be tuned using Fan Xpert 4. Also, the CPU fan headers and chassis fan headers support the Extreme Quiet Mode which creates a silent desktop experience during low CPU utilisation circumstances. The high amp fan header can cope with up to 3A for a PWM fan and 1A if you attach a DC fan. On a similar note, the water pump header is rated for up to 3A which makes it suitable for custom loop cooling hardware. If you own a closed-loop-cooler, the AIO_Pump header will be a great option at 1A. Both of these default to 100% duty so you don’t have to worry about the pump failing to reach its full speed. ASUS included two water cooling temperature Sense headers and a water flow Sense header to monitor system values. If you feel the motherboard’s fan configuration isn’t enough for some reason, it’s possible to connect a fan extension card.
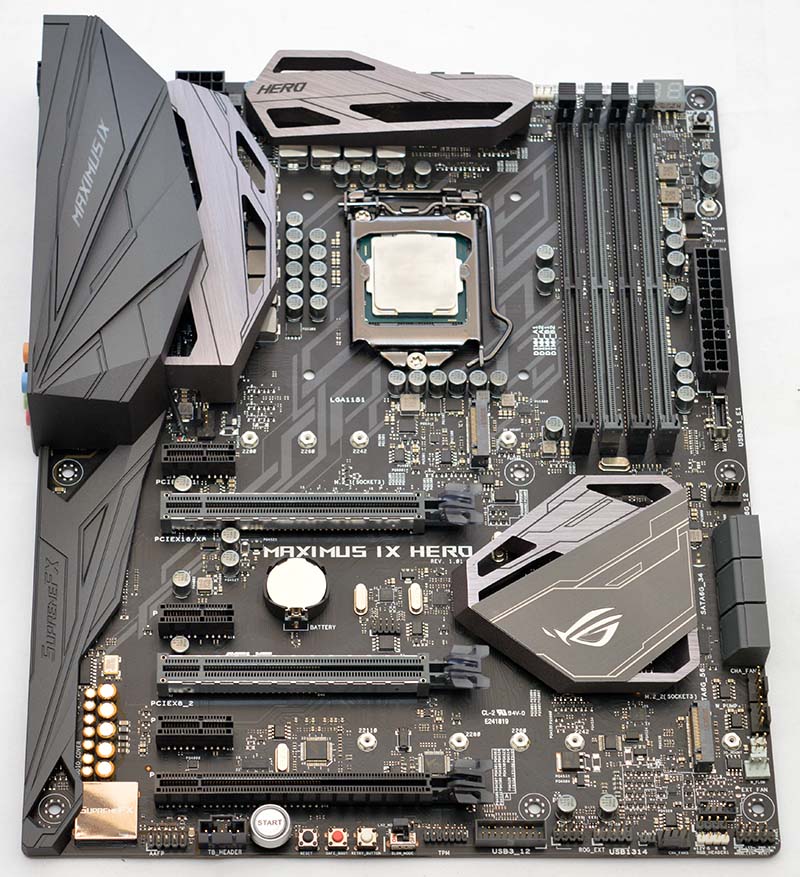
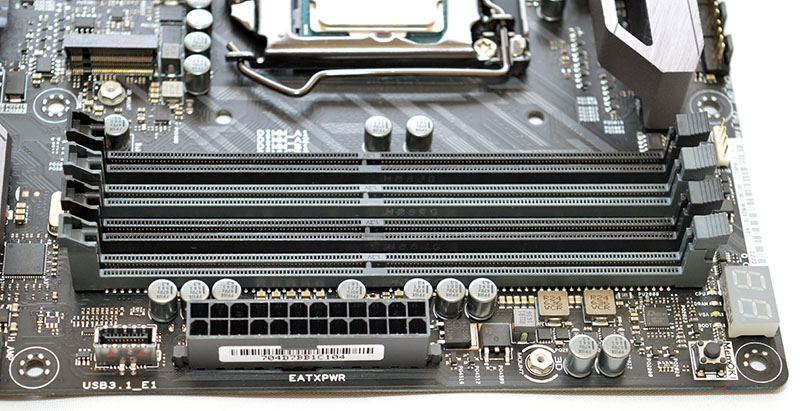
The motherboard utilises an Extreme Engine Digi+ 8-phase power delivery for the CPU and 2-phases are directed to the iGPU. Furthermore, the memory has its own dedicated 2-phase power design. As expected, the product opts for MicroFine Alloy chokes which are 31 percent cooler than large granules and offer a 75 percent less hysteresis reduction. This greatly improves the efficiency at higher currents which aids stability. The motherboard’s Texas Instruments NexFET MOSFETs are 50 percent smaller than traditional alternatives and have an excellent efficiency rating. Also, the Japanese-made 10K black capacitors have a 20 percent greater temperature endurance and exceedingly long lifespan.
ASUS’ BCLK generator works alongside the Turbo Processing Unit to open up the options for overclocking. The full BCLK range becomes accessible with an adjustable clock amplitude and clock slew rate. As a result, you can tune the BCLK in smaller increments and push your CPU to its maximum potential. Additionally, the BCLK generator has a less jitter and is a really handy feature for overclocking aficionados. The LANGuard uses signal-coupling and surface-mounted capacitors into a single chip to provide superb ESD protection. According to ASUS, this invention cuts the signal loss from 130KHz to 300MHz.
In terms of memory support, the motherboard can accept up to 64GB with a maximum rated speed of 4133MHz. Of course, this isn’t a viable target for most people and they’ll simply enable their memory kit’s XMP profile. ASUS’ 3rd generation T-topology circuit reduces crosstalk electrical interference which creates an enhanced signal integrity. ASUS worked with key upstream vendors to improve the T-topology process. Near the 24-pin ATX connector is a screw to attach your own 3D printed piece and add a personal taste to the motherboard. The LED post readout is useful for system diagnostics and to check the stability of a particular overclock. The MEMOK! button is deployed to assess the memory stability which could be the root cause of boot problems.
The motherboard’s SupremeFX solution is based on a new S1220 codec with an 113dB signal-to-noise ratio line-in and 120dB line-out. As a result, the codec provides a better frequency response and dynamic range while exhibiting minimal noise. Not only that, the codec has an ESS ESS9023P 24-bit DAC and RC4580 buffer, The headphone amplifier utilises a 2.1Vrms output and can drive high-impedance headphones up to 600 Ohms. The de-pop MOSFET reduces pop noises and acts an impedance sense pathway. The impedance sensing automatically determines the optimal rating for connected devices between Performance (0-50 Ohms), Powerful (51-109 Ohms) and Extreme (109 Ohms and above). As expected, there’s a healthy supply of premium Nichicon capacitors which deliver a warm, rich sound with superb clarity. The SupremeFX shielding has a physical isolation guard which isolates crosstalk and other noise interference. Also, the left and right channel track separation work to reduce the audio interference.
Here we can see the ASUS Maximus IX Hero has three PCI-E slots and supports up to 2-way SLI and 3-way CrossfireX configurations at x16/x8/, x8/x8 and/x4/x4. Interestingly, ASUS’ Safeslot design has been improved upon and contains more solder points which reinforce the slot and adds a greater durability. More specifically, the extra soldering improves the strength on the X-axis by 16 percent, 66 percent on the Y-axis and 34 percent on the Z-axis. The fortifying shielding combats EMI and prevents the slot from being damaged by an aggressive installation. Underneath the final PCI-E x16 slot is a useful selection of buttons including Start, Reset, Safe_Boot, Retry_Button and Slow_Mode.
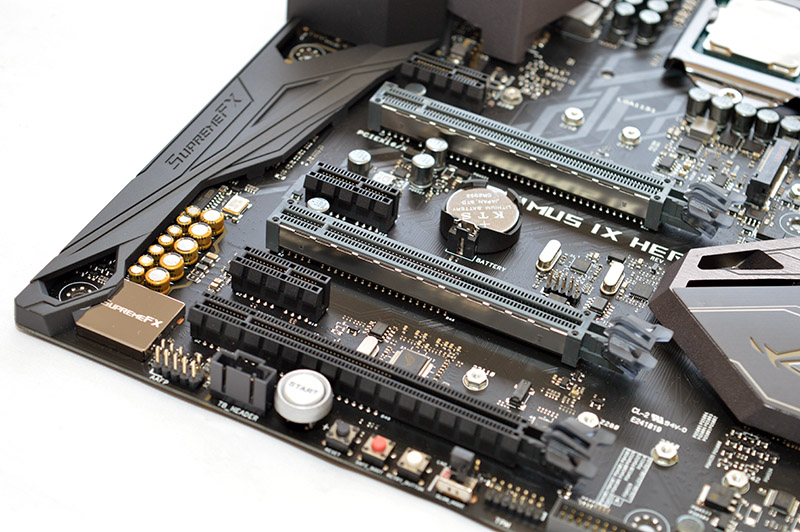
Connectivity-wise, the motherboard has six SATA3 ports, two M.2 ports and a USB 3.1 port positioned near the DIMM slots. The first M.2 connector supports type 2242/2260/2280 while the second can accommodate type 2242/2260/2280/22110 drives. The USB 3.1 connector allows you to reach speeds of 10Gb/s and ASUS has worked with Lian-LI and In-Win to ensure consumers can take advantage of this addition.
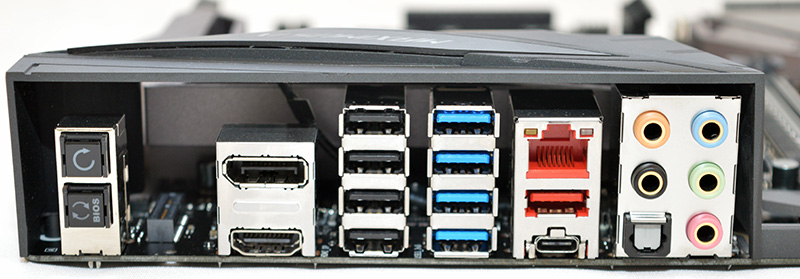
On the rear I/O, there’s a Clear_CMOS button, USB BIOS Flashback button, DisplayPort, HDMI, four USB 2.0 ports, four USB 3.0 ports, Intel i219V Gigabit LAN, USB 3.1 Type-A, USB 3.1 Type-C, five audio jacks and S/PDIF Out.
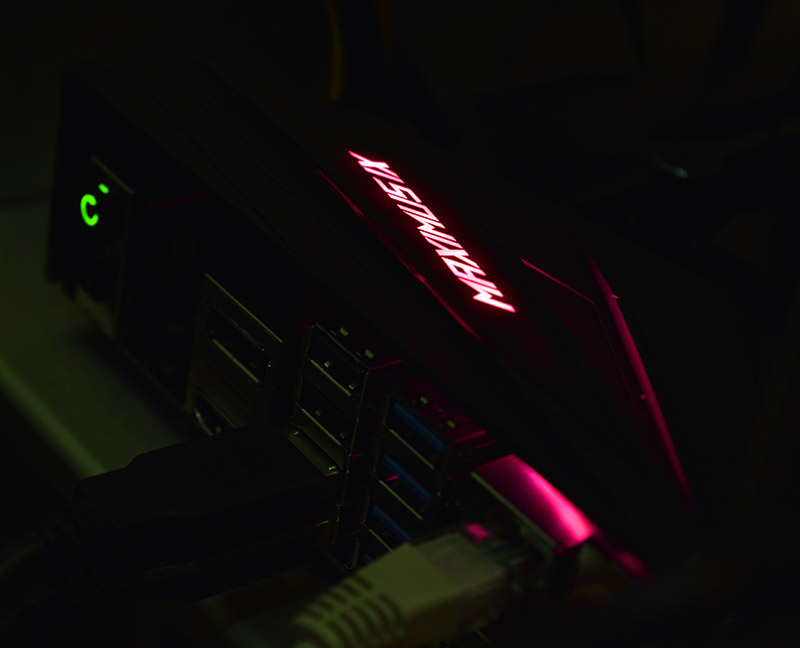
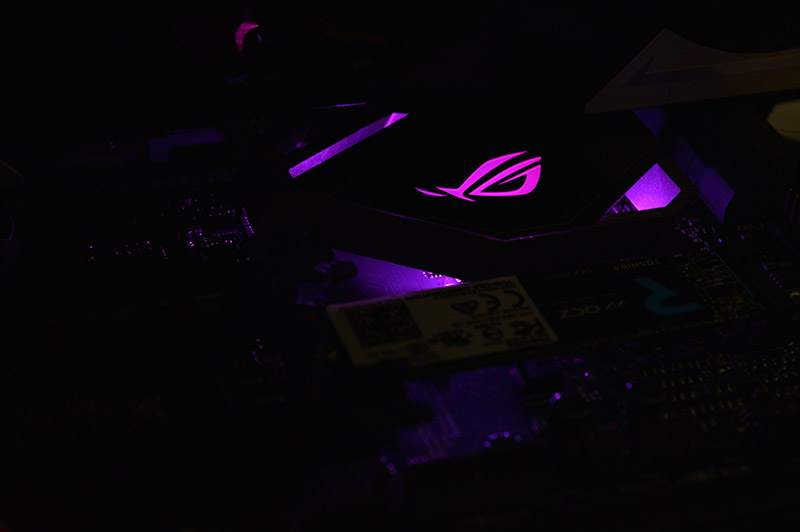
Unfortunately, it’s quite difficult to capture the Aura RGB lighting on camera in a way which reflects its true beauty. Rest assured the colours are extremely vibrant and a joy to look at. The motherboard’s Maximus logo lights up on the I/O cover and the PCH contains RGB technology. ASUS incorporated two headers which can control 5050LED strips and it’s possible to connect other RGB lighting peripherals and modify their visual style. The software houses a huge range of transitional effects including breathing, colour cycle, strobing, rainbow, comet, flash and dash. Furthermore, the lighting can be tuned to a music track or change depending on temperatures.
The RGB lighting in the PCH looks absolutely breathtaking and it’s great to see the iconic ROG logo being proudly displayed.
Testing & Methodology
Here is the test bench used for all Z270 motherboard reviews:
Hardware
- Motherboard varies by review
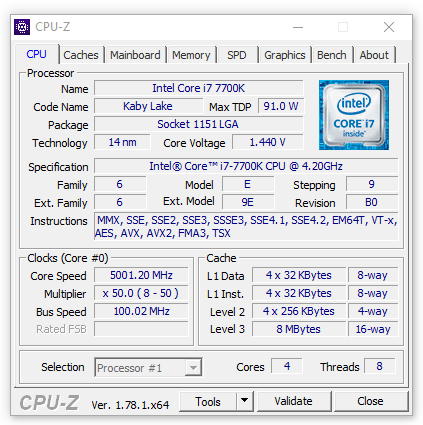
- CPU: Intel Core i7-7700K
- GPU: Gigabyte G1 Gaming GTX 980Ti 6GB GDDR5
- RAM: Crucial Elite 16GB (2x8GB) 2666MHz
- Cooling: Thermaltake Water 3.0 AIO with Gelid GC-Extreme
- Case: Lian Li T80 Test Bench
- Storage Drives: Main storage: Toshiba OCZ VX500 500GB SATA, Test Devices: Toshiba OCZ VX500 500GB SATA , Toshiba OCZ RD400 512GB NVMe M.2 and Patriot SuperSonic Magnum 256GB USB 3.0 Flash Drive
- PSU: Be Quiet! Dark Power Pro 11 850W
- Operating System: Windows 8.1 64-bit
- Networking: ASUS RT-AC68U router
Software
- SiSoft Sandra Engineer – available here
- WPrime – available here
- Cinebench – available here
- 3DMark – available here
- AIDA 64 Engineer – available here
- Latencymon – available here
- Rightmark Audio Analyser – available here
- Passmark – available here
Memory
For our memory tests, we use the built-in memory benchmarks in AIDA64 Engineer and SiSoft Sandra. For more details on each of the benchmarks please see here and here respectively.
Storage
To test the storage performance in our motherboard reviews we use AIDA’s Disk Benchmark utility built into their AIDA64 Engineer Edition software package and run linear read and write tests. We run each of the benchmark tests on a SATA III, USB 3.0 and M.2 device. For SATA III testing we use a SanDisk Extreme Pro 240GB, for USB 3.0 testing we use the Supersonic Magnum 256 GB USB 3.0 flash drive and for M.2 testing we use Plextor’s 256GB M.2 M6e SSD. The drives are always formatted before use.
Networking
For our networking tests we connect the test system up to our Intel Gigabit-enabled ASUS Rampage IV Extreme X79 motherboard test system through the ASUS RT-AC68U router and run our tests. We opted for this over a direct point-to-point connection because we wanted to simulate real-world performance. For our WiFi tests we do the same except we connect the test system to the ASUS RT-AC68U router via WiFi at a distance of 2 metres from the router. The testing is conducted using PassMark’s Advanced Network Test detailed below.
PassMark
The PassMark Advanced Network Test (which is part of PerformanceTest) is designed to test the data transfer rate between two computers both of which must be running PerformanceTest. One of the computers must act as the server and will sit waiting for a connection. The other computer acts as a client. It connects to the server machine and sends data to it for the duration of the test. You can download a trial version of PerformanceTest from here.
Power Usage
To measure power consumption we, use a “killawatt” meter and measure the total system power draw at the wall. We run three different use-case scenarios for 5 minutes and take the average reading.
RightMark Audio Analyser (RMAA)
RMAA suite is designed for testing quality of analog and digital paths of any audio device. The results are obtained by playing and recording test signals passed through the tested audio path by means of frequency analysis algorithms. A more common mark is also provided for those unfamiliar with measured technical parameters. Available here. We run the RMAA test using a 3.5mm to 3.5mm cable connecting the line out to the line in to test the quality of the motherboard audio codec, not any external audio devices. We run the complete playback and recording test at default settings and then get RMAA to interpret the results giving the below outputs. We sync the playback and recording audio devices to the same setting as the test for accurate results.
DPC
DPC is a Windows tool that analyses the capabilities of a computer system to handle real-time data streams properly. It may help to find the cause for interruptions in real-time audio and video streams, also known as drop-outs. This software is available for download free here.
wPrime
wPrime is a leading multithreaded benchmark for x86 processors that tests your processor performance by calculating square roots with a recursive call of Newton’s method for estimating functions. wPrime is a free utility that is available for download here.
Cinebench R15
Cinebench is a widely respected benchmark for testing the performance of x86 CPUs. The program allows you to test single and multi-threaded performance as well as GPU performance by rendering with Open GL. Download here.
3D Mark
The new 3DMark includes everything you need to benchmark your hardware. With three all new tests you can bench everything from smartphones and tablets to notebooks and home PCs, to the latest high-end, multi-GPU gaming desktops. Download here.
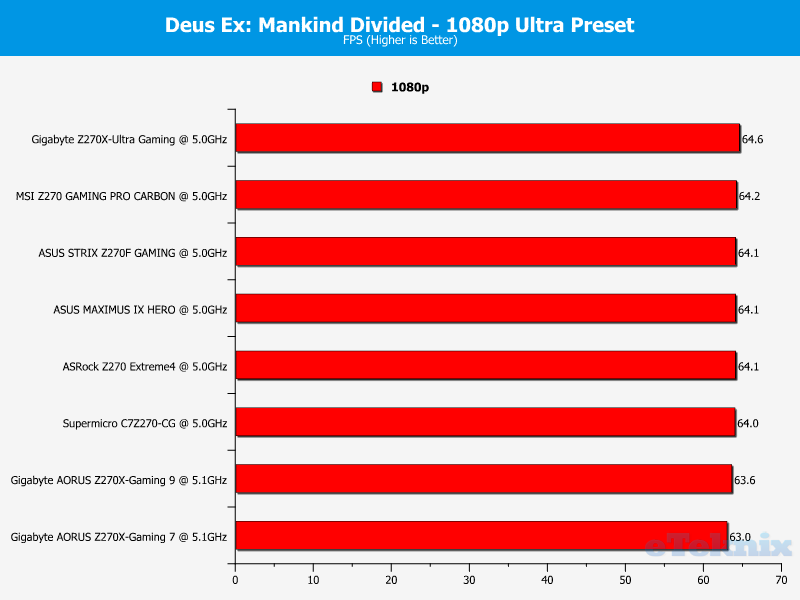
Deus Ex: Mankind Divided
Deus Ex: Mankind Divided is an action role-playing stealth video game developed by Eidos Montreal and published by Square Enix. Set in a cyberpunk-themed dystopian world in 2029, two years after the events of Human Revolution, Mankind Divided features the return of Adam Jensen from the previous game, Deus Ex: Human Revolution, with new technology and body augmentations.
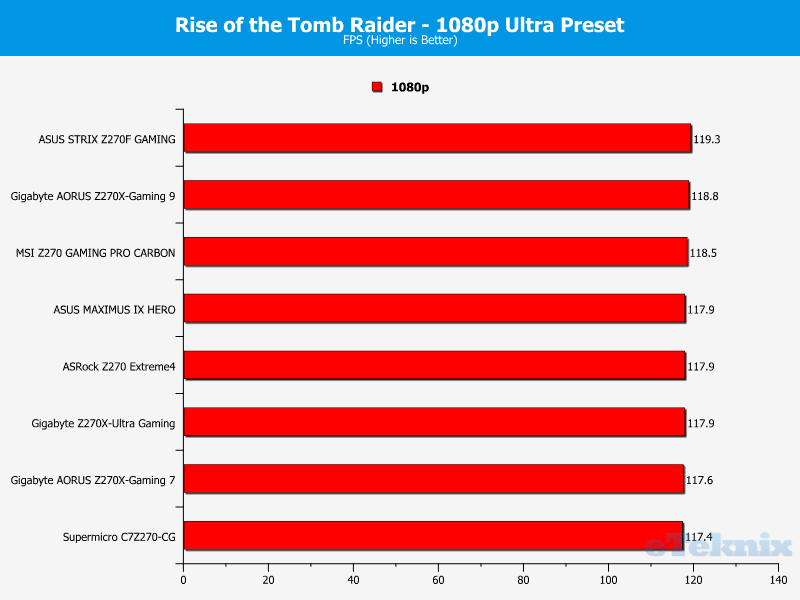
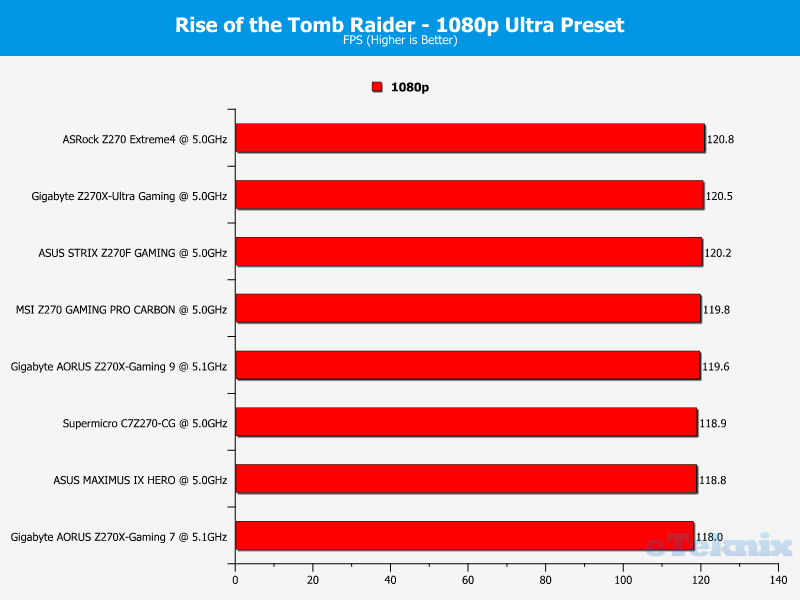
Rise of the Tomb Raider
Rise of the Tomb Raider is a third-person action-adventure game that features similar gameplay found in 2013’s Tomb Raider. Players control Lara Croft through various environments, battling enemies, and completing puzzle-platforming sections while using improvised weapons and gadgets in order to progress through the story. The game is run on the Very High preset with FXAA enabled. Please note, the DirectX 12 API has been selected and an average from 3 benchmark runs is taken for the final result.
BIOS and Overclocking
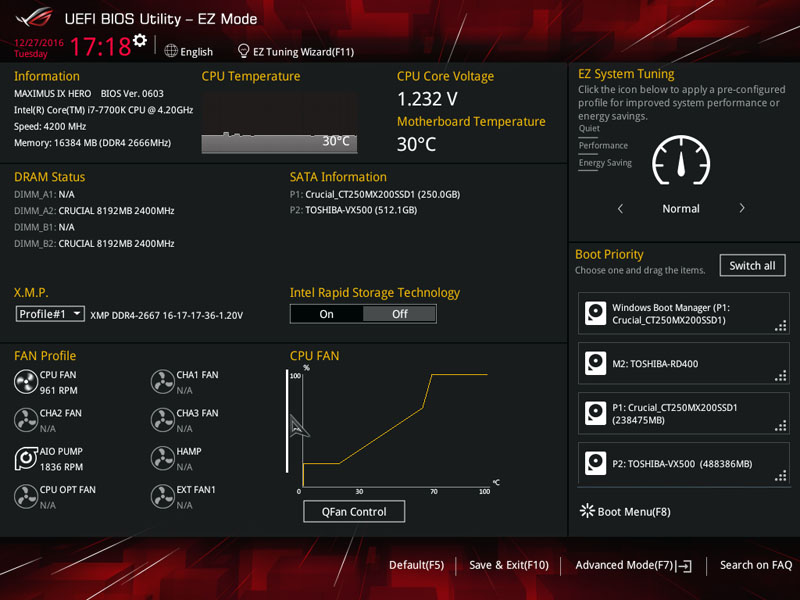
ASUS’ UEFI BIOS is brimming with options to tweak every aspect of your system and presented using a slick user-interface. The BIOS is divided into two modes; the EZ BIOS for beginners, and an advanced section which caters to users with a high level of technical expertise. The EZ mode’s main page lists essential system parameters, allows you to adjust the cooling RPM values and set an XMP profile. It’s also really simple to modify the boot order and select from a number of pre-configured performance settings. Here we can see the classic ROG theme which employs a clear white font and makes everything extremely easy to read from a distance.
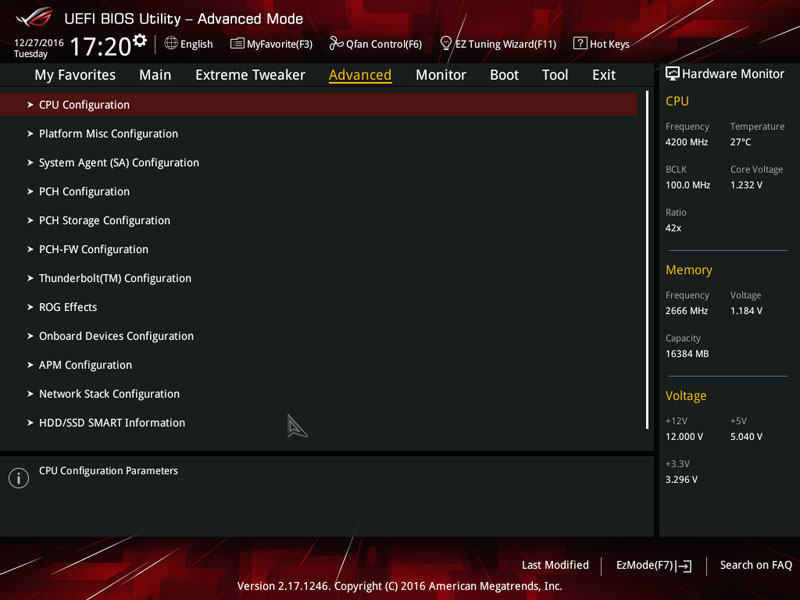
The advanced mode contains a huge selection of variables which provides everything you need to customise the system to your specific requirements. On the main page, you can view essential system information such as motherboard model, BIOS version, CPU ID and much more.
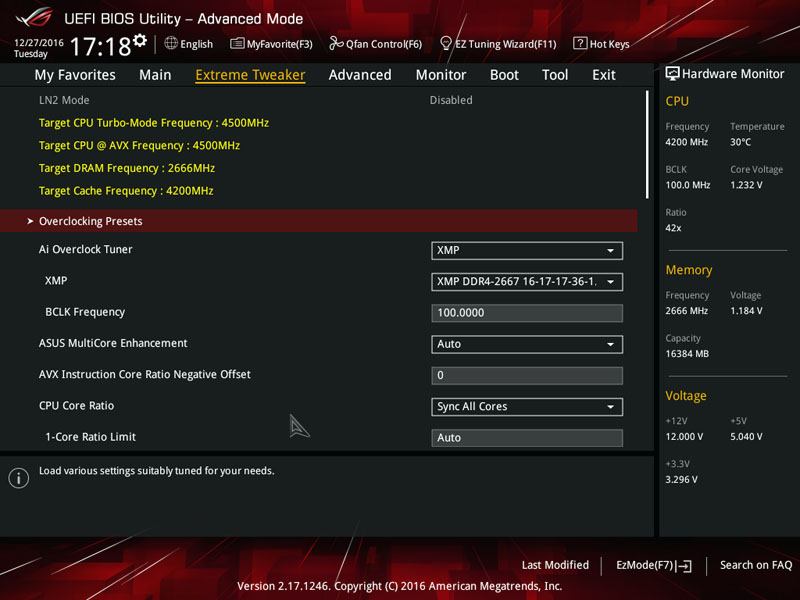
ASUS’ Extreme Tweaker is the section you need to navigate to when setting the XMP profile, adjusting the BCLK frequency and making other overclocking alterations. The hardware monitor and target frequency details are extremely useful to gauge the effect of each change in the BIOS.
The CPU Core/Cache Voltage is easily modified in either a fixed, manual or offset mode. Additionally, you can change the DRAM Voltage, VCCIO, SA and much more.
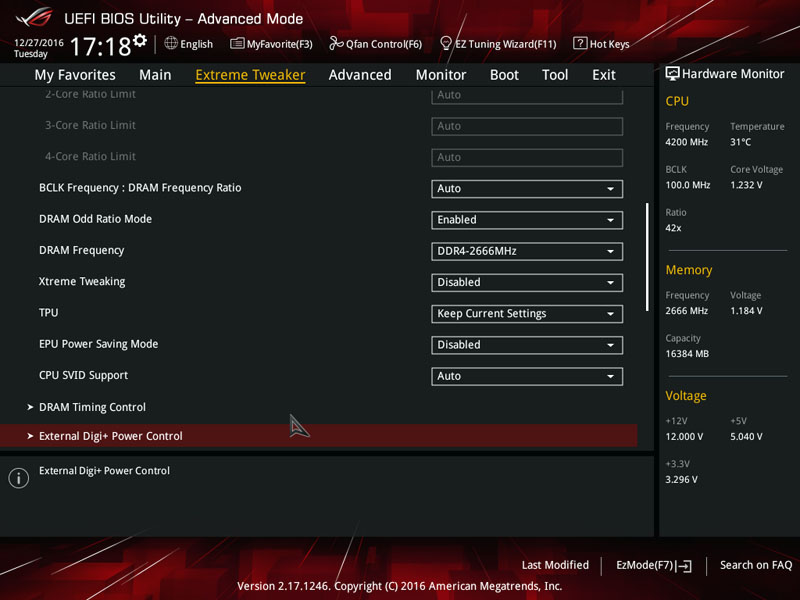
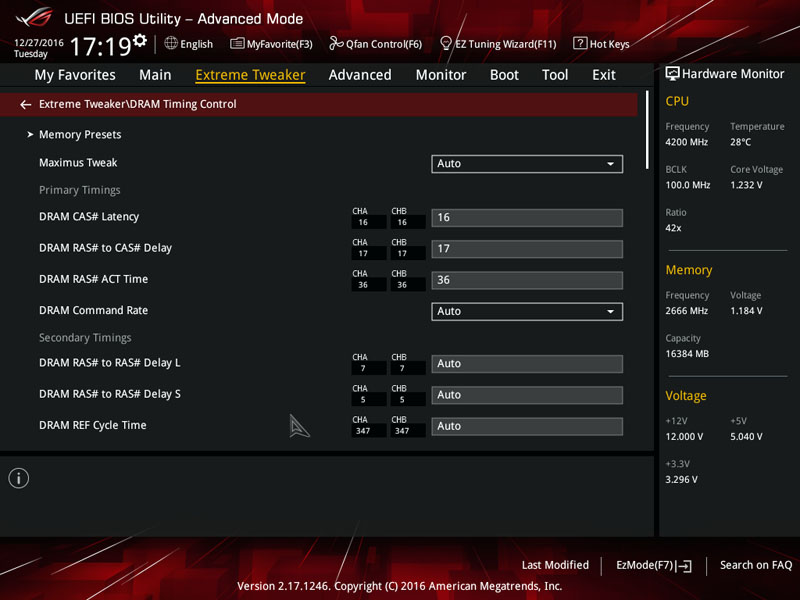
Next up is the DRAM Timing Control page which allows you to tighten or slacken the memory timings to reduce latency or make an overclock more stable.
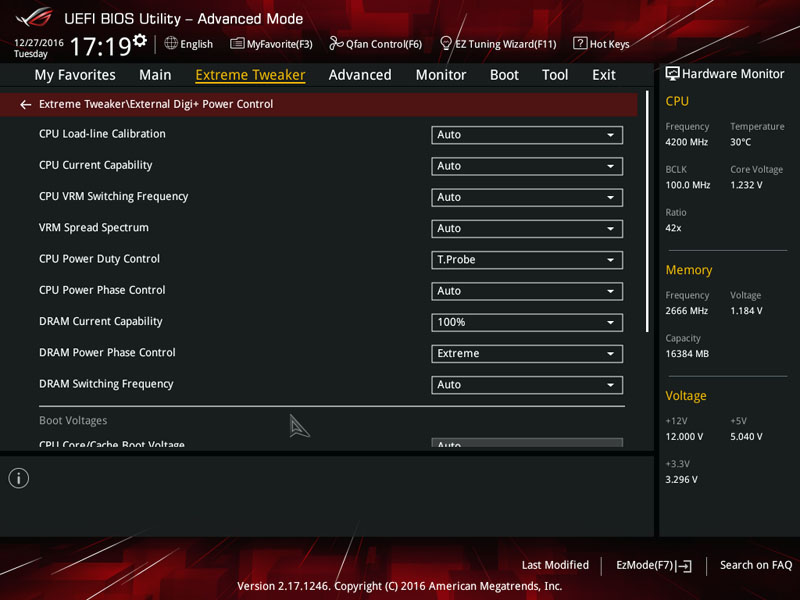
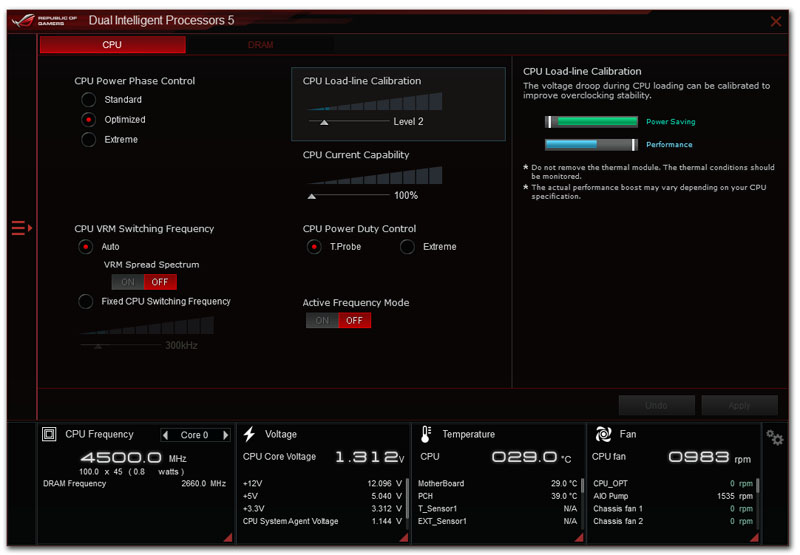
In the Extreme Digi+ Power Control, you can adjust the Load-Line Calibration settings, VRM Spread Spectrum and CPU Power Phase Control.
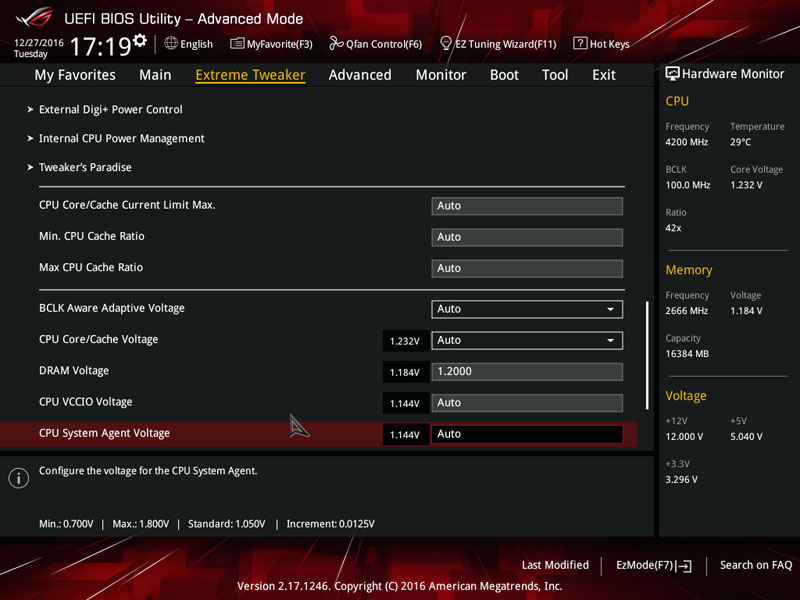
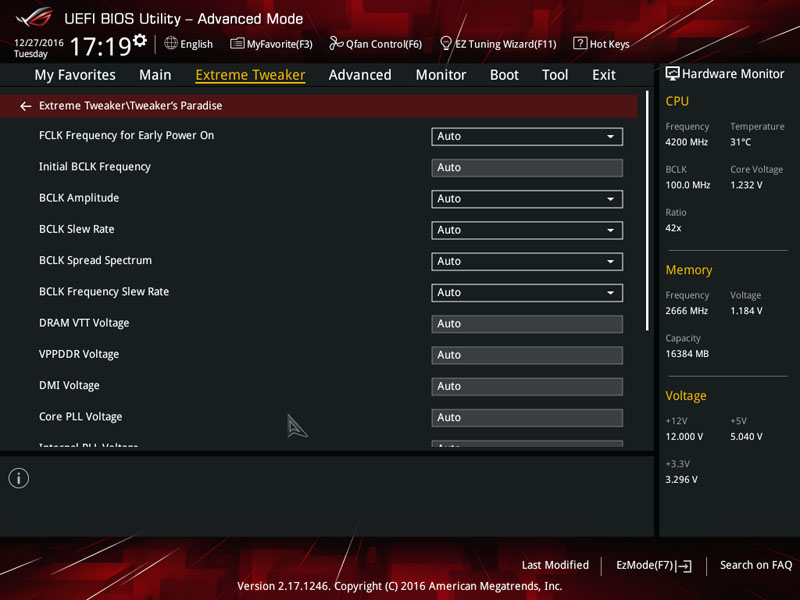
The Tweaker’s Paradise is designed for professional overclockers and enthusiasts who enjoy altering every aspect of their system such as the VPPDDR Voltage, BCLK Speed Spectrum and even the BCLK Amplitude. Of course, the majority of users should retain the Auto values to prevent posting problems.
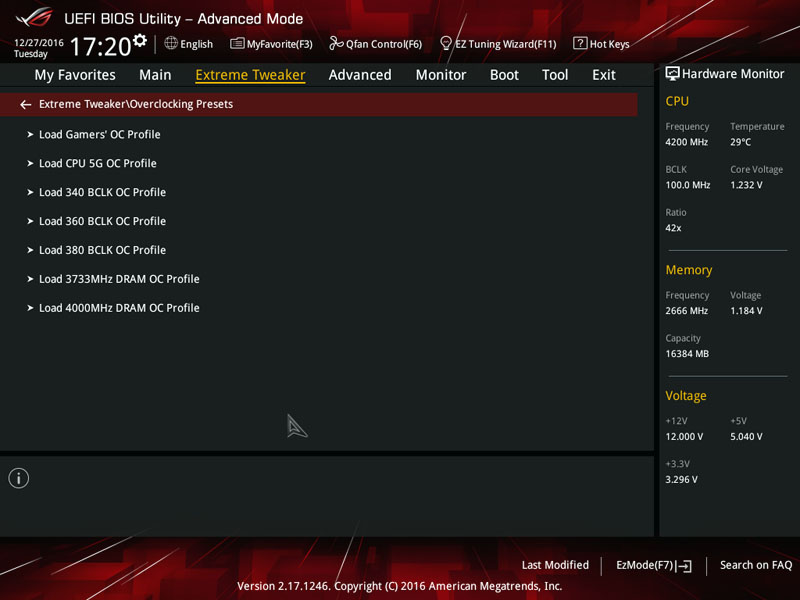
Unlike the ASUS STRIX Z270F GAMING, the BIOS contains pre-configured profiles for various overclocking scenarios.
The Advanced tab grants access to a marvellous range of sub-menus and offers exceptional customisation.
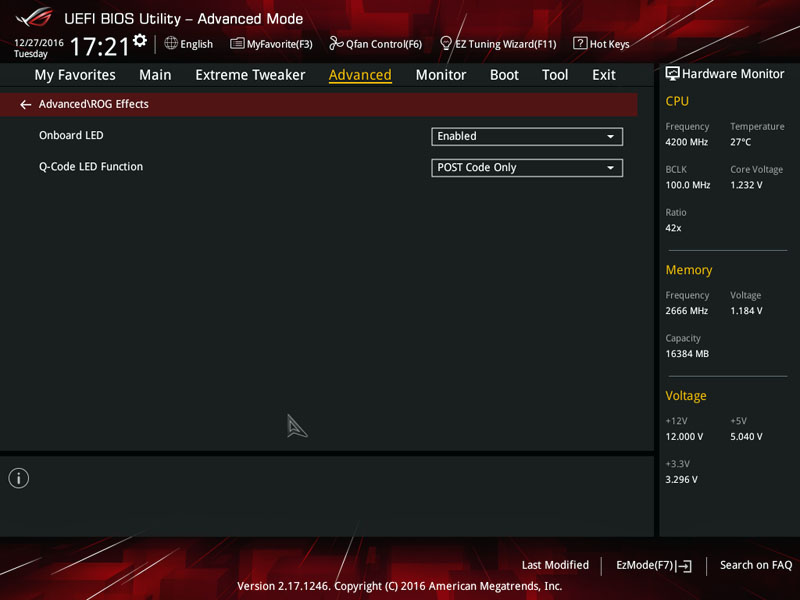
Changing the onboard LEDs is a really simple and can be done in the ROG Effect sub-menu.
Another superb addition is the Monitor tab which outlines key system readings such as the CPU temperature and CPU fan speed.
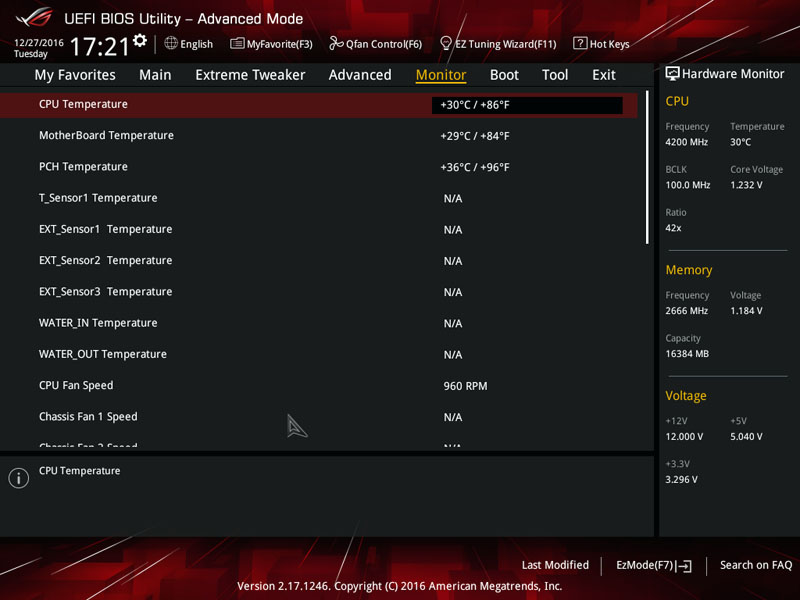
Not only that, the menu displays the CPU Voltage, 3.3V Voltage, 5V Voltage and 12V Voltage figures.
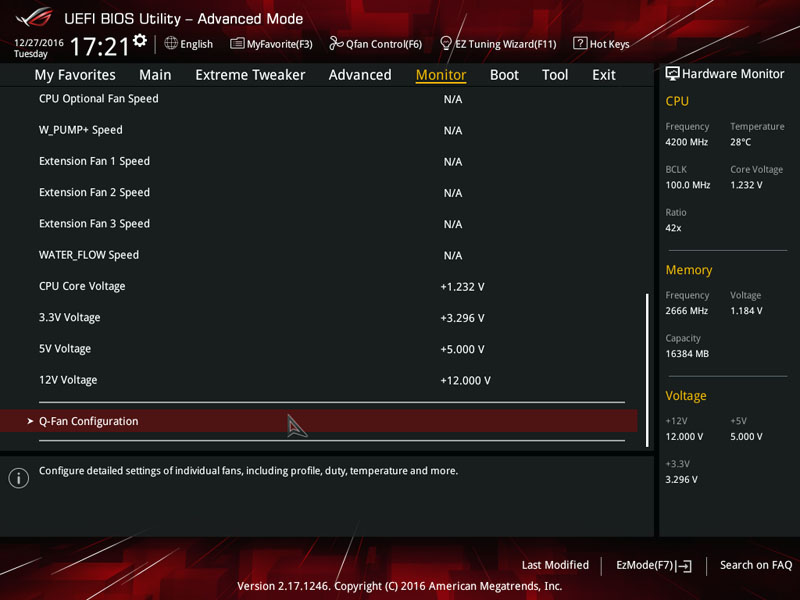
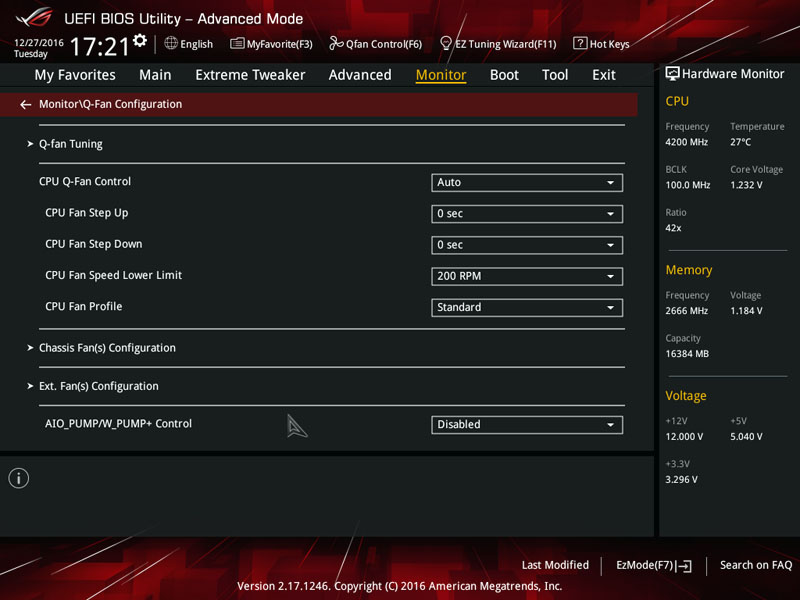
Further down the Monitor page, there’s a number of options to adjust the fan configuration and initiate the Q-fan calibration.
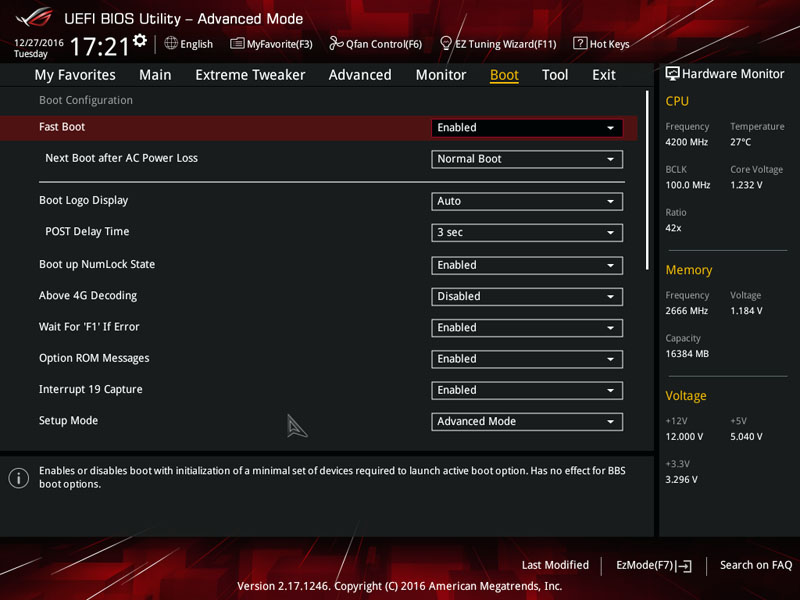
In the Boot area, you can enable/disable fast boot and a make whole host of other modifications.
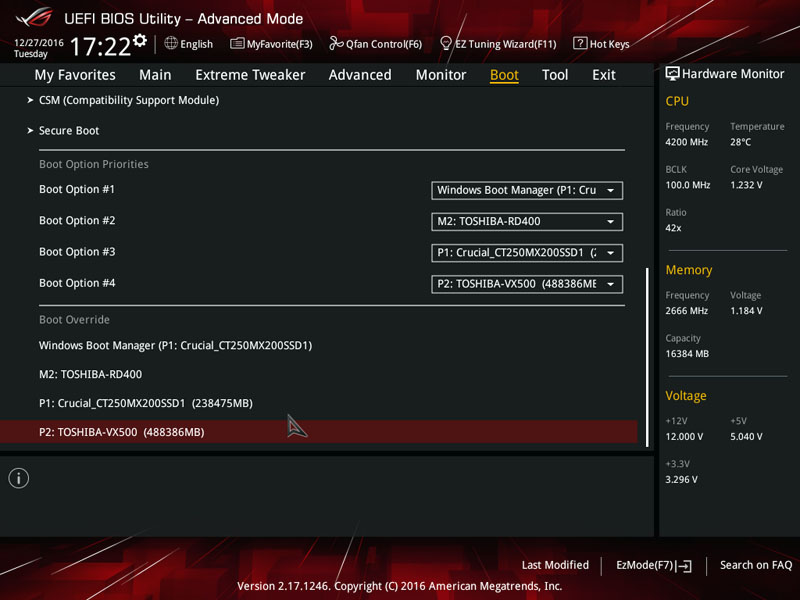
Tweaking the default boot priority is a simple task and it’s remarkably easy to override the default boot order. As a result, you can quickly boot into a secondary drive which might have a different operating system installed.
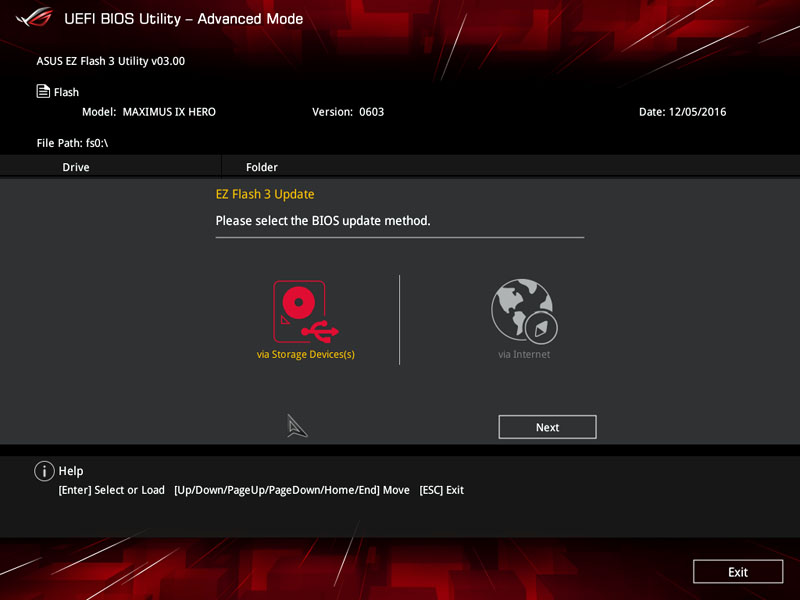
On the tool page, you can access the BIOS update utility, securely erase sensitive data and even investigate the current PCI-E configuration.
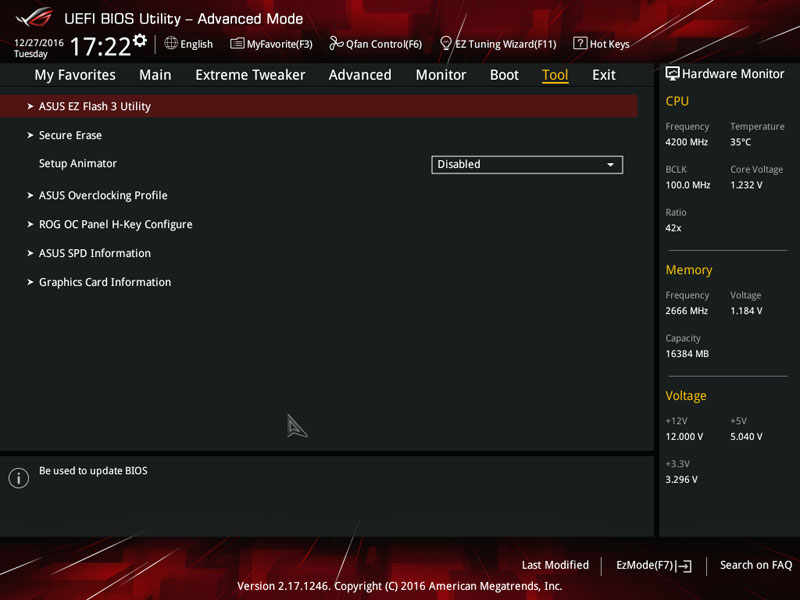
ASUS’ EZ Flash 3 Utility makes updating the BIOS an absolute breeze either via a downloaded file or direct network connection.
The GPU Post screen provides a wonderful visual indication of the current PCI-E setup and informs the user of each card’s operating speed.

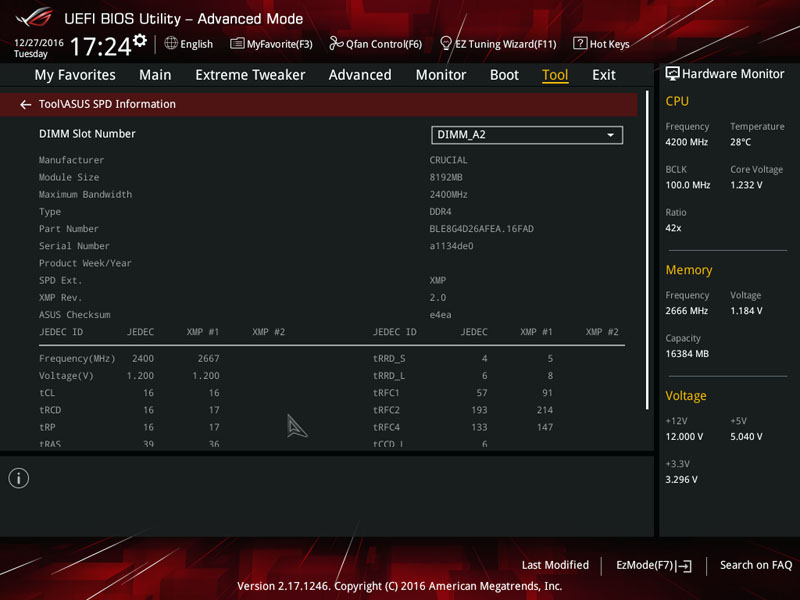
The ASUS SPD Information utility lists technical information on the memory modules which comes in handy if you’re fault checking.
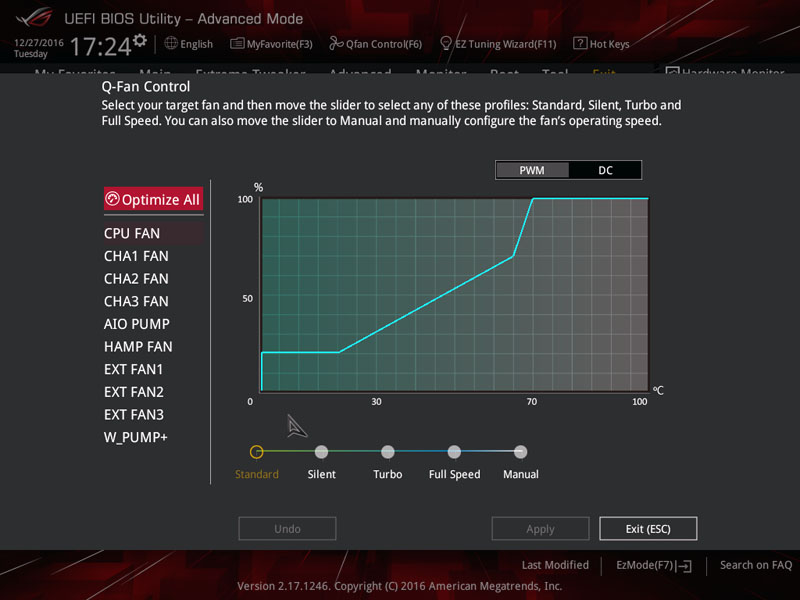
ASUS’ Q-Fan control is incredibly useful to set an RPM fan curve, choose from various presets or allow the BIOS to detect your cooling hardware and optimise the fan speeds.
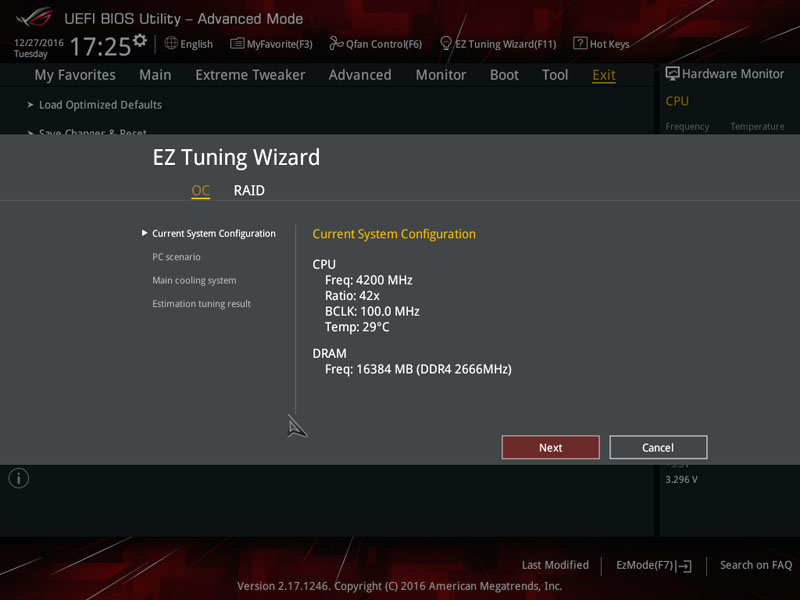
The EZ Tuning Wizard asks you some rudimentary questions about your cooling hardware to accurately gauge the optimal settings for an automated overclock. This is very useful for users who want to leverage extra performance but feel intimated by the overclocking procedure.
On the final page, you can load optimised defaults, save any changes in the current session and disregard any tweaks which have been made.

Overclocking
The CPU sample I’ve been given for the later testing is a poor overclocker and it’s really frustrating. As a result, 5.0GHz required an absurdly high amount of voltage to remain stable and the temperatures were perilously close to the 95C degree mark. I’ve only posted this figure for benchmarking purposes and you wouldn’t run such an extreme voltage for 24/7 operation. To be clear, the motherboard isn’t at fault and has so many settings to tweak the CPU. However, the particular chip I have has a limited headroom and performs significantly worse than the previous two i7-7700K used for review purposes.
Software Overview
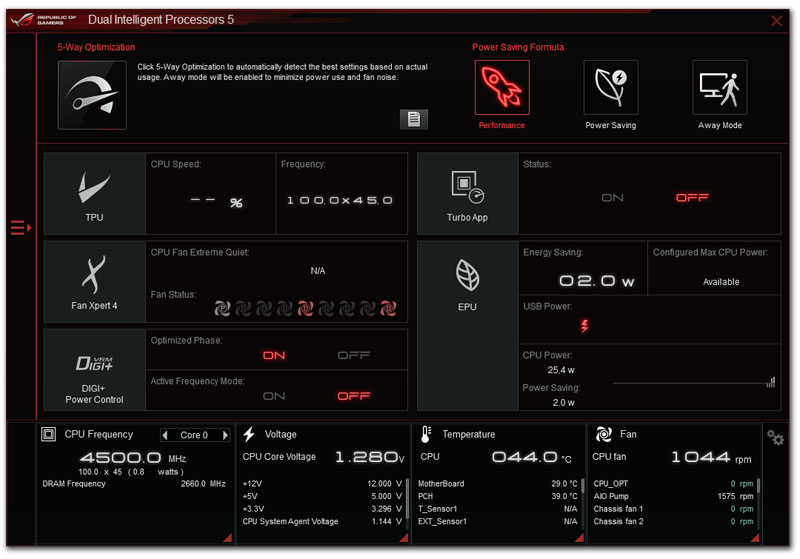
ASUS’ AI Suite 3 software package houses an impressive range of utilities within a single, compact window. The Dual Intelligent Processors 5 combines TPU, EPU, DIGI+ VRM, Fan Xpert 4 and Turbo App functionality to optimise your system’s hardware. The 5-Way Optimisation automatically configures your PC based on real-time usage and allows you to prioritise pure performance and enjoy a faster CPU frequency within a single click or employ a lower power draw. Not only that, the software can create tailored settings for different applications. The Extreme Tuning engine allows you to manually set the target CPU voltage, frequency and temperature. Interestingly, the calibration process utilises a memory stress test and AVX instruction to check for stability.
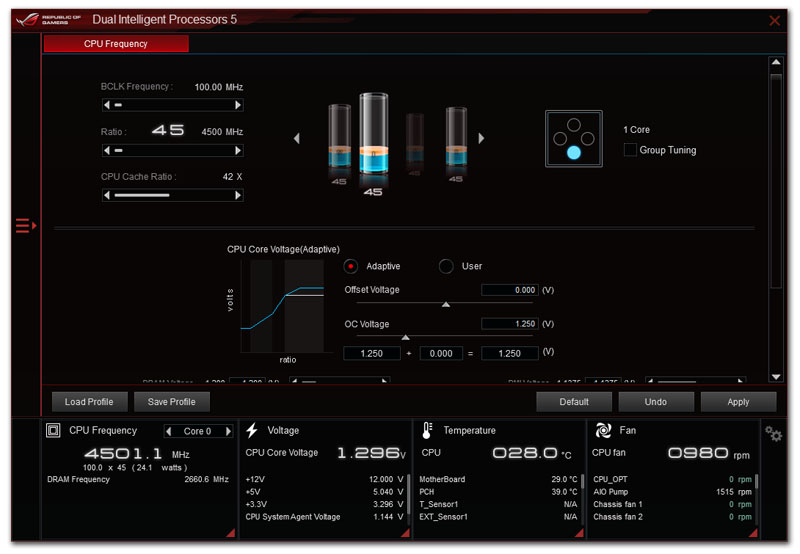
Directly in the software, you can adjust the BCLK frequency, CPU Core Ratio, Cache Ratio and voltage. Notice how the end-user is able to rely on adaptive voltage or create their own fixed rate. The menu’s clear diagrams make the overclocking procedure an enjoyable experience and less daunting to newcomers. Also, the various readings help to gauge system stability to detect if something is amiss.
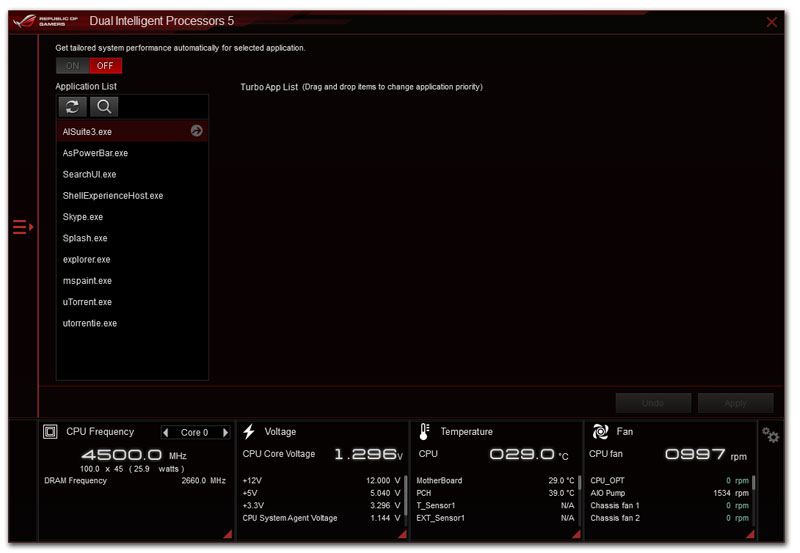
The Turbo App list is another useful tool to set specific CPU overclocking rules and fan speeds for different applications. Essentially, you can use a higher frequency for demanding programs and dial the fans back down when it seems suitable.
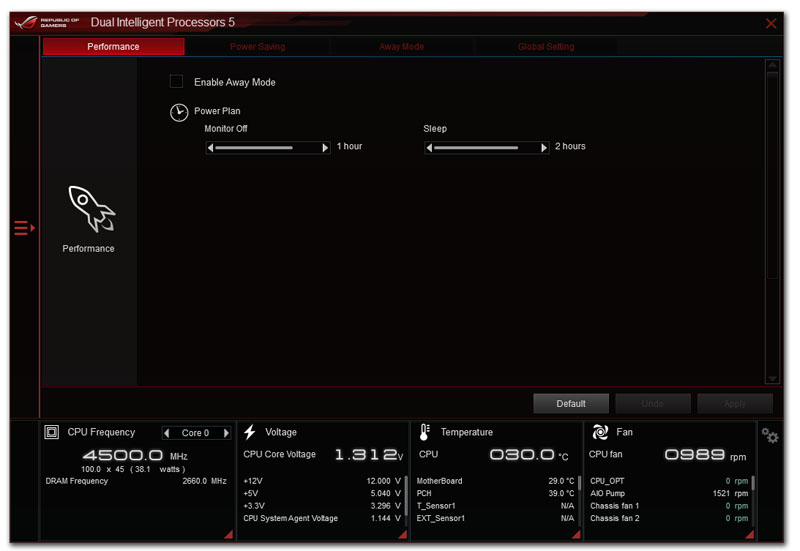
The software’s power control is a handy extra to customise the time period when the monitor or system switches off due to inactivity.
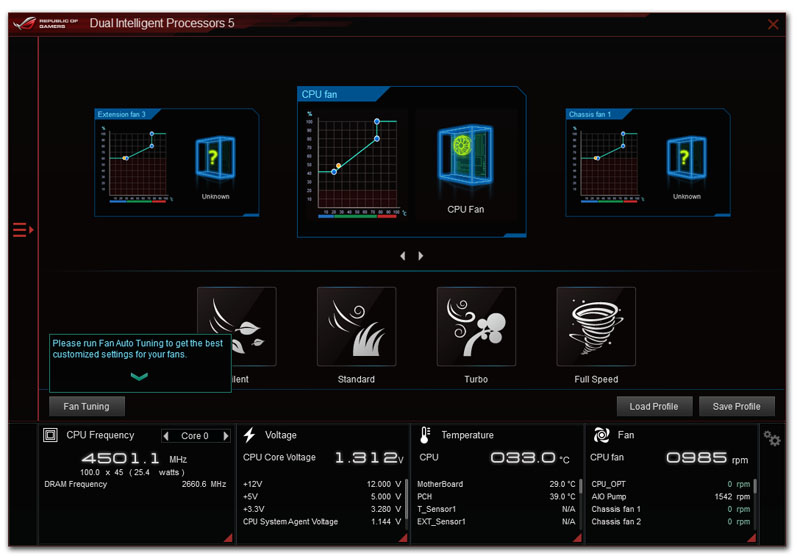
As you might expect, the software contains a fan tuning utility which can automatically create a fan curve based on your cooling hardware and thermal values. Not only that, it’s possible to select from four default profiles which match your personal preference.
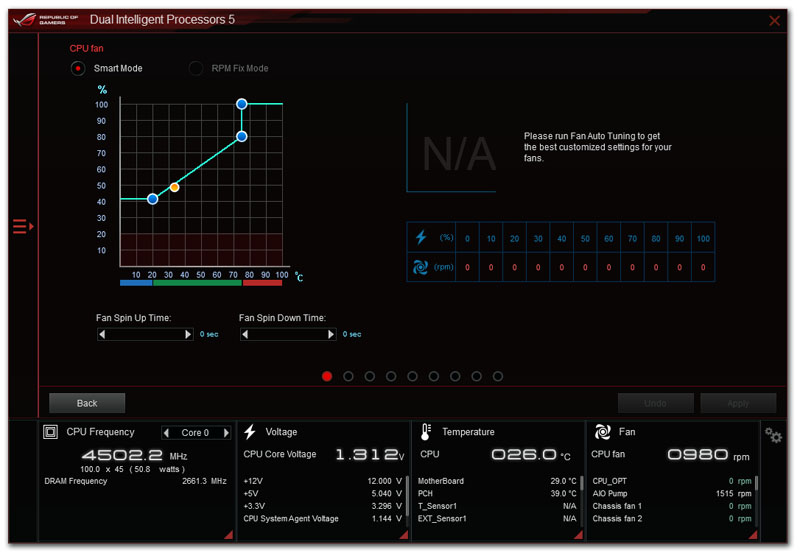
Here we can see the manual mode which revolves around a percentage curve and temperature threshold from 0-100C.
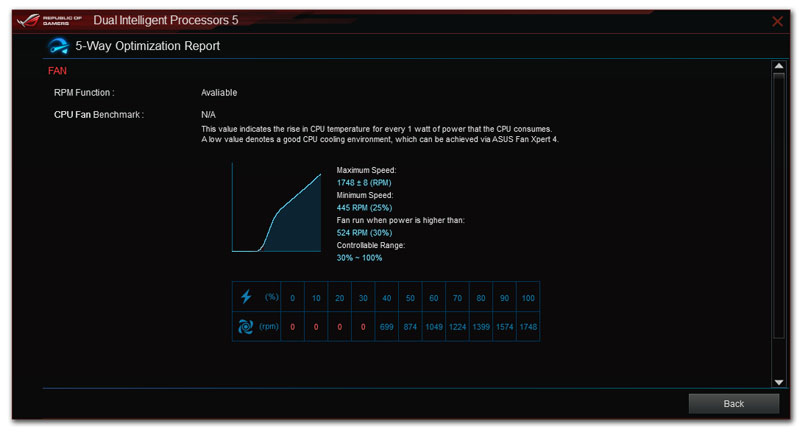
Once calibrated, the software has a report detailing its findings and illustrates the fan curve on a graph.
Interestingly, it’s possible to modify the CPU Power Phase Control, VRM Switching Frequency, Load-Line Calibration and more in a quick manner.
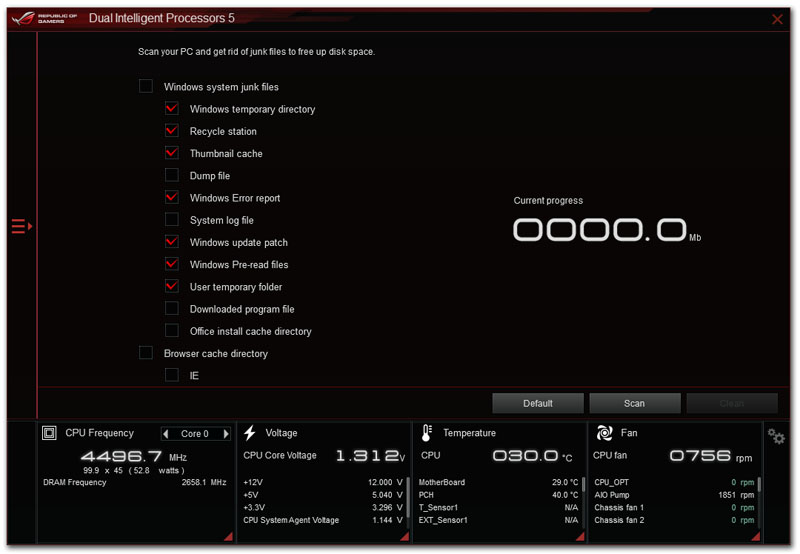
The software has a dedicated application to clean up a Windows install and remove any junk files such as temporary directories, pre-read files and system logs. Unfortunately, it doesn’t seem to analyse the registry and delete duplicate entries.
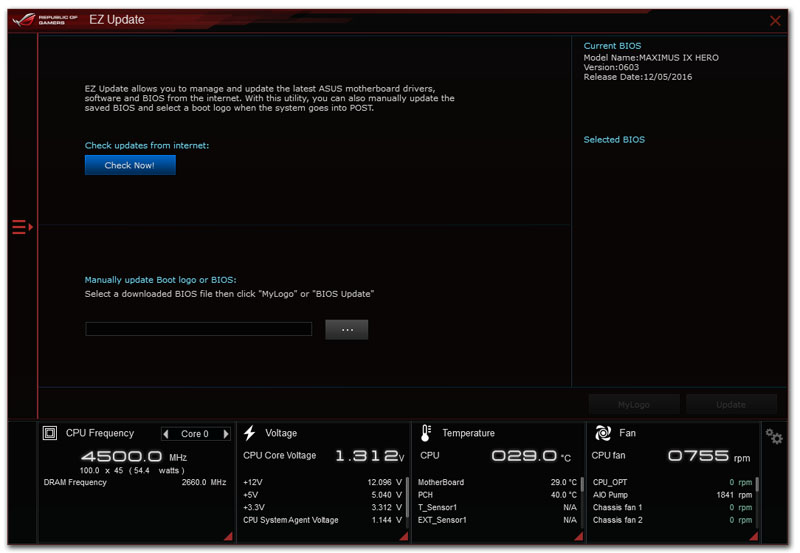
Updating ASUS’ software suite and the motherboard’s BIOS is really simple and much more convenient than manually searching for each individual update.
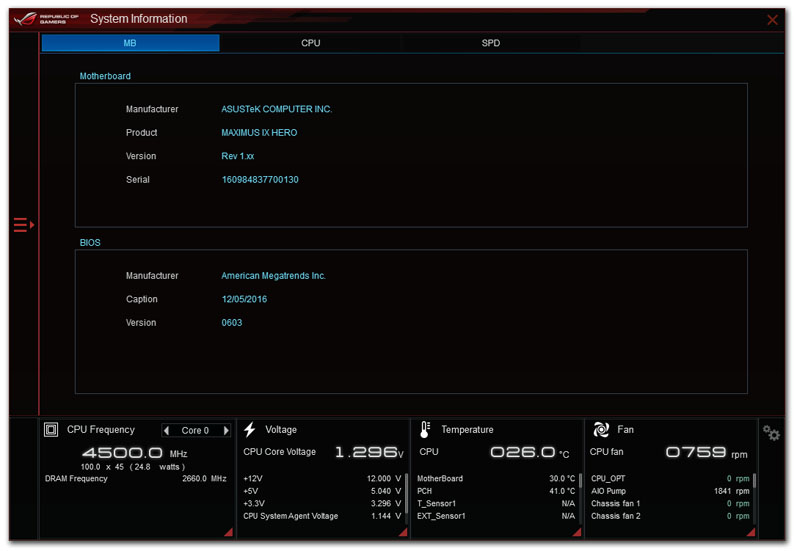
The System Information tab lists the motherboard model, BIOS version and even the serial number.
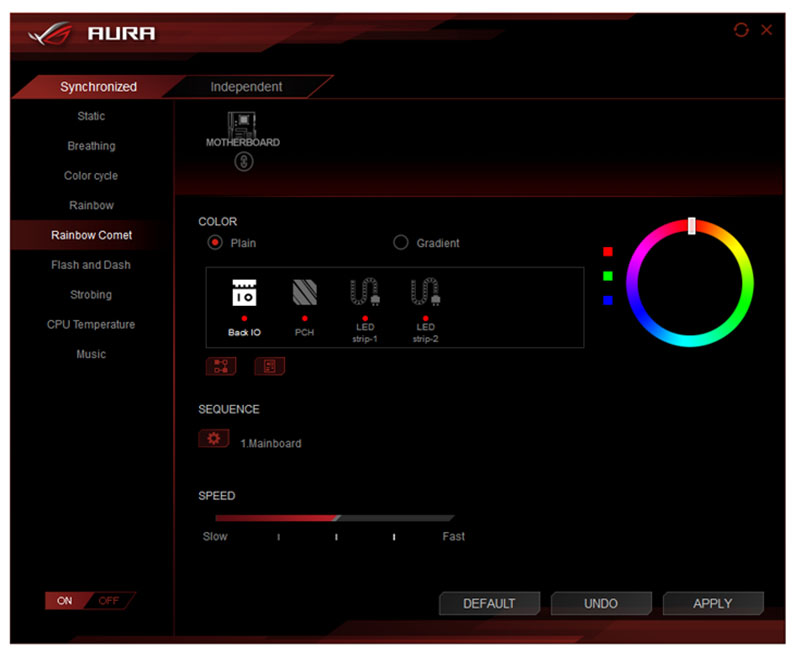
Next up is the Aura lighting application containing an impressive range of transitional effects and colour options. Not only that, it’s possible to change the sequence, speed and choose from a staggering 16.7 million colours. The software isn’t just limited to the motherboard and allows you to modify the visual style of other ASUS devices like the ROG Claymore and Spatha.
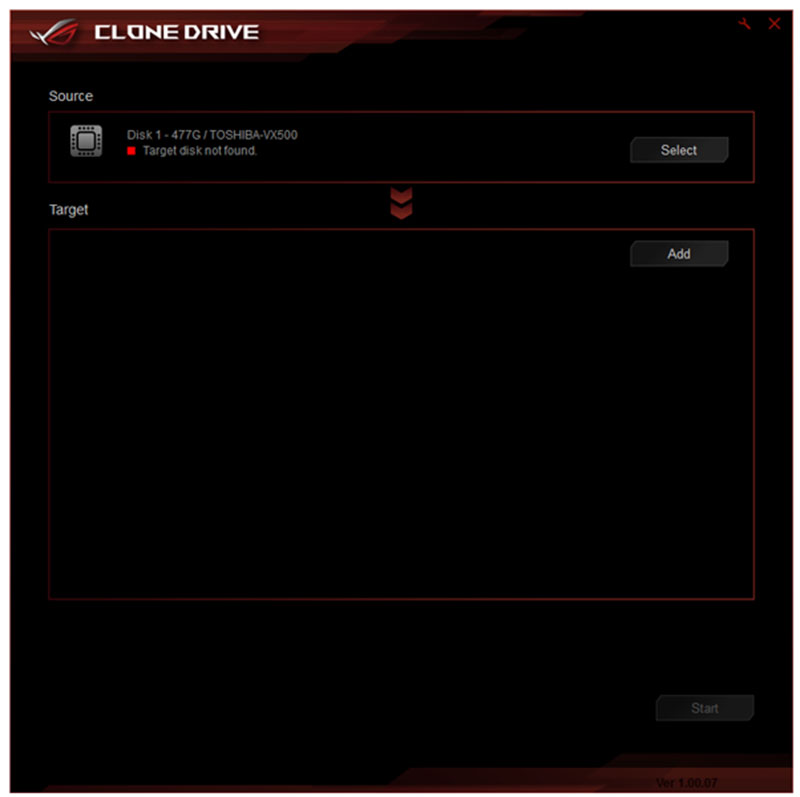
The Clone Drive utility creates an identical copy of a hard drive and backs up all your sensitive data. Unbelievably, the process only requires up to 5 percent CPU utilisation and can be run in the background without impacting on performance. The Clone Drive has the ability to copy two drives simultaneously which become functional once the process is complete.
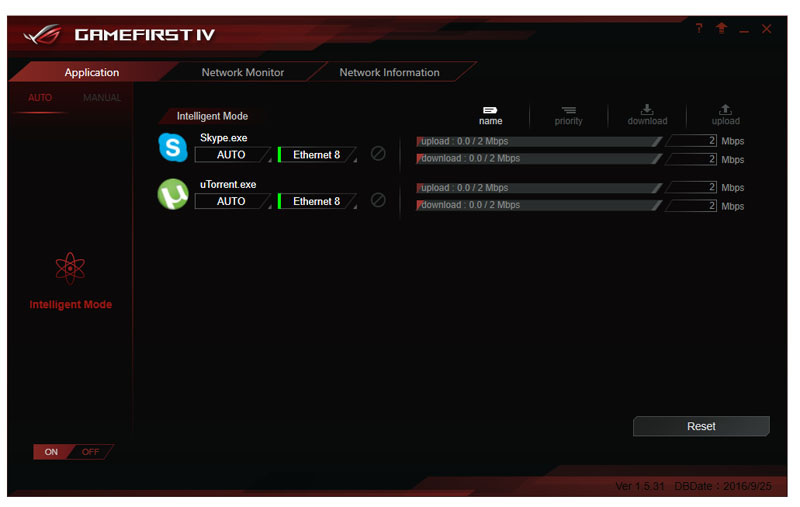
The GameFirst IV application prioritises network traffic to reduce lag during competitive games. ASUS’ latest version has Multi-Gate Teaming which combines multiple gateway networks to provide the maximum bandwidth. On another note, the Intelligent Mode analyses the most frequently used software and optimises the bandwidth accordingly. Furthermore, the utility identifies apps and can set P2P software to a lower affinity while a game is being played.
Here we can see the RAMCache II tool which can be used to allocate a cache of RAM between the hard disk and applications. The end result is an extremely fast drive which even eclipses the most expensive NVMe storage devices available today. Unlike some RAMDisk solutions, ASUS’ creation isn’t limited to a specific program, providing it’s the dedicated storage device.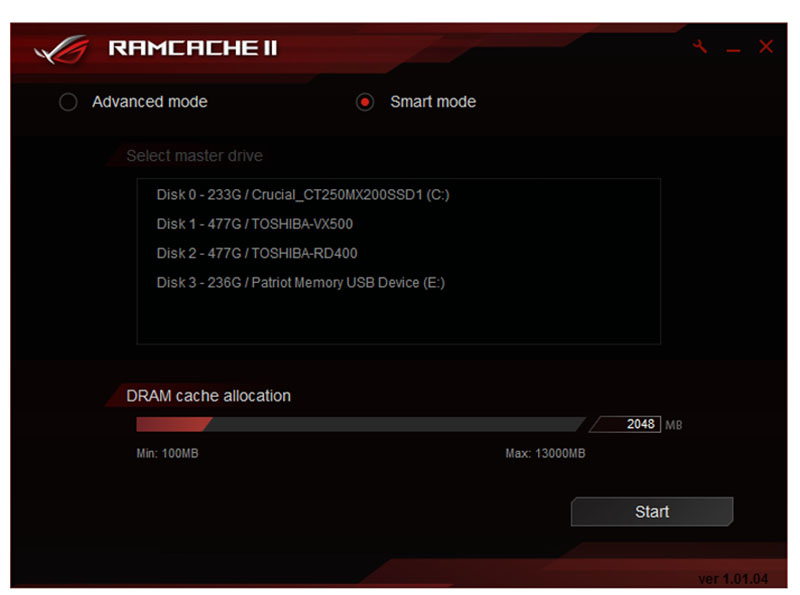
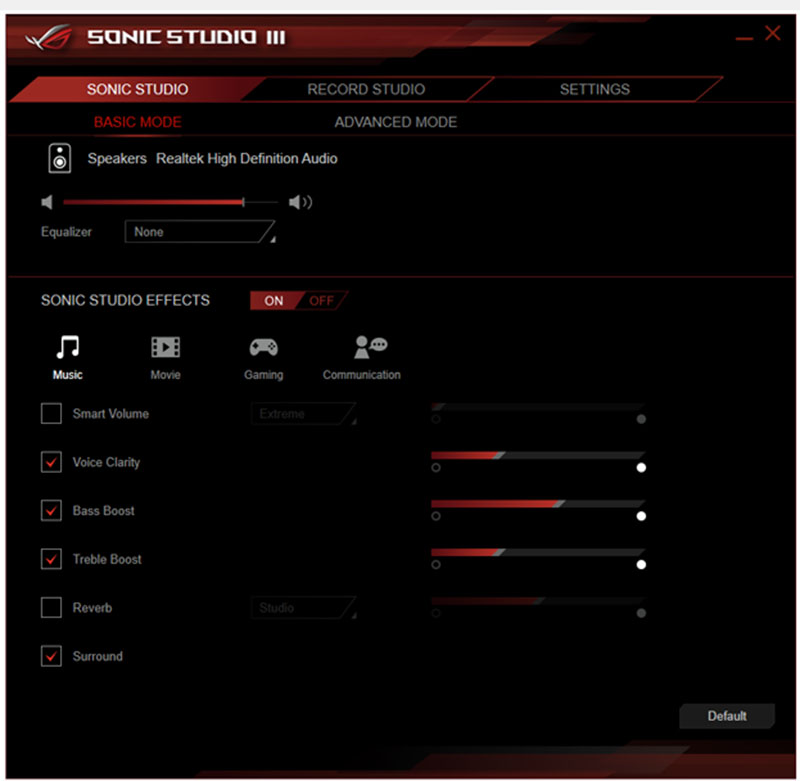
The Sonic Studio III allows you to add various effects such as Reverb and change the audio characteristics based on four pre-configured profiles. Also, you can map audio streams to different outputs. For example, it’s possible to direct a web browser’s audio through a connected TV and use the headphone port for gaming scenarios.
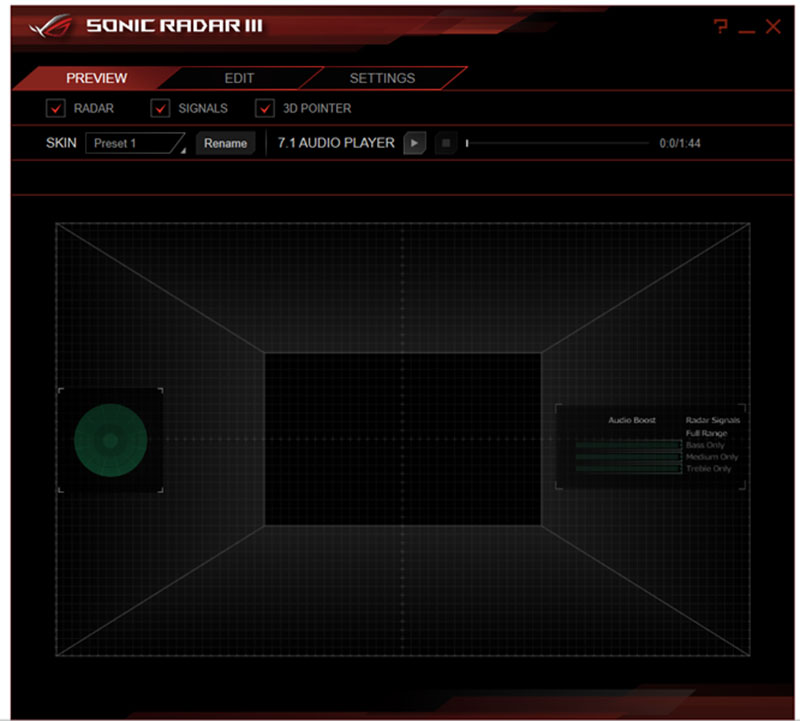
Sonic Radar III has been completely overhauled and displays the direction of incoming sounds. The audio movement is charted on a radar overlay to give you an advantage over the competition. Interestingly, the latest version has a simplified radar design which isn’t as distracting. In total, the radar contains 24 segments which allow for extremely high accuracy when determining the movement of sound. The 3D arrow adds direct feedback while being unobtrusive. Also, the audio boost allows users to listen to active Sonic Radar Filters which target specific sound sources.
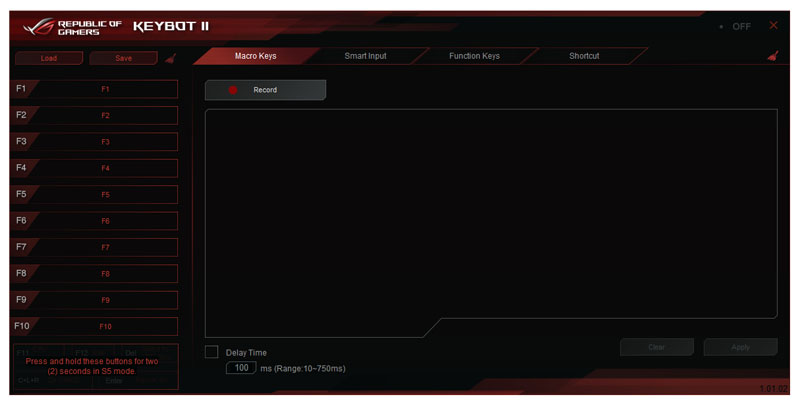
ASUS’ Keybot II allows you to assign macros to individual keys and perform essential commands. This could save you a lot of time and increase productivity.
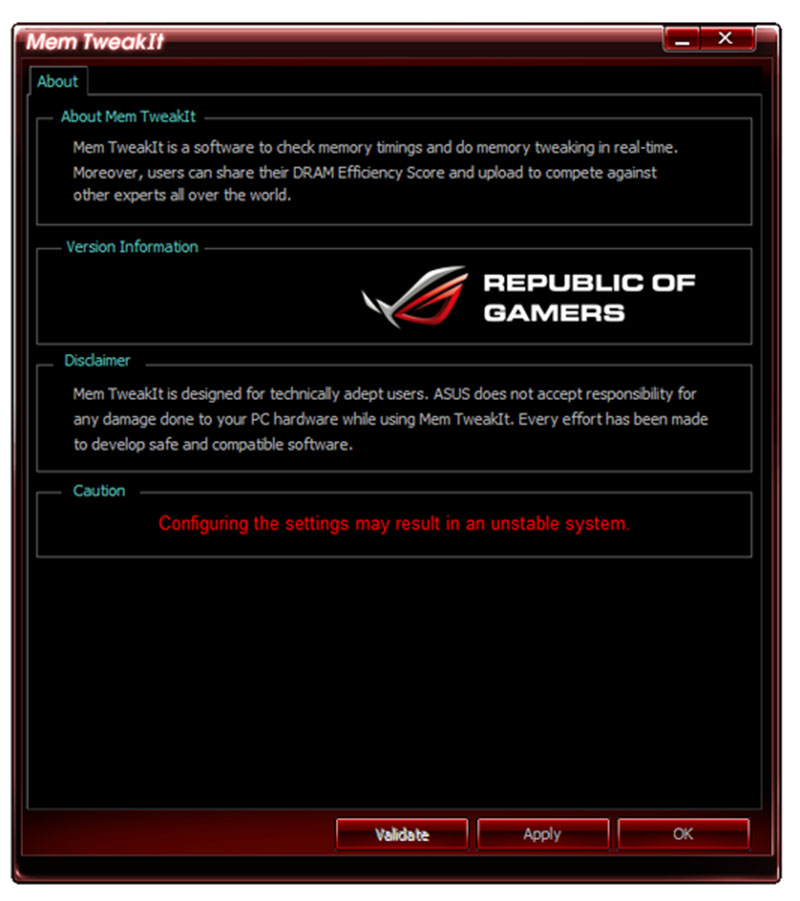
The Mem TweakIt utility constantly analyses the memory timings in real-time and makes adjustments to enhance system performance.
CPU & GPU Performance
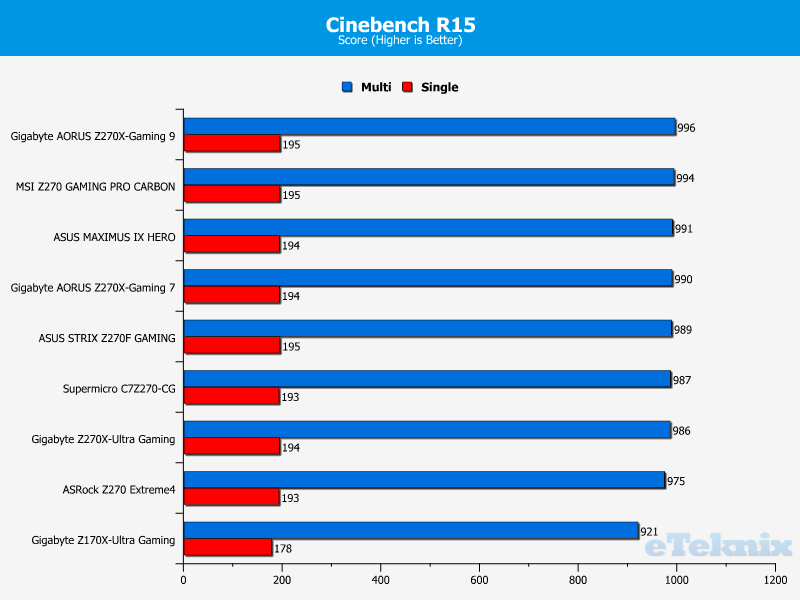
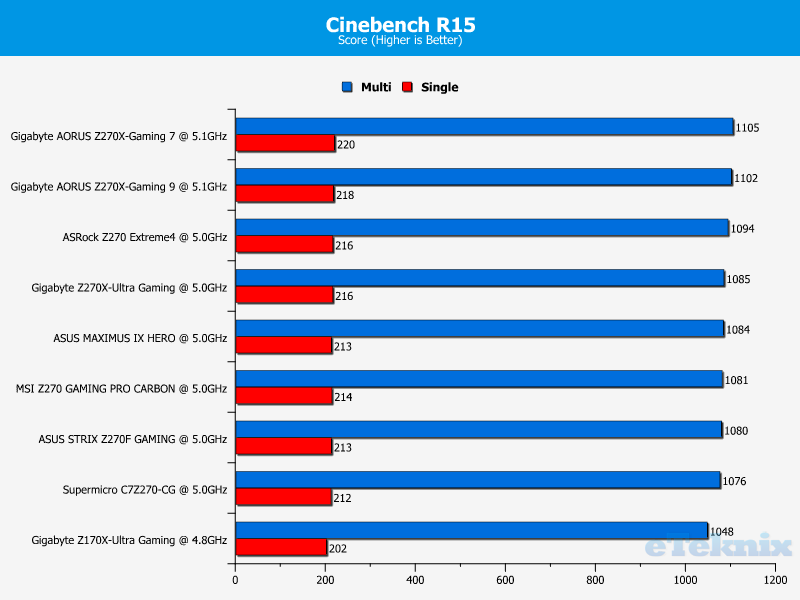
Cinebench
In Cinebench R15, the motherboard obtains an excellent set of scores and slots into a very respectable third position. Once overclocked, the performance remained pretty good and the motherboard wasn’t overblown by competing solutions.
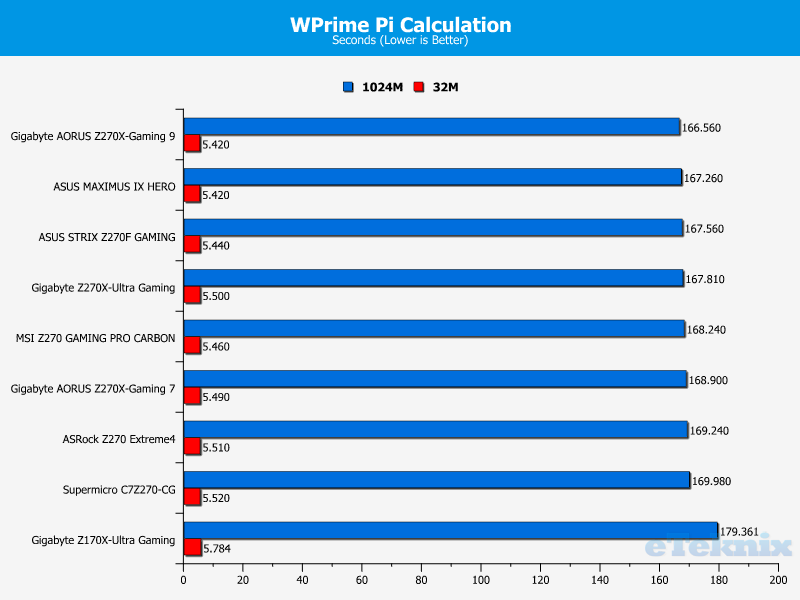
WPrime
The motherboard completes the WPrime Pi calculation tasks in a superb time and almost comes out on top. Once overclocked, the ASUS MAXIMUS XI HERO reports the fastest time of all the 5.0GHz results.

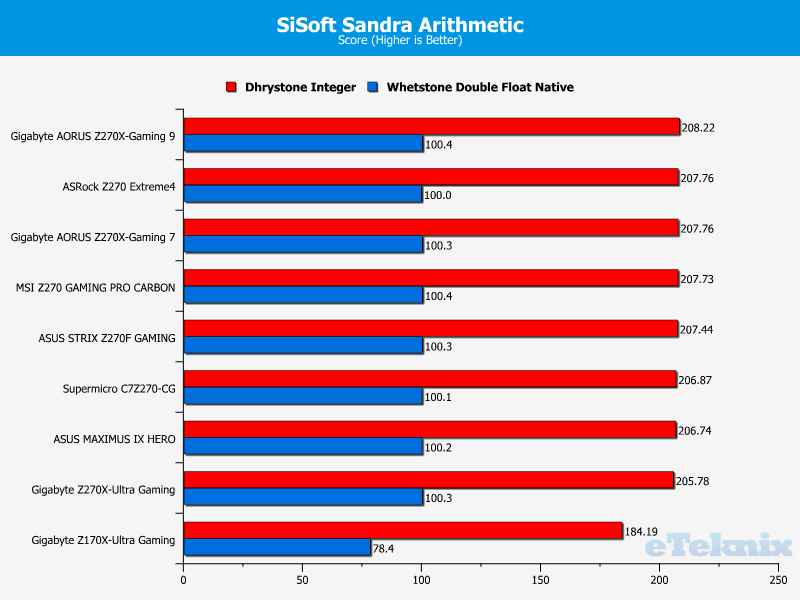
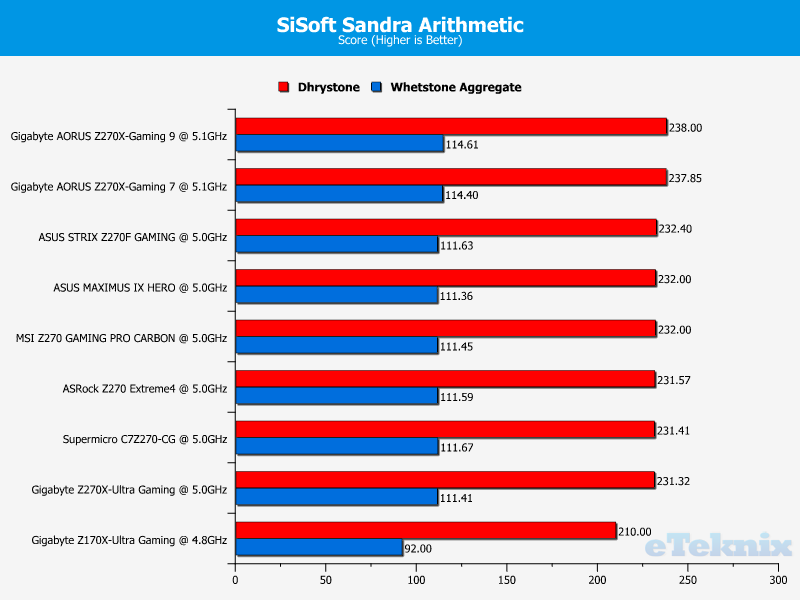
SiSoft Sandra
Here we can see the motherboard doesn’t quite come up to par and lingers behind the majority of the field. Thankfully, the performance is much better at 5.0GHz and the motherboard outputs commendable scores.
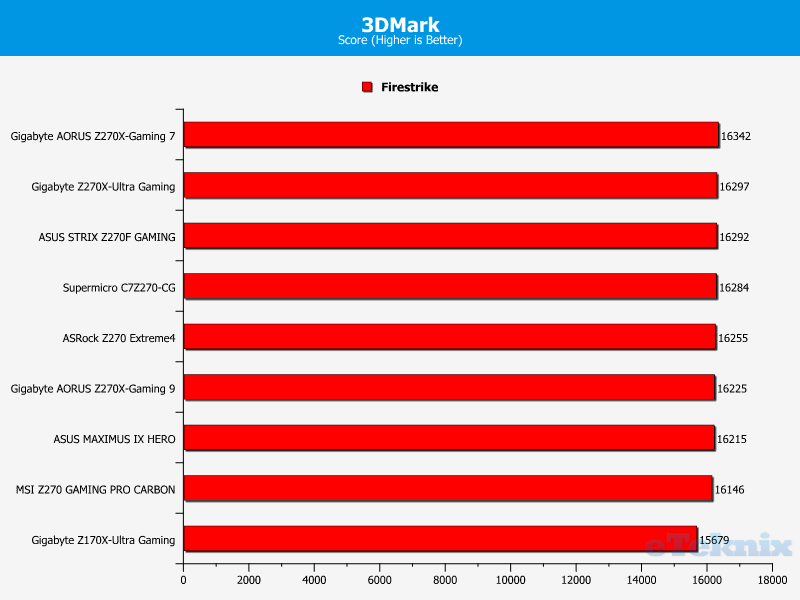
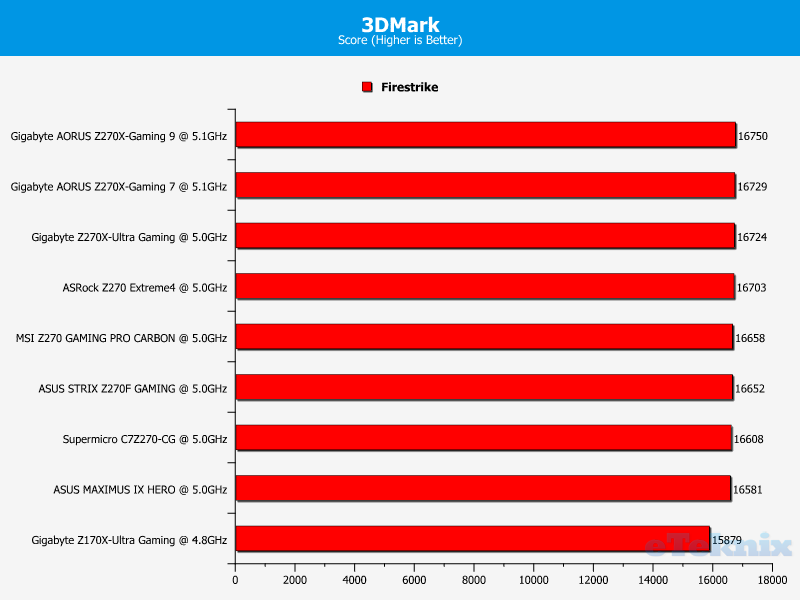
3DMark
In 3DMark, the motherboard achieves a decent score but it’s towards the lower-end of the spectrum. After the overclock was applied, the situation didn’t improve much and the motherboard couldn’t surpass other Z270 products. Saying that, the difference isn’t that substantial to warrant any concern.
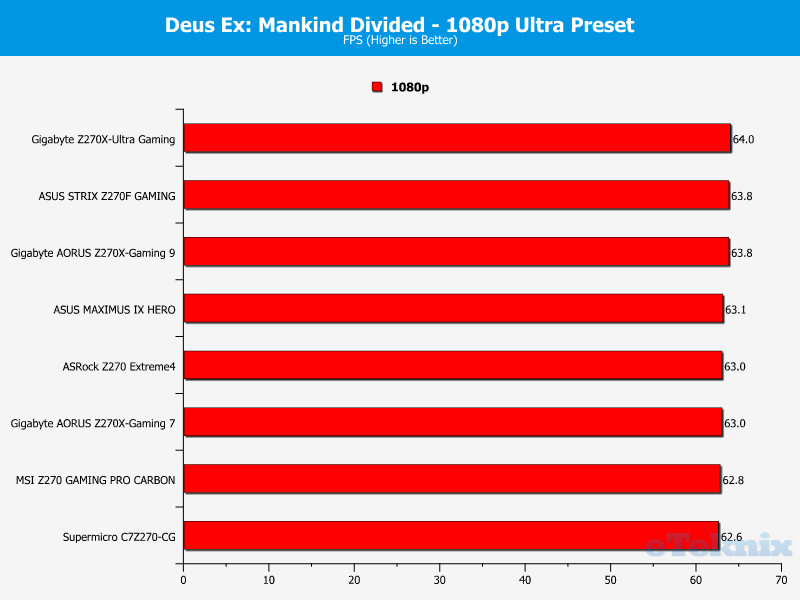
Deus Ex: Mankind Divided
As expected, the motherboard selection doesn’t really improve the gaming experience, nor does a hefty CPU overclock.
Rise of the Tomb Raider
During the Rise of the Tomb Raider benchmark, the motherboard maintained a very stable frame-rate alongside the GTX 980Ti.
Memory Performance
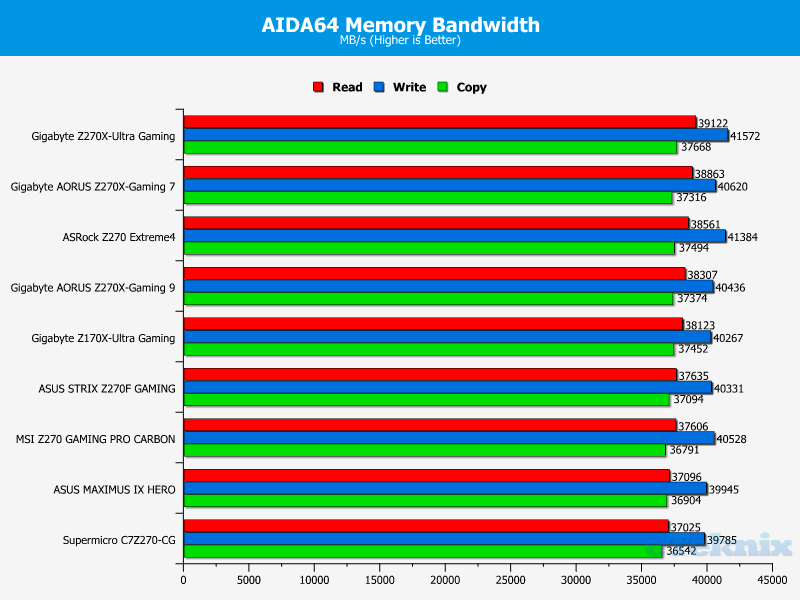
AIDA64 Engineer
Sadly, the motherboard’s memory bandwidth isn’t the best on record and falls behind a large number of rival products. Despite this, the bandwidth is still pretty consistent and shouldn’t be noticeable outside of synthetic benchmarking.
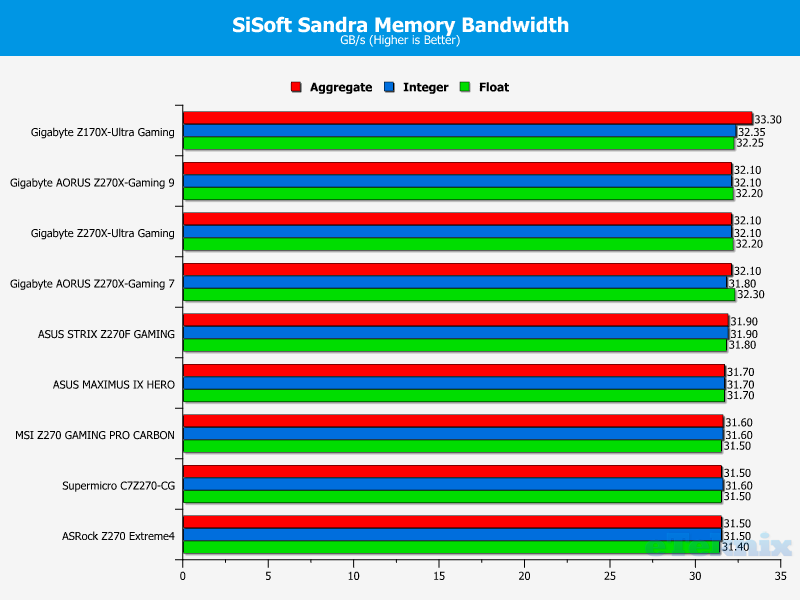
SiSoft Sandra
On a more positive note, the motherboard’s memory performance is better during the SiSoft Sandra benchmark and just edged the MSI Z270 GAMING PRO CARBON.
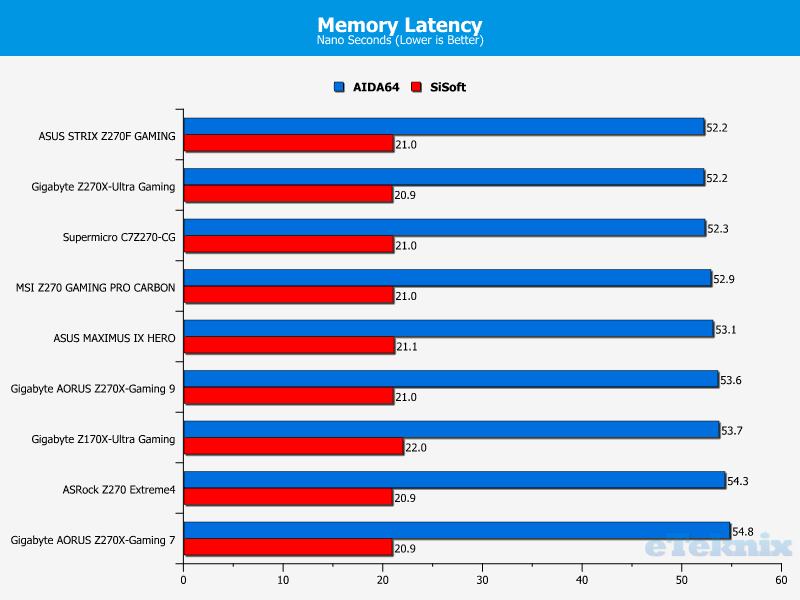
Combined Latency Test
The motherboard’s memory latency is impressive even though it’s not able to emulate the ASUS STRIX Z270F GAMING’s unbelievably strong showing.
Storage Performance
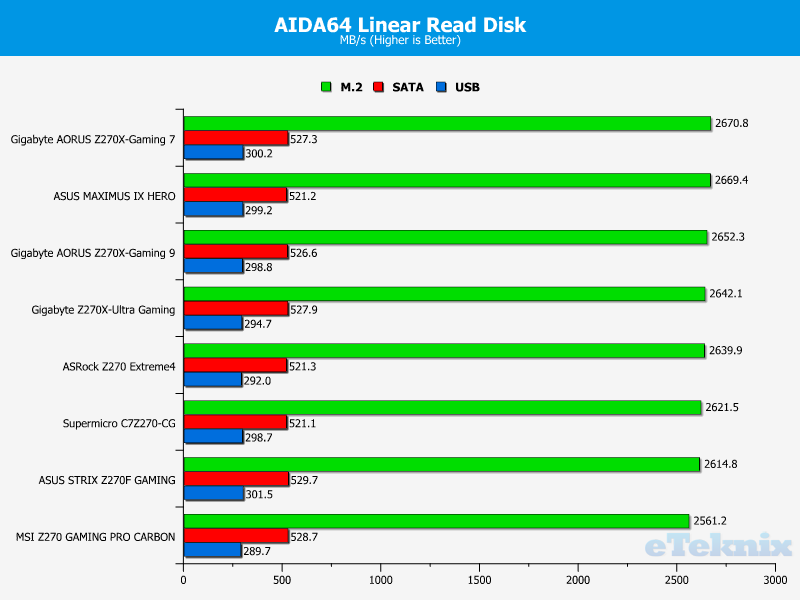
Linear Read
When it comes to linear read performance, the motherboard is superb and upholds an extremely high M.2 rate. On another note, the SATA read speeds were good while the USB 3.0 rate almost went past 300MB/s.
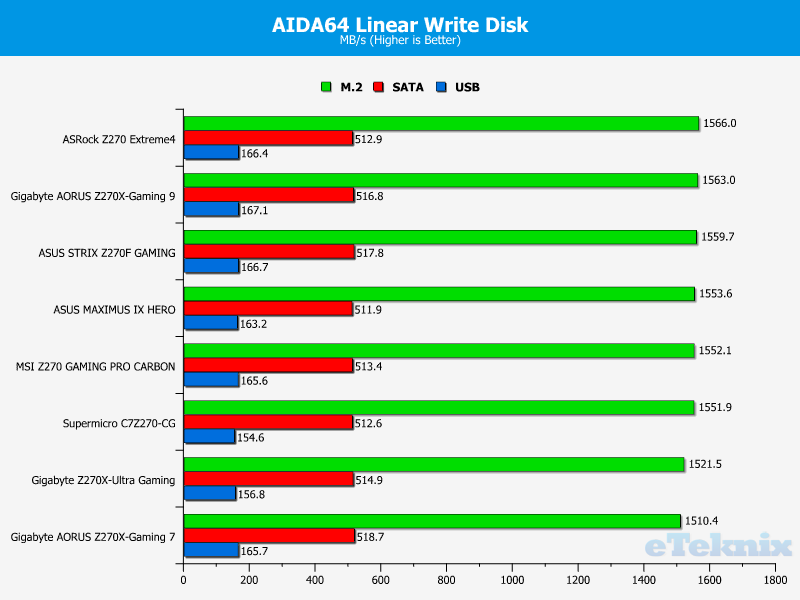
Linear Write
The linear write performance was pretty good while using the M.2 NVMe test drive. Ideally, I would have preferred the SATA result to be slightly higher but it’s not a huge issue since the deficit to the top spot is very small. The USB 3.0 write speed was pretty decent.
Networking Performance
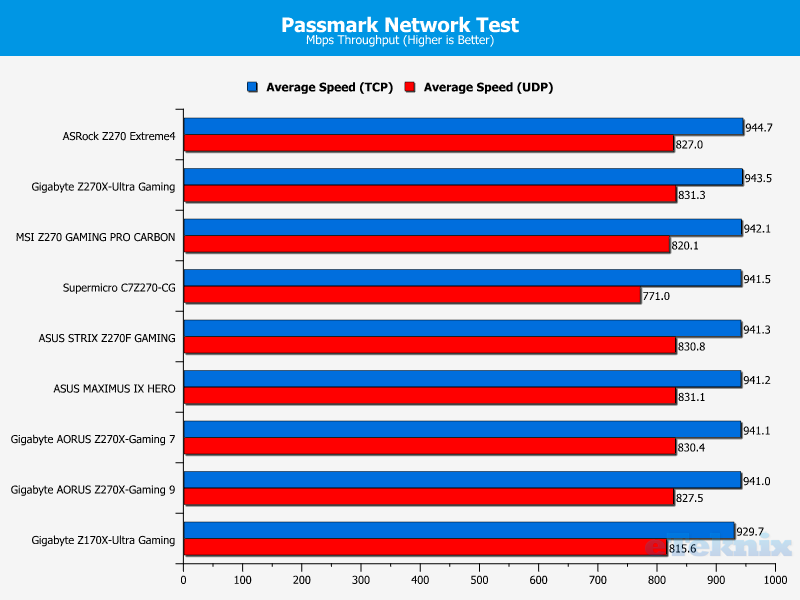
Passmark Performance Test 8 – Ethernet
The motherboard’s Intel i219V Gigabit networking solution delivers consistently high speeds during TCP and UDP testing. While the motherboard fails to finish in the top spot, it doesn’t really matter given the small gap.
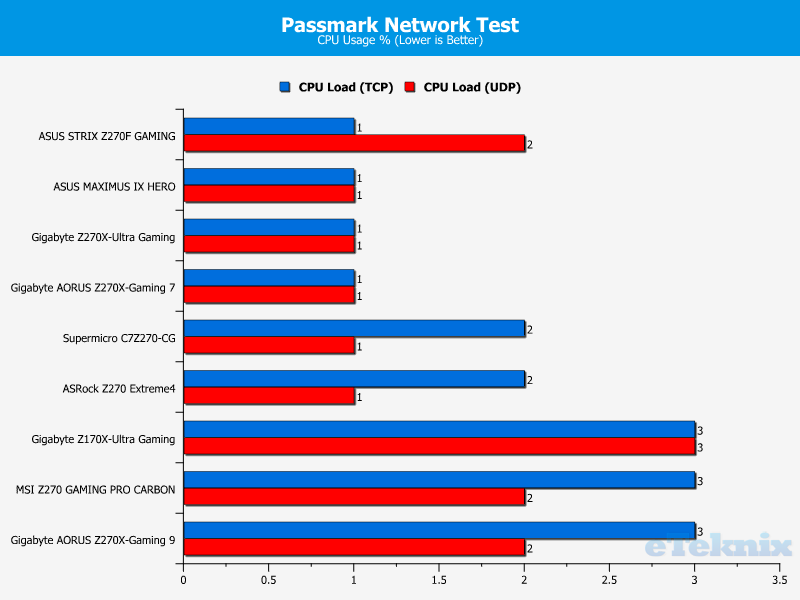
Passmark Performance Test 8 – CPU Work Load
As expected for an Intel networking chip, the CPU utilisation is almost non-existent.
Audio Performance
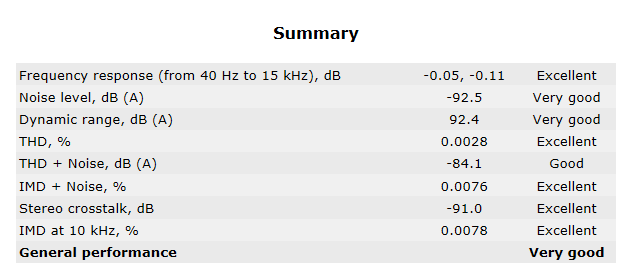
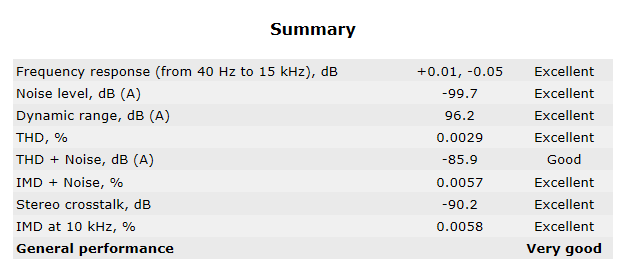
The ASUS MAXIMUS IX HERO’s audio hardware excelled throughout the testing process. As you can see, the frequency response, stereo crosstalk, dB and IMD at 10 KHz, % results are fantastic. Of course, the ratings improved as the bit-rate increased which is the norm. On the whole, the audio performance is really good and illustrates the clear signal produced by the new SupremeFX circuitry.
16 Bit, 44KHz (DVD Quality)
16 Bit, 96KHz (Studio Quality)
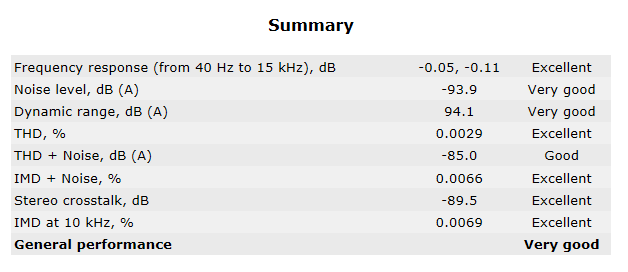
24 Bit, 96KHz (Studio Quality)
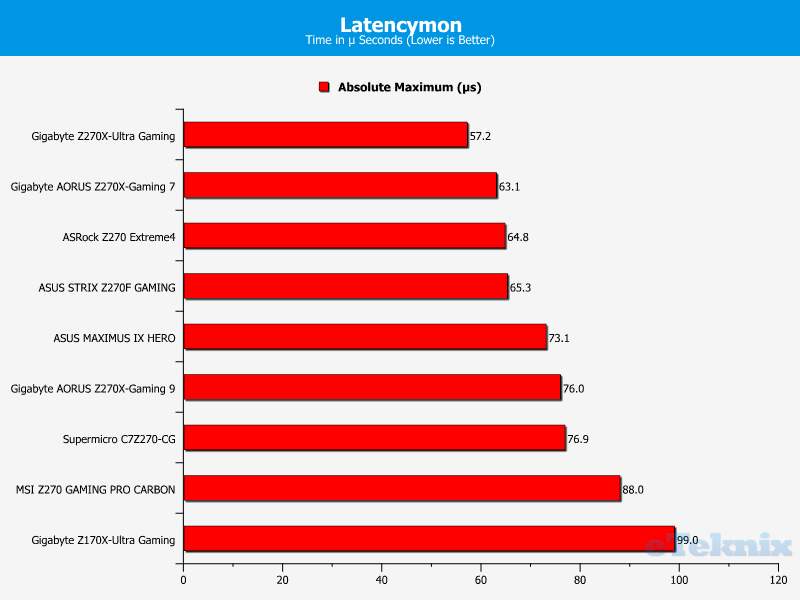
DPC Audio Latency Analyser
The motherboard’s audio latency remains quite low and outperforms many rival options.
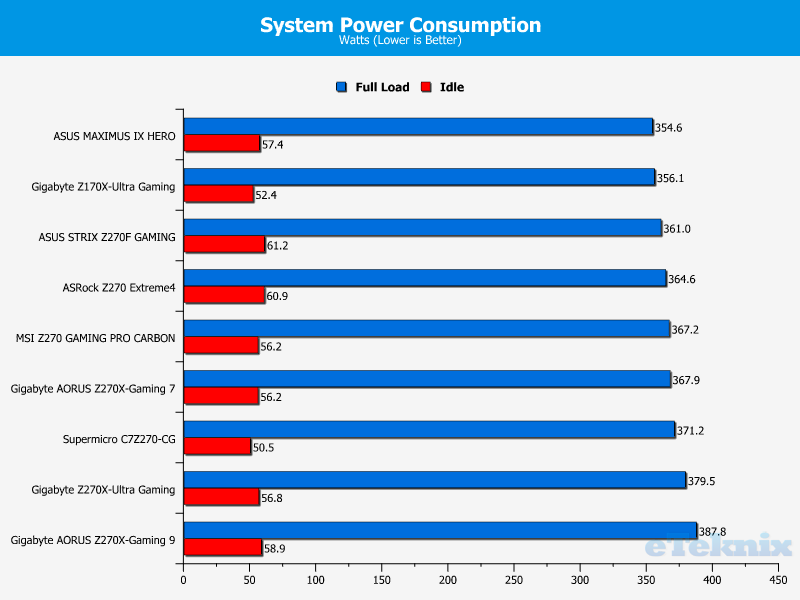
Power Consumption
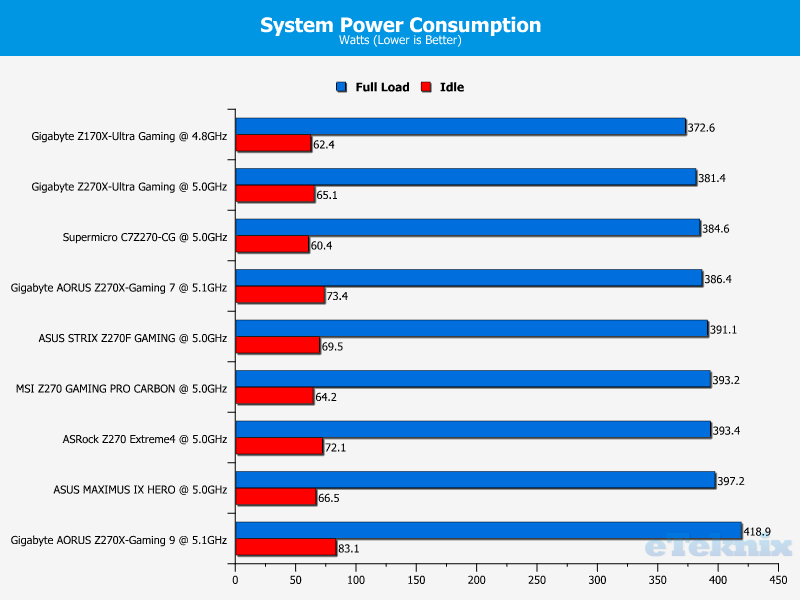
At stock settings, the motherboard’s total system power draw comes to a very impressive 354.6-watts. Once overclocked, the wattage seems to increase by a large degree and almost exceeds the 400-watts mark.
Final Thoughts
Pricing
Unfortunately, there’s been a complete lack of information regarding the Z270 motherboards and their retail prices. As a result, it’s impossible to conduct a fair comparison between numerous products and assess the value proposition. Rest assured, once the full Z270 range is available to purchase, I’ll be adding the appropriate links and revisiting the pricing analysis. According to my sources, it’s likely vendors will add approximately £10-£30 compared to the previous generation. However, this doesn’t help matters when a company unveils something completely new and the predecessor can’t be researched to gauge a pricing estimate. Honestly, I’d expect more details to emerge during CES when PR contacts return from the holiday break.
Overview
In a similar vein to the ASUS STRIX Z270F GAMING, the motherboard employs a neutral black and silver theme. This subtle styling evokes a luxurious feel and isn’t tailored towards those who prefer the traditionally lavish red and black colour scheme. Honestly, it’s a positive notion because many users became disinterested with the huge number of motherboards based on a single colour combination. The advent of RGB technology means you can customise the motherboard’s hue based on your own personal preference. More specifically, it’s possible to modify the lighting around key areas or connect an RGB strip to an onboard header. This widens the products appeal and ensures it doesn’t clash with certain components. Despite the aesthetic being quite understated, the large I/O cover and brushed silver heatsinks form a more distinctive touch. Additionally, the unusual cut-outs and absolutely gorgeous PCH shape combine rather nicely. Also, the PCB has a stunning print which travels from the audio segment to the DIMM slots, creating a really stylish effect. Personally, I really like the motherboard’s visual design and think it’s been well-thought out.
On another note, the motherboard comes with eight hybrid fan headers with PWM/DC switching. Not only that, the new control chip protects the IC from being damaged during a sudden thermal change or power surge. The fans support ASUS’ Extreme Quiet Mode which optimises your cooling hardware to create the most enjoyable user experience throughout idle and load usage scenarios. There’s even a high amp fan header for connecting fans with an extreme RPM rating and water pump header capable of accommodating hardware up to 3A. Of course, a large portion of users will be opting for a closed-loop-cooler and ASUS included a header for those configurations.
The motherboard utilises an Extreme Engine Digi+ 8-phase power delivery for the CPU while the iGPU is controlled by a dedicated 2-phase VRM. Also, the memory has a 2-phase power design which is slightly more than the ASUS STRIX Z270F GAMING’s 1-phase circuitry. The motherboard uses MicroFine Alloy chokes, Texas Instruments NexFET MOSFETs and 10K capacitors. Once combined, the motherboard’s electronics have a better lifespan and cope well with extreme temperatures. The company’s BCLK generator is another great addition which opens up the BCLK overclocking headroom. The LANGuard has signal-coupling and surface-mounted capacitors to offer superb ESD protection, cutting the signal loss from 130KHz to 300MHz. Interestingly, ASUS’ revised T-Topology circuit reduces crosstalk electrical interference creating an enhanced signal integrity. The motherboard even has a 3D printing friendly screw mount to conjure up your own design and add an individual touch. Around the motherboard, there is a huge range of tools to help the overclocking process such as the MEMOK! button, diagnostics post LED, Slow_Mode button and Clear_CMOS.
Perhaps the product’s most impressive attribute is the audio solution based on the S1220 codec. The audio delivers a 113dB signal-to-noise ratio line-in and 120dB line-out. Furthermore, the codec has an ESS SDD9023P 24-bit DAC and RC4580 buffer. The de-pop MOSFET reduces pop noises and the impedance sensing adjusts the settings based on a connected device’s Ohms rating. Of course, the audio codec is shielded by a cover and there’s a good supply of premium Japanese Nichicon capacitors. Even the left and right audio channels are kept apart to maintain a clearer signal. The PCI-E slots are fortified by ASUS’ SafeSlot technology which now has more solder joints to make the slot more rugged and protect against EMI.
When it comes to connectivity options, the motherboard is impressive and houses two M.2 connectors, SATA six ports, USB 3.1 Type-A and Type-C as well as wealth of USB ports from the previous standard. This is probably the best configuration and allows you to connect a huge number of devices and pair two NVMe storage drives together to reach really high read/write rates. Even though U.2 could have been an option, it’s fairly niche and SATA Express is now a rarity. Ideally, I would have preferred to see Thunderbolt 3 but this is probably being reserved for some of the upcoming flagship motherboards. The onboard USB 3.1 Type-A port is an interesting move and looks likely to be taken advantage of by new chassis designs.
As per usual, ASUS’ BIOS is fantastic and caters towards professional overclockers and users wanting a simple user experience. In particular, the advanced mode has an incredible array of settings to tweak different voltages, frequencies, CPU features and much more. The EZ Mode is great for people who aren’t too familiar with the BIOS and want to monitor thermal values or enable an XMP profile. ASUS includes various utilities such as the EZ-Tuning Wizard and Q-Fan control. These are beautifully designed and offer marvellous functionality. On a similar note, the company’s software package is brilliant and there are many tools which should prove useful to the core gaming demographic. For example, the reworked Sonic Radar III allows you to track the direction of noise using an overlay which doesn’t distract from the main gameplay.
The motherboard’s performance throughout the various tests was pretty good and I couldn’t detect any weak areas to be concerned about. To be fair, Z270 products perform very similar to each other and can only be separated by synthetic applications. As you can see by the charts, the difference isn’t substantial and the performance tends to be determined by the CPU. During the AIDA64 memory benchmark, the motherboard fell behind but it’s only by a small degree. Furthermore, the performance was much more competitive in the SiSoft Sandra memory assessment. Overall, the performance is worthy of praise showcases the motherboard as a great option to go alongside the new i7-7700K.
Pros
- 12-phase DIGI+ VRM
- 3D Printing friendly design
- Attractive Aura RGB lighting system
- BIOS Flashback
- Eight hybrid fan headers with overcurrent and overvoltage protection
- Excellent stock power consumption
- Exemplary SupremeFX audio
- Good storage results
- Great software package
- Impressive selection of onboard buttons, switches and LEDs for diagnostic purposes
- Loads of USB 2.0 and USB 3.0 ports
- SafeSlot combats EMI
- Superb BIOS interface
- Supports dual M.2, SATA, USB 3.1 Type-A and Type-C
- USB 3.1 front panel connector
Cons
- AIDA64 memory bandwidth could be faster
- Lighting is a bit subdued compared to rival offerings
- Thunderbolt 3 support expected given the product’s high-end positioning
“The ASUS MAXIMUS IX HERO sports an understated, classy aesthetic and allows you to add a vibrant touch via the company’s Aura lighting system. Not only that, the motherboard’s SupremeFX audio is incredible and the wealth of other features designed for high-end gamers makes for impressive reading.”

ASUS Maximus IX Hero LGA1151 Motherboard Review
Thank you ASUS for providing us with this sample.


