Completed System
Installation was fairly simple in this case, however we didn’t find it too easy to deal with cable management as there is very limited space behind the motherboard tray and if you are not careful the one side of the case will not fit on. This is mainly due to the hard drives as they are perpendicular so the cables stick out whichever way you have them. I chose to have the cables at the ‘rear’ of the case as this is how they showed the hard drives in the User Manual.
From this side of the case you can see my awful attempt at cable tidying – yes I will probably get ridiculed by other eTeknix Staff members – the upshot is, unless you have a serious phobia to untidy cables you will find it hard to manage the cabling really well in this case. As you can see from the previous picture I did go for as much airflow through this case as possible to demonstrate the cases capabilites but this leads to lots of cables!
Due to using the Akasa Venom heatsink, it is both very tight up to the top fan – meaning you have to remove the heatsink to get at the top fan – in our case the Noctua 140mm fan – as well as not giving you space for the top of the two fans on the side of the case. That said, this is a problem that occurs on a lot of cases, due to the PSU being at the bottom and the motherboard at the top there are a few more clashes than normal. That said, it does provide better airflow in this arrangement.
You can see that there is plenty of space full a full-size motherboard, as well as the space for a much larger PSU than mine. All of the PCI bays are easily accessible, and only require a screwdrive to remove – it is annoying that the rest of the case is pretty much tool-less and this part isn’t. The only problem with this case is that there are no pre-set cable management areas of paths set out for the cables. Meaning you have to try and work out what is best – clearly I failed.
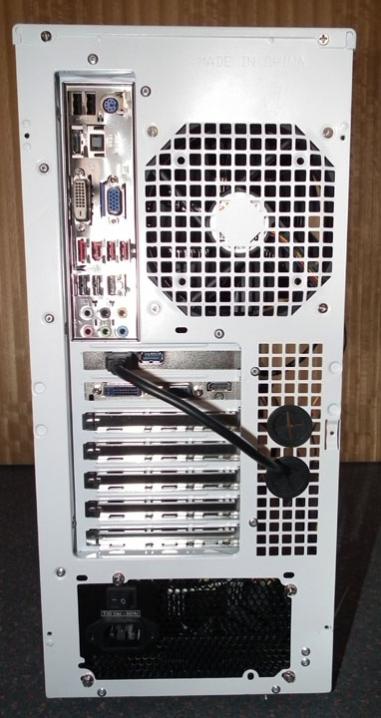
Taking a look at the back of the case you can see the USB cable running out of the bottom of the 2 holes. As well as all the I/O ports of the motherboad.
As this case only has 1 LED it is certainly not going to impress your gaming friends, however, it will look professional in nearly every environment. It is however very easy and flexible when it comes to further expansions. As you can see I have added an Akasa card reader into the ‘external’ 3.5″ bay, giving me a 2.5″ hot swappable drive bay on the front, perfect for ssd testing!
Fun Games: Let’s begin to play thrilling and exciting games. The electronic game cube contains…
Traverse a vibrant world, assemble units and direct them into exquisitely animated battles Perform heroic…
Essential Indoor Sports Set: Comes with 4 mini basketballs, making it the perfect choice for…
【All-in-One Cleaning Gadget】Our 20-in-1 electronics cleaning kit is designed to provide a deep and detailed…
I'm a big fan of the Evnia monitors, and rightly so, they're some of the…
🕹 Relive the classic 80's games with our retro handheld game console which includes a…