Nanoxia Deep Silence 1 Mid-Tower Chassis Review
Peter Donnell / 12 years ago
Now that we have the DS1 out of the box, we get our first proper look at the chassis. Starting with the front panel we see its finished with a really high quality plastic panel, which looks a lot like brushed aluminium. The black finish on the panel has an almost stealthy look and feel about it, so lets open it up and see what is hiding behind it.

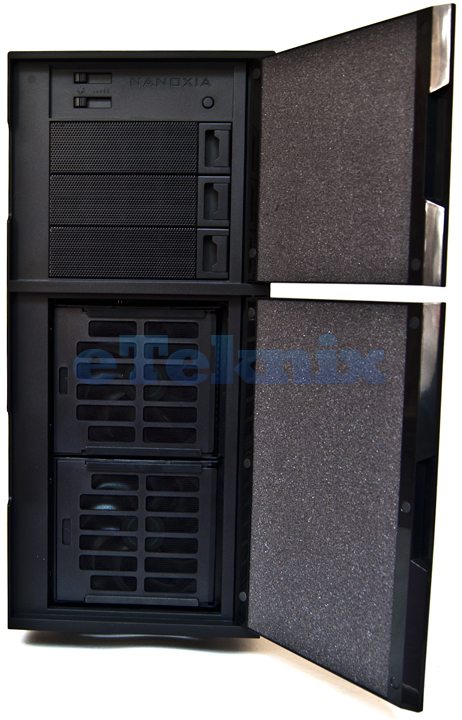
It’s a twin door system, the top half hides the two channel (3 fans each) fan controllers, which are operated by twin sliders. A Reset button on the top right hand side and finally 3 x 5.25″ bays, each of which features a quick release clip for easy installation of your drives.
The bottom door is hiding two 120mm pre-installed fans, each comes fitted with air filters and take their airflow from the side of the chassis, but the fun doesn’t stop there, so lets see what else is tucked away on the front panel.

With the bottom door open we can then open up the fan mounts thanks to a push-click mechanism, this allows you to gain quick and easy access to your fans for maintenance or installation. Each is held in with a simple clip on bracket to save need for screws. Both fans are really high quality too, I doubt there will be any need to upgrade them for anything else.
With the fan compartments open you can then slide out their front covers which also act as dust filters. These are extremely easy to maintain and overall this is one of the best thought-out front panel / cooling designs I’ve seen. Top that off with the heavy duty noise reduction material on booth the front panel doors, plus the fact that both doors are held shut by powerful magnets and we’re really off to a strong start in terms of functionality and design.

The top panel of the chassis is also fairly unassuming at first, with the power switch mounted at the top of the front panel being the only stand out feature here. Of course you can see two more plastic cut-out areas across the top, so lets take a look at what is hiding behind them.

At the front we have a hidden panel with 2 x USB 2.0, 2 x USB 3.0 and headset I/O sockets. This panel is on a spring loaded mechanism, simply push down till it clicks and it slowly glides up, allowing you access to the I/O ports.
Behind that we have the chimney, although it makes me think more of a sun room that a chimney. Using the simple left to right slider on the side of the chassis this can be raised to allow for additional airflow through the top of the chassis, behind which you will find room for twin 120/140mm fans, a single 200mm fan or even a compact water cooling radiator.

On the left side of the chassis we see that I have left the chimney up to give you a better view of how much clearance it has, it’s not a lot, but when your using it as a fan exhaust it’s going to be capable of shifting a lot of warm air from within the chassis. The side panel is held in place with a pair of thumb screws for easy access. But the most noticeable feature is the square panel in the bottom left, this is a removable section where you could mount an additional 120/140mm side fan, or you can leave it in place to keep the side panels sound proofing unaffected.

Around the back of the chassis we have 4 water cooling / cable routing holes, two across the top and a further two in the middle. These come fitted with rubber grommets but the chassis does come with solid rubber caps should you prefer to keep these holes plugged. We also have a high quality Nanoxia 140mm fan acting as the main exhaust, 8 reusable expansion slot covers and a bottom mounted PSU cut-out.

The right side of the chassis is a simple plain panel, also held in place with a pair of thumb screws, it does come fitted with extensive sound proofing, but we’ll take a closer look at that on the next page.

Flip the chassis on its side and we see it features a huge slide out air filter, this will prevent any base mounted cooling or your PSU drawing dust into the chassis. The chassis feet are also quite high offering 25mm of clearance, this should allow for a great amount of airflow to the chassis.


