Synology Diskstation DS115J 1-Bay NAS Review
Bohs Hansen / 9 years ago
Introduction

When we’re talking network attached storage in our own homes, it isn’t everyone that needs a large server with 4, 6 or 8 bays. Sometimes one bay is enough, if the features and functions still match. We’re also seeing a hard drive size that keeps growing with 6 TB consumer drives and 8 TB enterprise drives already available and the 10 TB drives aren’t far in the future. This might be a smart route to take for people who get into the NAS area now and need both a new device and drives for it, but also for those who just want to cut down on the running costs.
Today I’m taking a look at a device for just this situation, the brand new Synology DS115J Disk Station. A compact, lightweight and energy-efficient NAS that is perfect for the budget-conscious home users looking for a simple, yet feature-rich NAS server. You can easily back up documents, monitor live surveillance feeds, build a personal cloud to share files with friends and family or just use it as a media location.
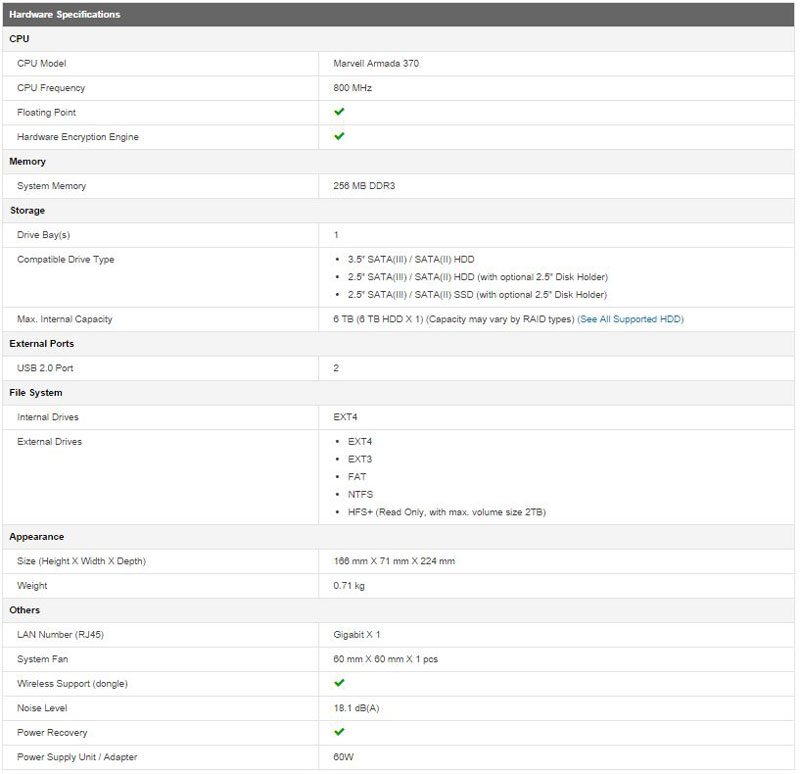
The performance doesn’t need to suffer when thinking in these directions and Synology shows that fact with this device. It promises speeds of up to 103 MB/s when reading; that is a 28% increase compared to its predecessor. This is achieved by using a CPU with built-in Floating-Point Unit (FPU), the Marvell Armada 370 that runs at 800 MHz. The NAS has 256 MB DDR3 ram which should be sufficient for a 1-bay device like this. Of course the device has been tested to support the newest 6 TB NAS drives and it should work just fine with any other 3½ inch SATA drive as well. It also supports 2½ inch drives, but that requires an optional Disk Adapter.
This new 1-bay NAS is powered by the same familiar and award-winning DiskStation Manager (DSM) we know from their other models. The intuitive user interface makes managing your NAS a breeze, even with all of its functions, and it doesn’t lack any of the functionality its bigger brothers have, from personal cloud services to media streaming and surveillance; the Synology DS115j does it all.
Besides the great and functional operating system itself, you also get access to a wide array of mobile apps for the most popular platforms as well as systems such as Samsung TV, Apple TV, Chromecast and Roku. Overall, the DS115j should cover any function you could want from such a device.
There aren’t that many devices that are designed specifically for the home environment, most of them cover a lot of business functions as well to increase the potential market. The DS115J is one of the few devices that breaks with this and is designed specifically for the home environment. It’s power saving features will allow it to perform its duties at just 13 watts under full load and barely 3.85 watts when the hard drive enters hibernation mode. Synology also applied noise dampening designs in order to make this NAS as quiet as possible, bringing it down to just 18.1dB(A).

There isn’t a whole lot in the box, but we get everything we will need. Besides the NAS device itself, we get a power brick and cable, screws for our drive, a network cable and a quick-start guide. One couldn’t ask for more as everything is covered.
A Closer Look
The front of the device is very simple and sleek. At the top you have three LED lights for Status, Network and Disk activity and the power button is located at the bottom. There is a small gap between the two case parts to allow for cooling air to enter.

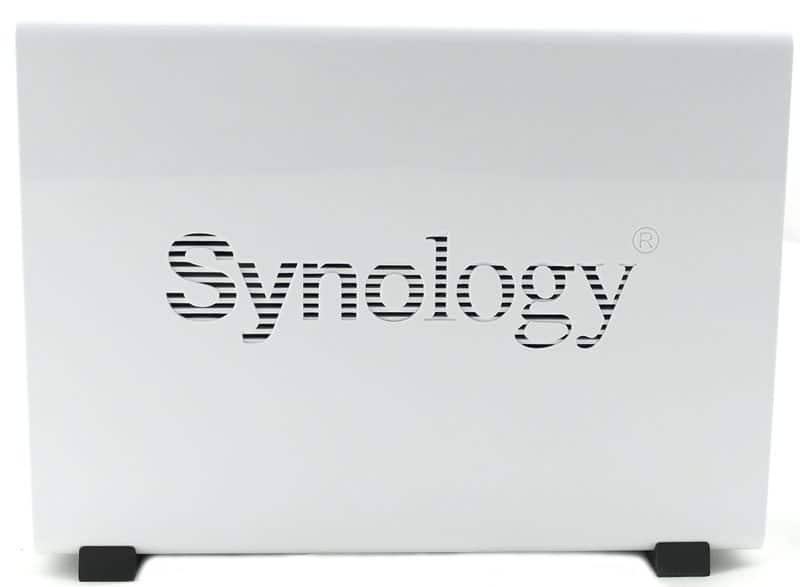
Turning the device 90 degrees and having a look at the side, we see the Synology logo beautifully carved into the side. At the same time the logo acts as air vents to supply even more fresh air to the hard-drive and other components.
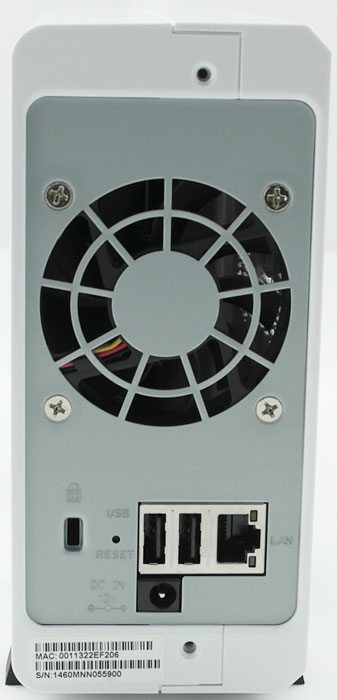
Giving it another turn to the rear gives us a look at the connection abilities. The DS115j has 2 USB 2.0 ports, a RJ45 Gigabit Ethernet port and a Kensington lock. We also see the power connection and the reset button in case we ever need that. The tiny 40 mm fan that cools this device is located above all of those connections.
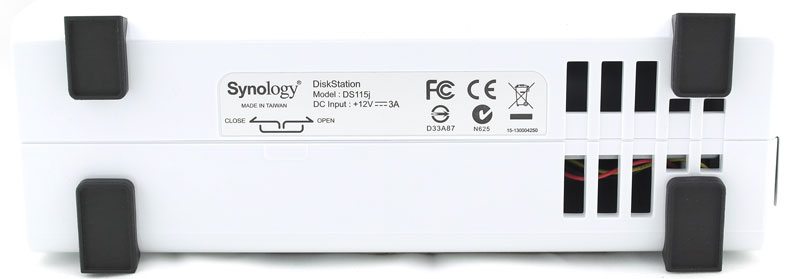
On the bottom of the device we find a sticker with the basic certification logos and the power rating. There’s also a simple illustration on how to take it apart. The four black rubber feet should absorb any vibration that could come from the mounted hard drive.
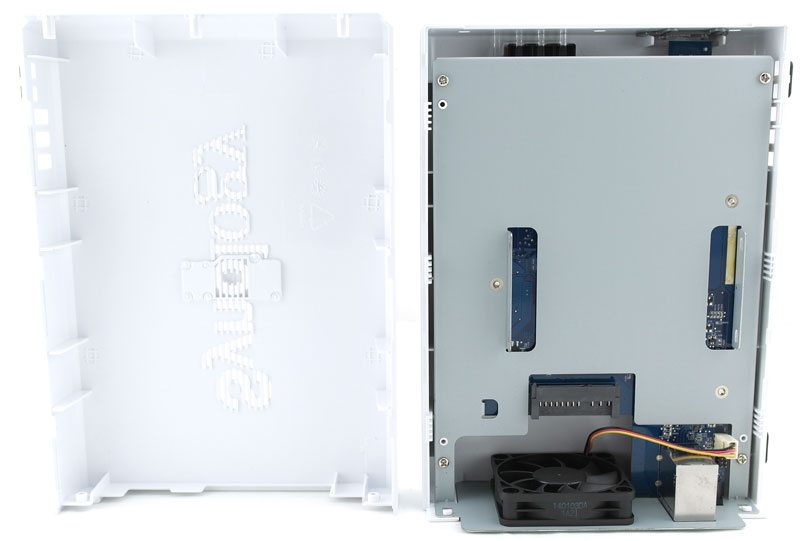
All you have to do to open the device is to loosen the 2 screws on the back and the 2 parts will slide apart. On the one side we see all of the equipment and the second side is just the cover.
Mounting the hard-drive is as easy as sliding it in and securing it with the screws that came with the NAS. As you can see on the photo below the holes for the screws are wide enough to allow for some variation on the drives, in case the holes aren’t aligned the way they should be. It generally also just allows for easier mounting than with just a tiny hole.

You can close it up now after having secured the hard-drive and it will be ready to be powered up. I’ll however take it a bit more apart and have a closer look at the internal components. The PCB is coloured blue with the Marvell processor located in the middle and the BIOS battery to the left. We also see the reset button all of the way at the bottom to the right.
At the top left corner we can spot the three LEDs for the activity lights and at the bottom we see the white connector for the power button.
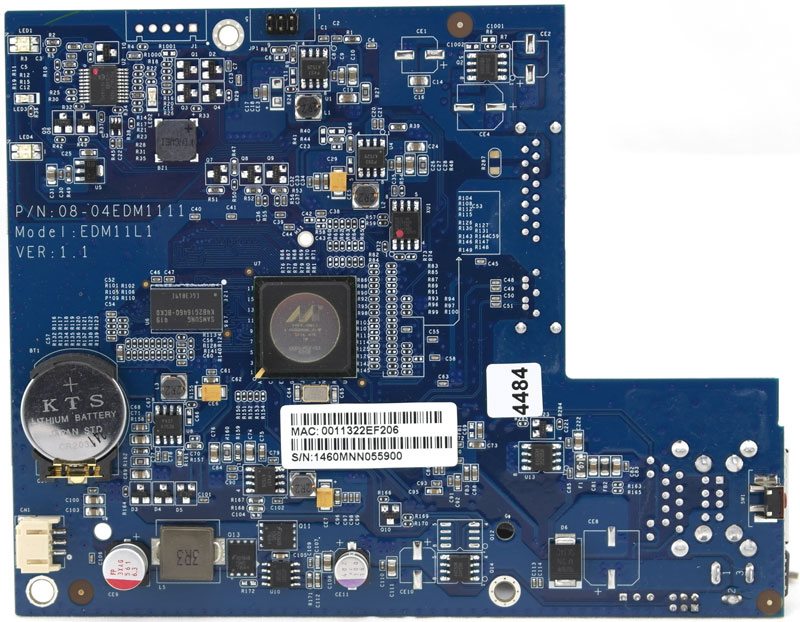
Turning the PCB around and we see the SATA connector to the left and at the bottom right corner we have the USB, LAN and power ports. The PCB is cushioned around the edges to prevent it from shortening on the metal frame when mounted. The chip we see at the bottom is the Marvell 88E1318 Ethernet controller. The built-in fan is connected to the white 3-pin connector at the bottom left corner.

System Spec, GUI & Power Consumption
System Specification
User Interface

The DS115j is powered by the same familiar DSM we know from other Synology devices. A great and easy to use operating system that should have a function and feature for almost anything you can think of.
Power Consumption
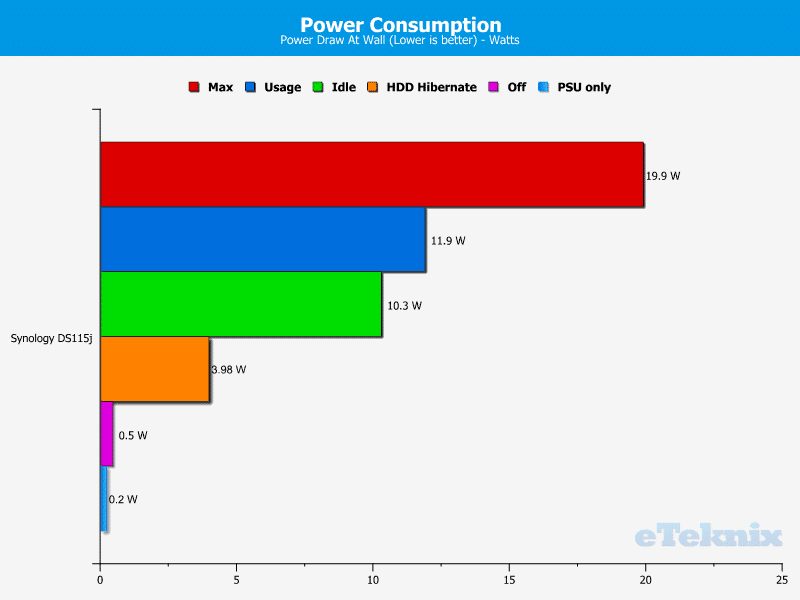
The Synology DS115j isn’t just a budget device when buying it, it barely uses any power while running either. It peaks at 19.9 watts during boot-up and operates around 11 watts. Once the HDD enters the hibernation mode it will only use around 4 watts.
I’ve been asked a lot lately about power figures of the just the power-supply bricks. To answer this question I also tested it without being connected to the NAS.
Basic Installation and Setup
Installation:
Once you have connected it to the network and turn it on, lights start to flash and it will be ready shortly. Head back to your workstation and navigate to either of the two URL’s mentioned in your quick-start guide. You can use any browser of your choice for this. Your NAS should be found almost instantly this way and there is no need to install any programs to locate its initial IP address or look it up in the routers connection logs.

This is a great and makes it a lot easier to set the device up. I only have one Synology device here, but I can only assume that all Synology devices connected to your network will show up here. Hovering the Device Info text gives you more details about the devices, such as model number, IP address, serial number, mac address and the status, if installed or not. It is very easy to locate your new device and get started.
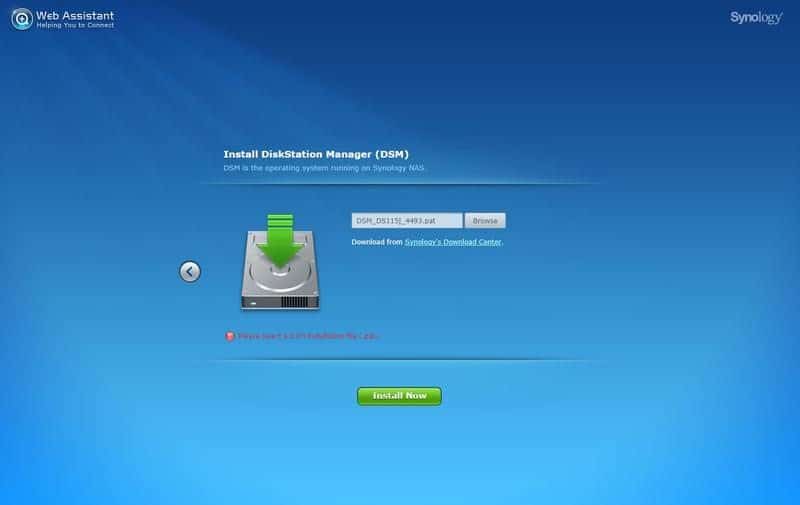
When you hit the Set up button it will ask you to provide the operating system, also sometimes referred to as firmware. All you need to do is hit the link it provides and download the file.
While some might not like this step and would prefer it to have a stock firmware built-in and ready to go, I see this method as a huge bonus. Not only are we sure we get the newest version right away, this saves us a later update that might or might not cost us our settings, but it also makes sure that we have the most secure version. Synology is very quick to react and release fixed software when new vulnerabilities are discovered, like the SSH or Bash bugs we’ve read about.
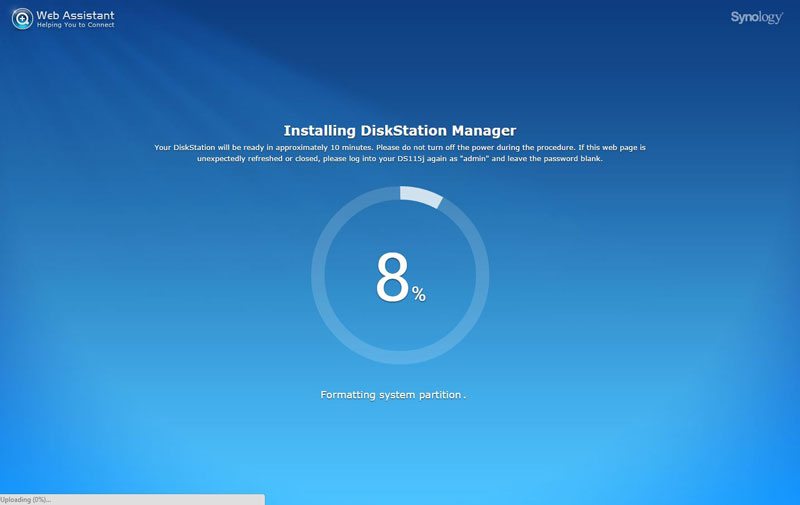
The installation won’t take long and you can lean back and take a sip from your drink while the progress bar fills to 100 percent. The mentioned approximately 10 minutes was a close match on my used 6TB hard-drive. It’s to be noted here that all data on the drive will be deleted when DSM is being installed. So if you already have data on the drive, make a backup before you use it.
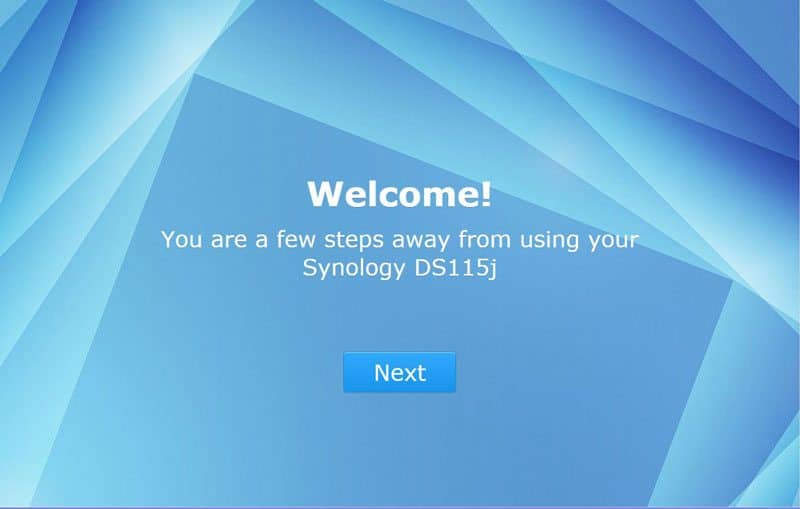
It will take you to a welcome page where you can configure the basic setup once the installation is done . You will have to provide a name for the device and define your administrator users name and create a password for it.

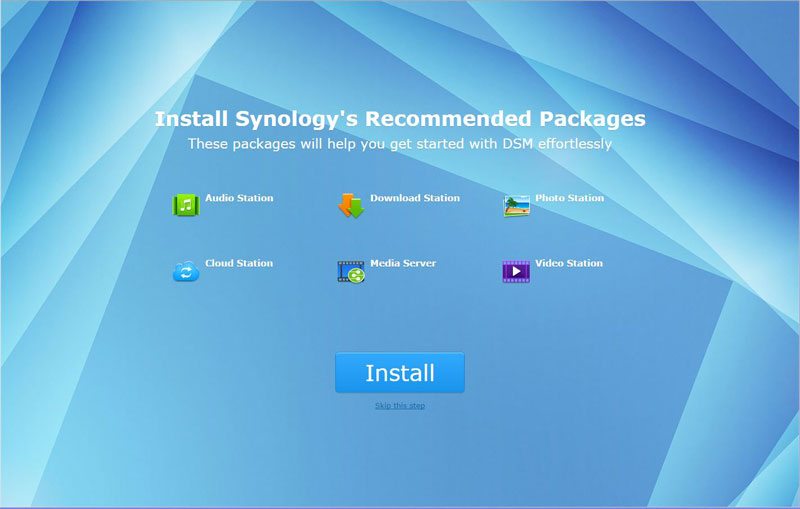
On the next page you can install some of the great extra functions the DSM system has to offer, or you can skip it for now. You can always add or remove them at a later time if you change your mind. And that is all the configuration you have to do to get it up and running.
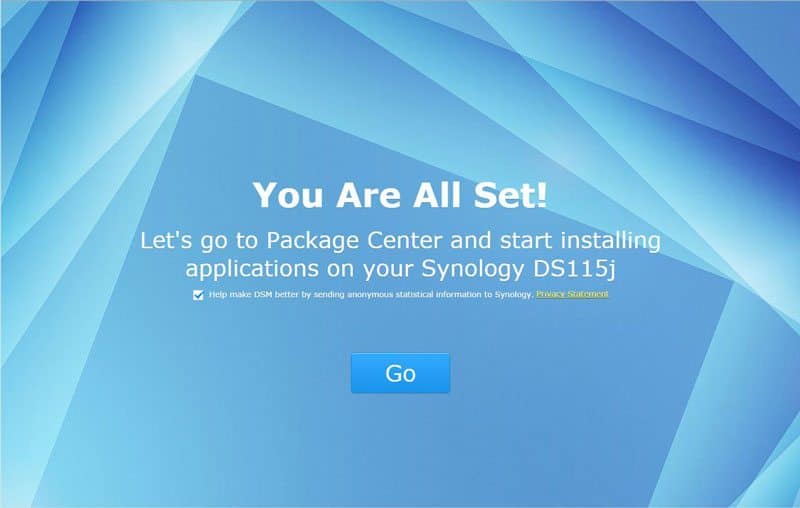
If you chose to install the extra service it will take a little while for it complete that action before it takes you to the final page of the setup. It will tell you that you’re all set and asks you if you wish to report anonymous feedback to help improve the system.
When we arrive at the DSM dashboard for the first time, it will give us a small tour in tutorial mode. This will help new users find the basic functions right away and all you have to do is click the mouse on the screen a couple of times to get through it.
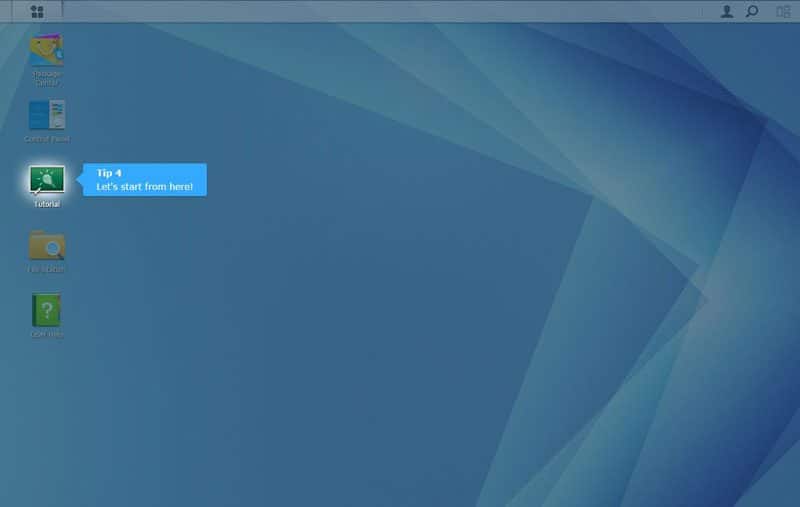
Once you’ve clicked your way through the tutorial, you can start to create the setup for your personal needs.
Basic setup
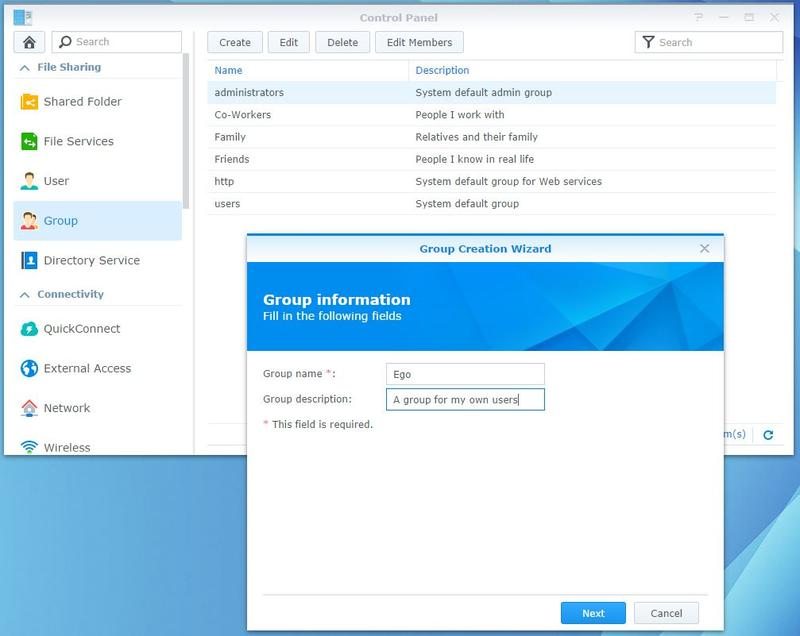
While it doesn’t matter in what order you configure the different parts of your new NAS, you can save yourself some time and effort by doing it in the right order. I prefer to start with the user groups. User groups allow you to easily set access rights for a whole group of people by just adding them to the group. It also allows you to easily remove an entire groups access to a shared folder if needed.
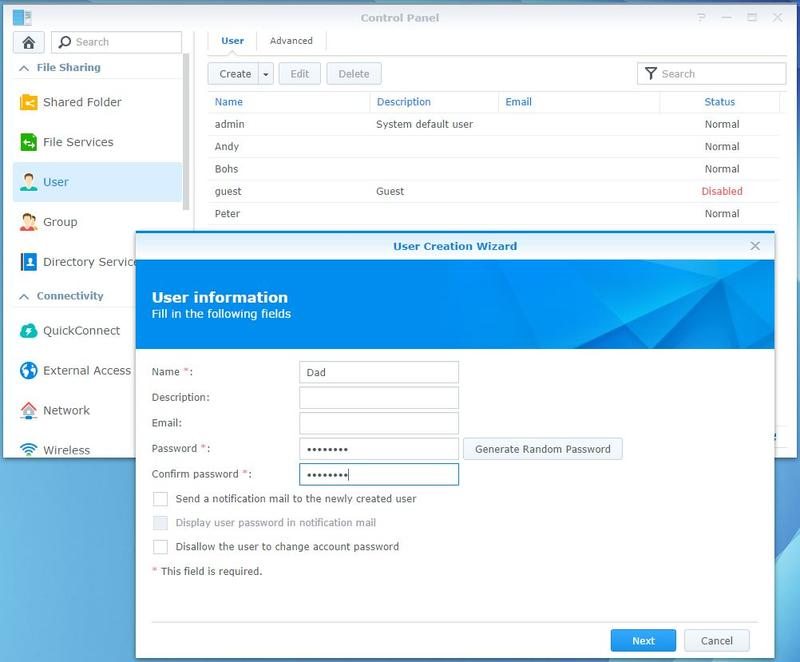
The next part is to set up your users. You got quite a few options to set, but there aren’t that many needed. You’ll need to supply a username and a password. You can have the system auto-generate a password for you and it can also send out an email to the user about his new account. There are a lot more options to explore, but every one of them is explained. As you get through the create pages, you can assign the new user to the previous generated groups and tell what services they’re allowed to use.
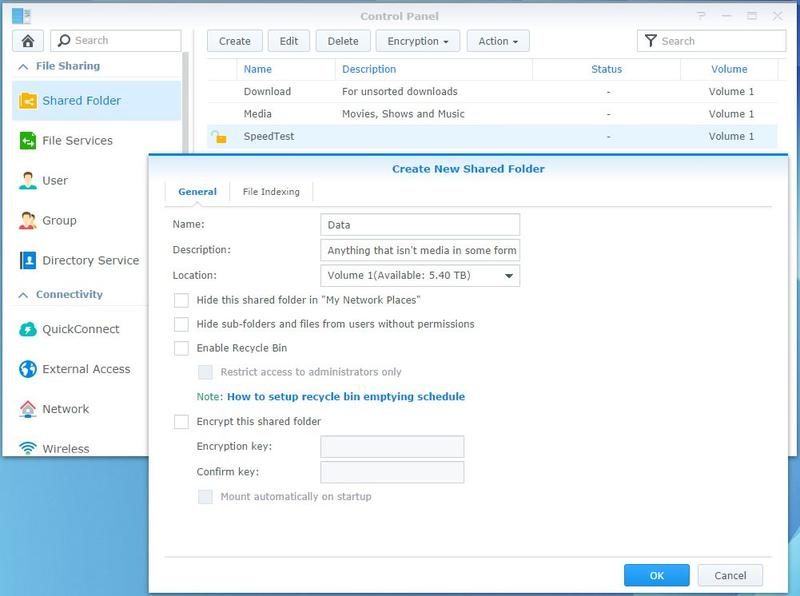
We of course also need some folders for all the files we want to share across our network, so we need to set up some shared folders as well. I prefer to have few basic folders, grouping my files into bigger categories. This allows for faster file-moves from one sub-directory to another as well as easy network-share-mounting. My basic setup is Download, Media, Personal and Data. But how you set up your shares is completely up to you and your usage needs.
Once you’ve entered the name and otherwise selected what you’d like on the first page, it takes you to the permission page. In the combo box you can switch between users and groups. Setting rights for groups is a lot faster than doing it for individual users. The user page still allows you to block out someone though their group still has access.
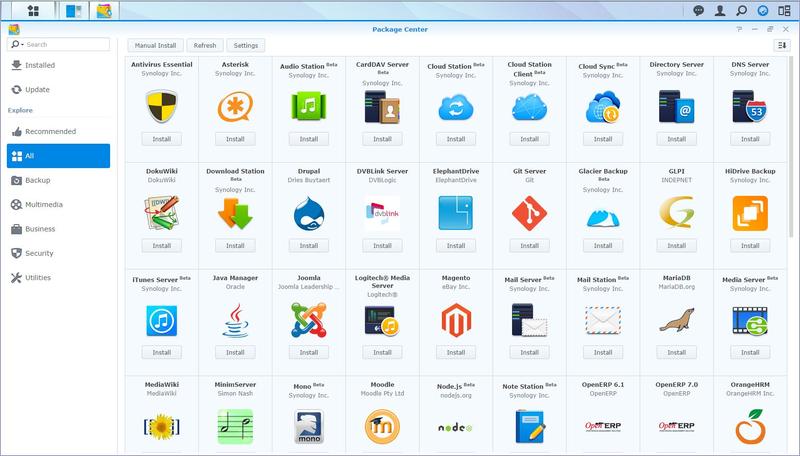
Your basic setup is now done, but that doesn’t mean you have to stop here. DSM offers a long range of applications and services from online photo albums and cloud services, ranging from DLNA streaming and download services, all of the way to running your own web and email servers. The image below shows a fraction of what is available.
You can choose to let the DSM system keep your system and all of your apps updated automatically or notify you either on the dashboard or via email.
Testing Method
Test system:
- Supermicro C7Z87-OCE
- Intel Xeon E3-1230Lv3
- Corsair Vengeance 8GB 1866MHz
- Corsair H100i
- BeQuiet Dark Power Pro 850W
- Kingston HyperX 240GB SSD
Disks in Product:
- Western Digital RED 6TB 3.5-inch
- Western Digital RED 1TB 2.5-inch
We would like to thank Be Quiet, Supermicro, Intel, Corsair, Kingston, Lian Li and Western Digital for supplying us with our test components.
Software used:
When testing a device of this sort, the system that we use to test with is not a major factor in its performance. The performance of the NAS box comes down to the network it is running on and its own internal hardware. With a device of this sort having so many different applications, Intel’s NASPT software covers all the bases and also gives us a set of results that we will be able to utilise and therefore give a benchmark against other similar systems in the future.
Intel NASPT (Network Attached Storage Performance Toolkit) performs its test by transferring varying sizes and quantities of data to and from the device based on twelve different scenarios.
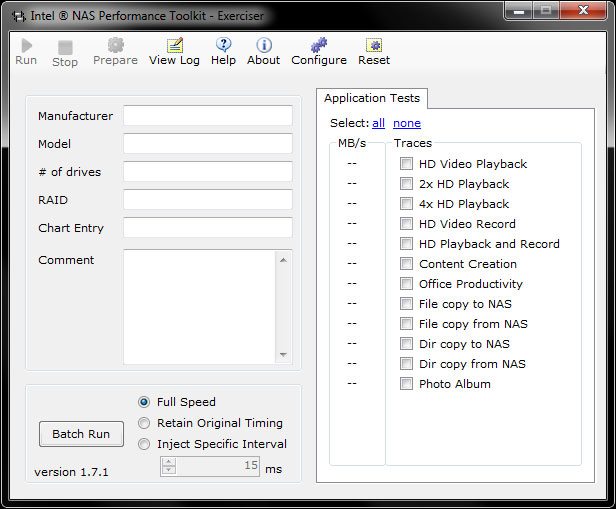
The NAS itself will be packed with Western Digital’s latest RED NAS drives. The system that we use to run the Intel NASPT software does require us to drop the memory right down to 2 GB as any more than this leads to data caching and therefore skews the results from the NAS box.
Since this is a 1-bay NAS and it doesn’t have any eSATA connection, I can not run any raid comparison tests on this device. To increase the coverage I chose to test it with both a 3.5-inch drive with 64MB cache and a 2.5-inch drive with 16MB cache to see how big of an impact that will have on the NAS’ performance. I also tested each drive with encryption enabled. While this device isn’t really build for this sort of operation it still supports it, and I’m sure there are more than one user out there who prefer to encrypt their sensitive data, even if it means some performance loss.
In addition to measuring the performance of the NAS as it is built to be used, we have noticed that a number of users are using the USB ports to connect up secondary storage devices such as external hard drives or flash drives. This device doesn’t have any USB 3 ports but it does have two USB 2 ports. I will be testing these ports to the maximum by connection an external USB3 SSD to the port. A drive like that is sure to give us what the USB 2 port can handle.
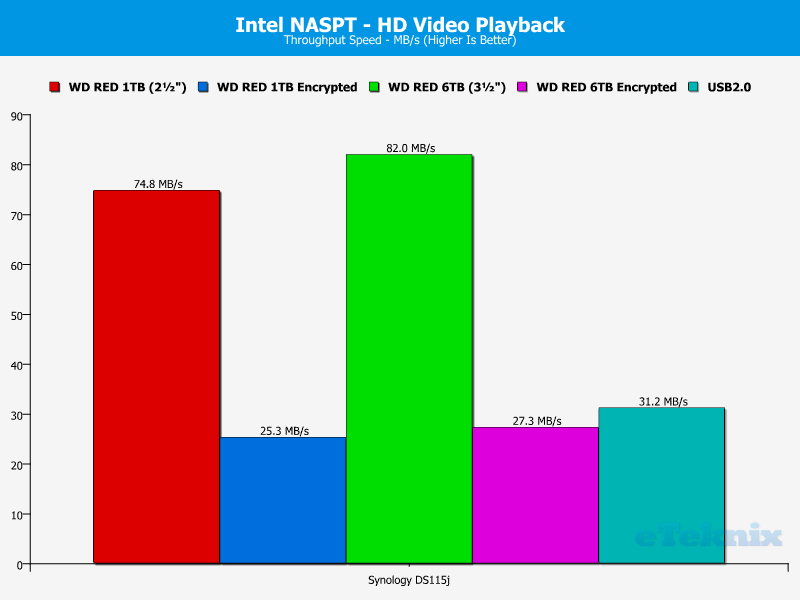
HD Video Playback
HD Video playback is a read test, where a single 2 Gb file is read in 256 kB blocks sequentially from the drive. This simulates where a 720p HD video is being watched across the network to a media player on the other end.
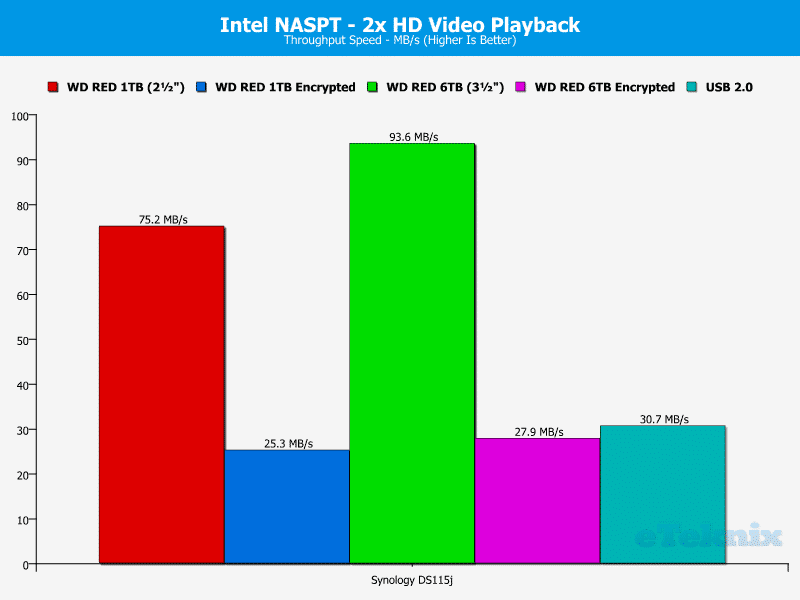
2x HD Video Playback
2x HD Video Playback works with exactly the same data set as the first HD Video test, however this time the same content is streamed twice from the NAS box simulating two simultaneous streams being made to external media players.
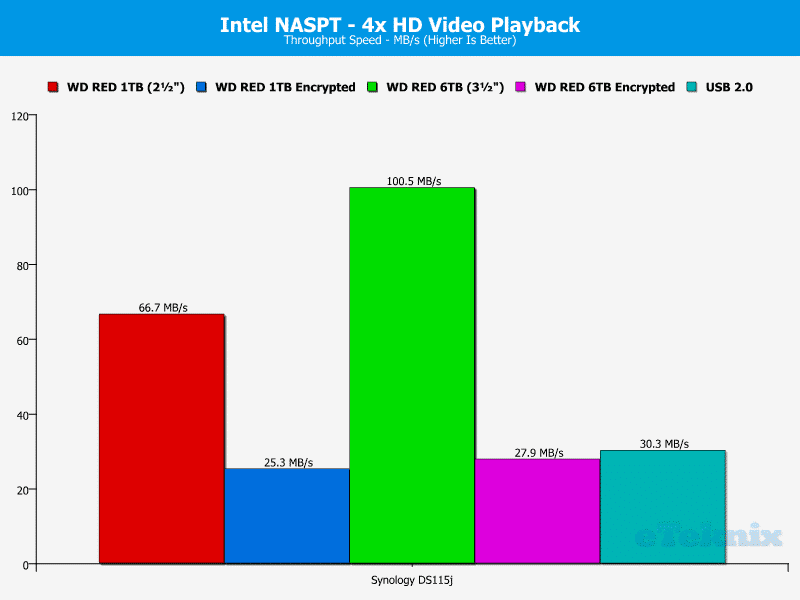
4x HD Video Playback
In the same way that the 2x Video Playback streams to the equivalent of 2 external media players at the same time, the test here doubles that again up to a simulated 4 media players.
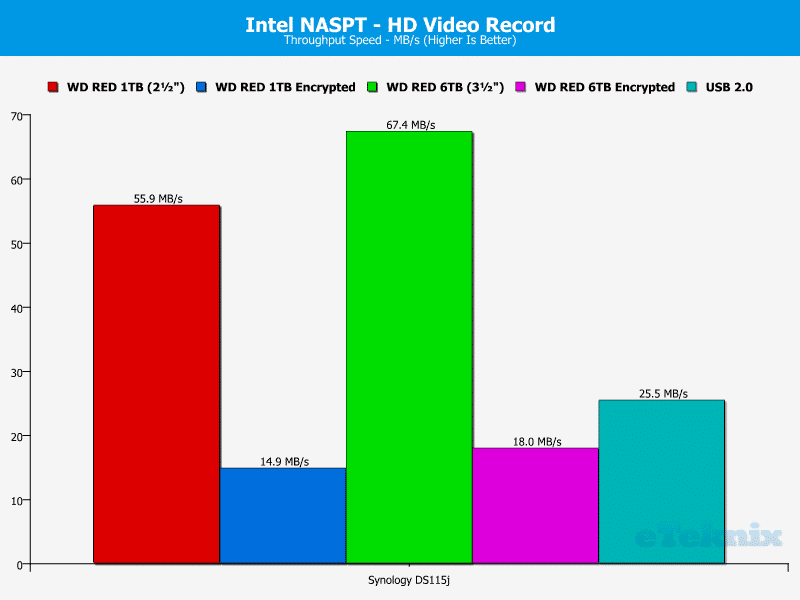
HD Video Record
The HD Video Record test is as the name suggests a write test to the NAS box. A single 2 GB file is written to the device in 256 kB blocks sequentially to the disk.
HD Playback & Record
The HD playback and record test now put the drive under the same single record and playback tests as before, but now at the same time. This will factor for the quick changes needed to switch between reading and writing two large blocks of data across the network to the device.

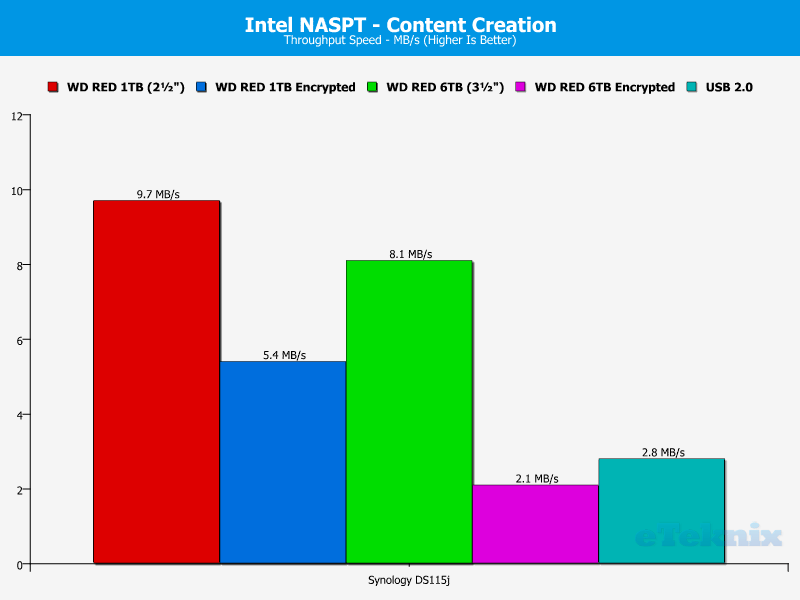
Content Creation
For content creation, Intel have simulated access to via video creation applications. This is made up of 98 files with 12 MB reads and 14 MB writes in varying sizes of blocks. The activity is predominantly non-sequential with the majority of access time made up of writing to the drives. There are quiet periods of read/write activity interrupted with busy periods to present a difficult workload on the drives.
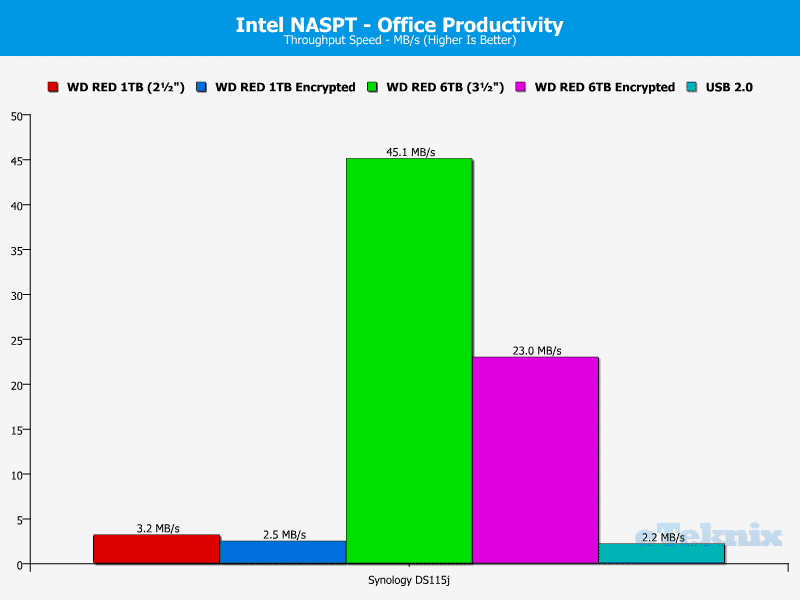
Office Productivity
The office productivity simulation is very similar to the content creation, with a total of 607 files written to and read from the drive. A total of 1.4 GB of data is written to and read from the drive with a close balance between each made – the majority of write access is made up of 1 kB writes.
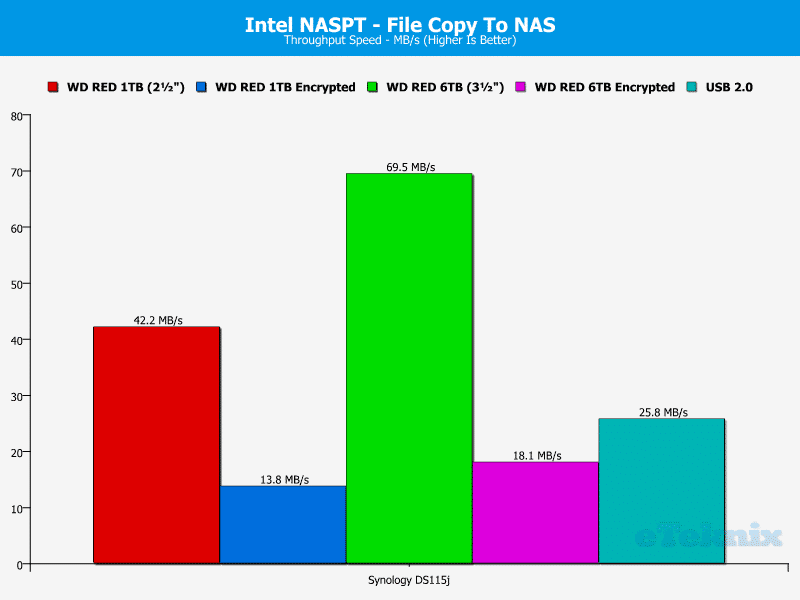
File Copy To NAS
This test quite simply put copies a single large file from the test system to the NAS box to show how well the system can sustain a single write speed. The 1.4 GB file is copied to the drive and written in 64 kB blocks.
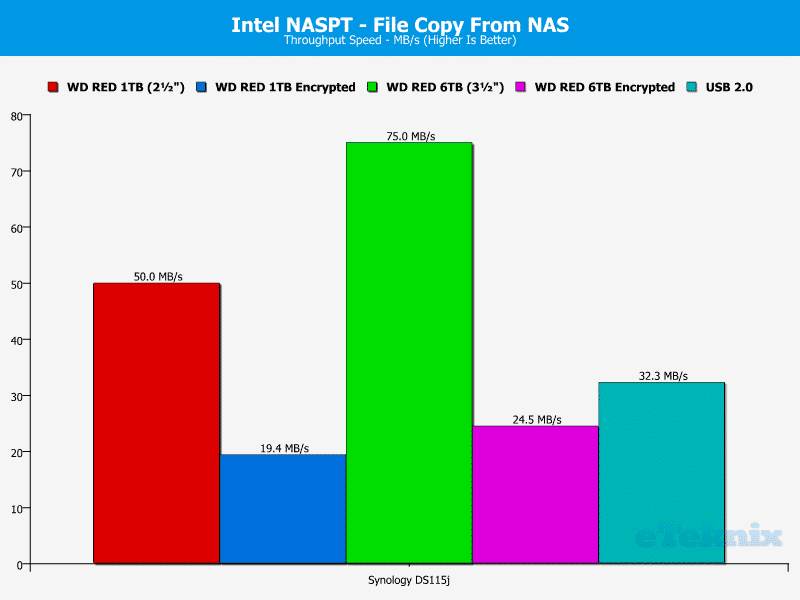
File Copy From NAS
File copy from the NAS works in exactly the same way as the copy test, however it works in the opposite direction. The single 1.4 GB file is read off the NAS in 64 kB blocks.
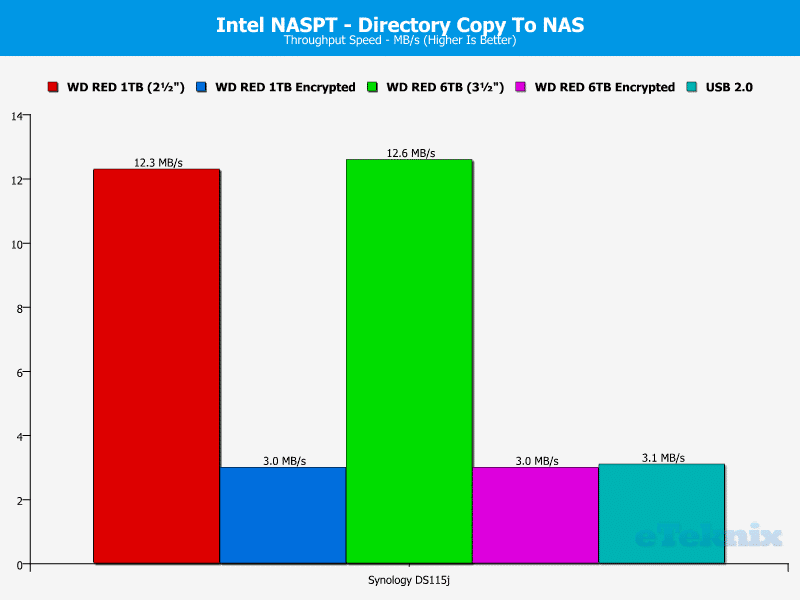
Directory Copy To NAS
In the directory copy to NAS test, a directory tree representing that of a typical commercially available office suite is copied to the NAS to trace the bulk copy of a complex directory. A total of 2833 files making up 247 MB are moved but the file sizes vary considerably with an average size of 41.4 kB. Due to the varying sizes of the files, only around 50% of the writes are sequential.
Directory Copy From NAS
In the same way that the file copy from NAS traces the same file back across to the test system, the directory copy from NAS does exactly the same but to the entire directory that it copied across previously.
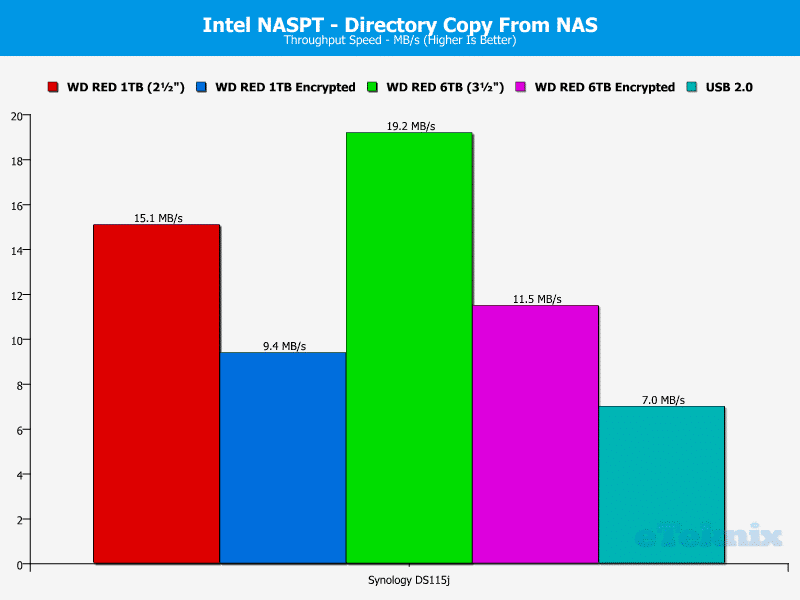
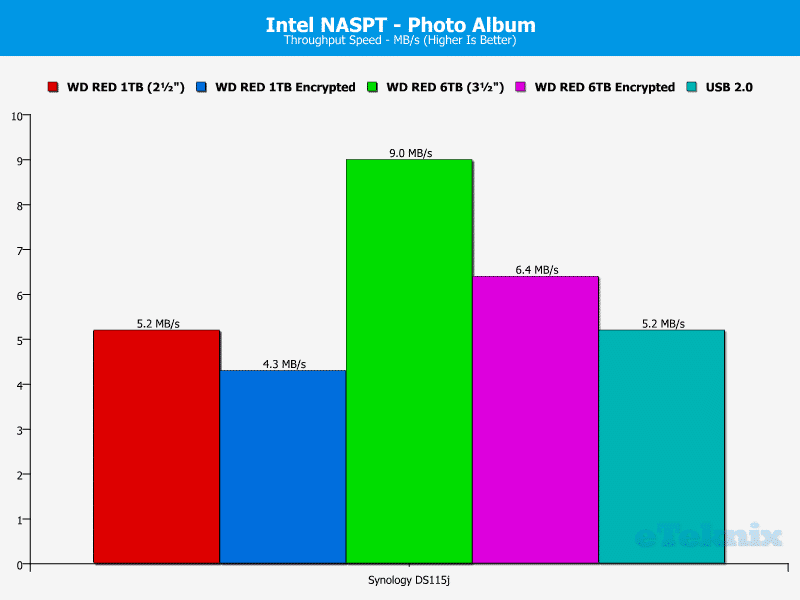
Photo Album
Last of all is a test based around a photo album. When a photo album is viewed on-screen, only the images that you see are loaded from the drive and so when you scroll through the album, the new images have to be fetched and read. The album here contains 169 photos with varying file sizes based on the size, quality and detail in the image. Reading the files in a photo album puts an unusual read load upon the drive as the metadata is read, a thumbnail constructed and finally the image viewed.
Final Thoughts
Pricing
The Synology DS115j is truly a budget device with its MSPR of just £78 before tax. The NAS is widely available and at the time of writing you can get it for £86.80 at Amazon UK and £81.06 at Scan. In the US it can be found at Newegg for $157.99 and at Amazon for $134.99. In Germany it can be had for €89,00 at Amazon with free shipping.
Overview
The Synology DS115j has a very simple, yet effective design. The white case blends in well and if you place it up against a white wall, you’ll barely notice it. The promised silent operation was offered as well. The fan wasn’t audible at all, so all you’ll hear is the hard drive. But even that sound is fairly well shielded by this device and I didn’t notice the device running at all during my tests. The LEDs are bright enough to be easily seen, but not so bright that they blind you when looking at them. This is a nice thing to see as some tend to use over-bright LEDs.
The DS115j did very well when it comes to transfer speeds. While a device like this isn’t really built to handle encryption, it did that pretty good too. Of course the speeds are nowhere near those of unencrypted drives, but that’s a given here. We also saw that the 3.5-inch drive did a lot better in the tests than the smaller 2.5-inch drive. This is mainly due to the fact that the 3.5-inch version has four times the cache. These tests show how much of a difference the hard drive selection can make when it comes to your NAS, and it’s something worth keeping in mind on your next hard drive purchase. In the most successful of the tests where it simulates 4 simultaneous media streams it managed to achieve over 100 MB/s
The Disk Station Manager (DSM) is an amazing operating system that will provide you with options for anything a home users could want as well as businesses. We will of course have to keep in mind that this is a budget device with limited performance, so running to much at once might bring it to its knees. A general setup for home users won’t have any issues and everything will run smooth. The setup and configuration of this device is a breeze and is nothing to worry about. Even novice users will find it easy to configure it for their needs.
Overall this is a great NAS. It has a superb operating system and a hardware setup to meet the basic needs, and that at an extremely low cost. There is no need to think long and hard if a NAS would be a good thing for you, at this price you should just take it home.
Pros:
- Price, this is truly a budget oriented device
- Software, the DSM system offers you the same options as on all the other Synology devices; and that is a lot.
- Easy set-up
- Good transfer speeds
Cons:
- Not the best at handling encrypted shares
Neutral:
- no eSATA port
“The time where you needed to think about taking the plunge into the world of NAS is over. The Synology DS115j has such a low cost while still providing all of the features you need, therefore making it a no brainer.”

Synology DS115j 1-Bay NAS Review
Thanks to Synology for providing us with this review sample.


