Game Max Onyx RGB Tempered Glass Chassis Review
Peter Donnell / 7 years ago
A Closer Look – Interior
The side panel is relatively easy to remove, just be sure to put it somewhere safe as it is a heavy glass panel. On the interior, there’s quite a bit of space, as the HDD bays are either on the backplate or tucked under the PSU cover, leaving a lot of room for longer expansion cards to be installed. There’s a large CPU cooler mounting cut-out behind the motherboard too, as well as a lot of cable routeing grommets, which should ease the installation process.

The PSU is mounted in the lower section of the chassis, hiding a lot of excess cable in the process, which should help you get a neat and tidy looking build with minimal effort. There are a few cable routeing grommets here too, so you can reach the headers on the bottom of the motherboard, as well as pass cables up to your expansion cards.

The expansion slots are a screw-in design, and can be reused, no cheap snap-off covers here!

In the front of the chassis, three very nice looking 120mm RGB LED fans, giving you a huge wall of airflow to blast through your system. You could fit a slim radiator here if you wanted, but this chassis is designed more towards air cooling than radiator support.

Tucked away on the side of the front panel, this lovely Game Max logo sits behind the glass and should light up when the system is powered on.

There’s a reasonable amount of space behind the motherboard, and there are loads of cable tie loops to help keep things in check. The cable routeing grommets look a little small, but there’s certainly enough of them to make up for that.

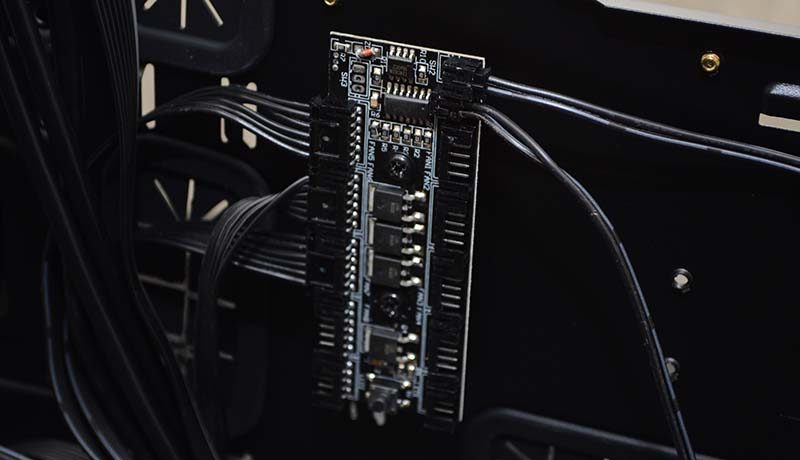
If you’re worried about having unsightly fan cables trailing all over your motherboard, fear not, as there’s built-in fan hub behind the motherboard, meaning you can keep things looking neat and tidy; just bear in mind you’ll need a Molex connector to power this.
While you can screw on a couple of 2.5″ drives directly alongside the motherboard, you can also fit 2 x 3.5/2.5″ drives below the PSU cover. 4 HDD mounts may not sound a lot, but it’s more than enough for most system builds, and if you’re using an M.2 equipped motherboard, that gives you another option too.

The PSU mounting section isn’t particularly big, but with care you should be able to cram any excess cables in here too, keeping the rest of the build looking neat and tidy. However, with dual tempered glass windows, I would advise a shorter design and modular power supply to get the best effect.

Remember I said the front panel was hiding more detail? Behind the glass panel, you can see there are screw mounts for 3 x 120mm fans, of course, as that’s what is installed there.

There’s also this lovely honeycomb effect finish, which should look pretty cool once the LED lighting is powered on.


